语法检查,element-plus,axios
1. 代码规范
1.1. 集成 editorconfig 配置
EditorConfig 有助于为不同IDE编译器,不同操作系统上处理同一项目的多个开发人员维护一致的编码风格
vue有类似文件规则:https://github.com/vuejs/vue/blob/main/.editorconfig
1 | # https://editorconfig.org |
VSCode需要安装一个插件:EditorConfig for VS Code
1.2. 使用 prettier 工具
prettier是一款强大的代码格式化工具,支持JavaScript,TypeScript,CSS,SCSS,Less,JSX,Angular,Vue,GraphQL,JSON,Markdown等语言,基本上前端能用到的文件格式它都可以搞定,是当下最流行的代码格式化工具。
安装VSCode插件
Prettier - Code formatter打开
设置,搜索Format并勾选Format On Save设置默认格式化程序
任意打开一个 vue 文件单击右键调出菜单选择
使用...格式化文档选择
配置默认格式化程序选择
prettier本地安装 Prettier
在每个项目中本地安装Prettier很重要,每个项目都会获得正确的 Prettier 版本支持
1
npm install prettier -D
配置 .prettierrc 文件
- useTabs:使用tab缩进还是空格缩进,选择false;
- tabWidth:tab是空格的情况下,是几个空格,选择2个;
- printWidth:当行字符的长度,推荐80
- singleQuote:使用单引号还是双引号,选择true,使用单引号;
- trailingComma:在多行输入的尾逗号是否添加,设置为none;
- semi:语句末尾是否要加分号,默认值true,选择false表示不加;
1
2
3
4
5
6
7
8{
"useTabs": false,
"tabWidth": 2,
"printWidth": 80,
"singleQuote": true,
"trailingComma": "none",
"semi": false
}创建 .prettierignore 忽略文件
1
2
3
4
5
6
7
8
9
10
11/dist/*
.local
.output.js
/node_modules/**
**/*.svg
**/*.sh
/public/*
.DS_Store在package.json 中配置scripts,运行
npm run prettier,统一修改项目中所有文件1
2
3"scripts": {
"prettier": "prettier --write ."
}
1.3. 使用 ESLint 检查
创建项目时,选择了ESLint,所以Vue会默认配置需要的ESLint环境
VSCode安装
ESLint插件解决eslint和prettier冲突问题
安装插件:vue在创建项目时,如果选择eslint+prettier,这两个插件会自动安装
1
npm i eslint-plugin-prettier eslint-config-prettier -D
.eslintrc.js 中添加prettier插件,如果vue项目创建选择eslint+prettier,插件会自动添加
1
2
3
4
5
6extends: [
'plugin:vue/vue3-essential',
'eslint:recommended',
'@vue/typescript/recommended',
'plugin:prettier/recommended'
]
1.4. git Husky 和 eslint
虽然已经要求项目使用eslint了,但是不能保证组员提交代码之前都将eslint中的问题解决了:
- 希望保证代码仓库中的代码都是符合eslint规范的;
- 需要组员在执行
git commit命令的时候对其进行校验,如果不符合eslint规范,自动通过规范进行修复;
那么如何做到这些呢?
- 使用
Husky工具 - husky 是一个git hook 工具,可以触发git提交的各个阶段:pre-commit,commit-msg,pre-push
- 使用
如何使用husky?
自动配置命令
1
npx husky-init && npm install
它完成了三件事:
安装 husky 依赖
1
2
3
4
5
6
7
8$ npx husky-init && npm install
Need to install the following packages:
husky-init
Ok to proceed? (y) y
husky-init updating package.json
setting prepare script to command "husky install"
husky - Git hooks installed
husky - created .husky/pre-commit在项目目录下创建 .husky 文件夹
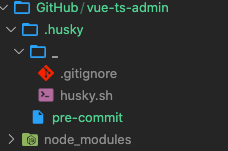
在 package.json 中添加一个脚本
1
2
3
4
5
6
7"scripts": {
"serve": "vue-cli-service serve",
"build": "vue-cli-service build",
"lint": "vue-cli-service lint",
"prettier": "prettier --write .",
"prepare": "husky install"
}
在进行commit时,执行lint脚本
在 .husky/pre-commit 中修改命令
1
2
3
4#!/usr/bin/env sh
. "$(dirname -- "$0")/_/husky.sh"
npm run lint测试提交
提交代码
git add .git commit -m "test",得到以下命令信息1
2
3
4
5
6
7
8
9
10
11
12
13
14
15
16
17
18
19> vue-ts-admin@0.1.0 lint
> vue-cli-service lint
The following files have been auto-fixed:
src/App.vue
src/components/HelloWorld.vue
src/main.ts
babel.config.js
vue.config.js
DONE All lint errors auto-fixed.
[master d3993ad] test
15 files changed, 148 insertions(+), 75 deletions(-)
create mode 100644 .editorconfig
rewrite .eslintrc.js (76%)
create mode 100755 .husky/pre-commit
create mode 100644 .prettierignore
create mode 100644 .prettierrc
1.5. git commit规范
1.5.1. 代码提交风格
通常 git commit 会按照统一的风格来提交,这样可以快速定位每次提交的内容,方便之后对版本进行控制
但是如果每次手动来编写这些是比较麻烦的事情,可以使用一个工具:Commitizen,编写规范 commit message。
安装 Commitizen
1
npm i commitizen -D
安装cz-conventional-changelog,并且初始化 cz-conventional-changelog
1
npx commitizen init cz-conventional-changelog --save-dev --save-exact
该命令会自动安装 cz-conventional-changelog
在package.json中会自动进行配置
1
2
3
4
5"config":{
"commitizen": {
"path": "./node_modules/cz-conventional-changelog"
}
}提交代码需要使用
npx cz:
第一步:Select the type of change that you’re committing: (Use arrow keys)
选择type,本次更新的类型
Type 作用 feat 新增特性 (A new feature) fix 修复bug (A bug fix) docs 修改文档(Documentation only changes) style 代码格式修改(Changes that do not affect the meaning of the code (white-space, formatting, missing semi-colons, etc) ) refactor 代码重构(A code change that neither fixes a bug nor adds a feature) perf 改善性能(A code change that improves performance) test 测试(Adding missing tests or correcting existing tests) build 变更项目构建或外部依赖(Changes that affect the build system or external dependencies (example scopes: gulp, broccoli, npm) ) ci 更改持续集成软件的配置文件和package中的scripts命令( Changes to our CI configuration files and scripts (example scopes: Travis, Circle, BrowserStack, SauceLabs)) chore 变更构建流程或辅助工具(Other changes that don’t modify src or test files) revent 代码回退(Reverts a previous commit) 第二步: What is the scope of this change (e.g. component or file name): (press enter to skip)
选择本次修改的范围,作用域
第三步:Write a short, imperative tense description of the change (max 86 chars):
选择提交的信息
第四步:Provide a longer description of the change: (press enter to skip)
添加详细描述
第五步:Are there any breaking changes? (y/N)
是否为一次大更新
第六步:Does this change affect any open issues? (y/N)
更新是否影响开源项目中的提交问题
- 或者在 package.json 中添加脚本,通过 npm run commit 来提交代码
1 | "scripts":{ |
1.5.2. 代码提交验证
- 如果按照 cz 来规范提交风格,但是依然有组员通过git commit按照不规范的格式提交应该怎么办?
- 通过 commitlint 来限制提交
安装 @commitlint/config-conventional 和 @commitlint/cli
1
npm i @commitlint/config-conventional @commitlint/cli -D
在根目录创建 commit.config.js 文件,配置commitlint
1
2
3module.exports = {
extends: ['@commitlint/config-conventional']
}使用husky生成 commit-msg 文件,验证提交信息
1
npx husky add .husky/commit-msg "npx --no-install commitlint --edit $1"
此时,在 .husky文件夹下生成了 commit-msg文件
1
2
3
4#!/usr/bin/env sh
. "$(dirname -- "$0")/_/husky.sh"
npx --no-install commitlint --edit若使用 git commit -m “test” 提交项目,将出现错误信息
1
2
3
4
5
6
7
8
9input: test
✖ Please add rules to your `commitlint.config.js`
- Getting started guide: https://commitlint.js.org/#/?id=getting-started
- Example config: https://github.com/conventional-changelog/commitlint/blob/master/%40commitlint/config-conventional/index.js [empty-rules]
✖ found 1 problems, 0 warnings
ⓘ Get help: https://github.com/conventional-changelog/commitlint/#what-is-commitlint
husky - commit-msg hook exited with code 1 (error)
2. 第三方集成
2.1. vue.config.js
vue.config.js有三种配置方式:
方式一:直接通过vue-cli提供的选项来配置
- 比如 publicPath:配置应用程序部署的子目录,默认为/,相当于部署在 https://www.my-app.com/
- 比如 outputDir:修改输出的文件夹
方式二:通过configureWebpack修改webpack的配置
可以是一个对象,直接
会被合并;1
2
3
4
5
6
7
8
9module.exports = {
configureWebpack: {
resolve: {
alias: {
components: '@/components'
}
}
}
}可以是一个函数,会接收一个config,可以通过config来修改配置;
1
2
3
4
5
6
7
8
9
10
11
12const path = require('path')
const { defineConfig } = require('@vue/cli-service')
module.exports = defineConfig({
transpileDependencies: true,
configureWebpack: (config) => {
config.resolve.alias = {
'@': path.resolve(__dirname, 'src'),
components: '@/components'
}
}
})
方式三:通过chainWebpack修改webpack的配置
- 是一个函数,会接收一个基于 webpack-chain 的config 对象,可以对配置进行修改;
1
2
3
4
5
6
7
8
9
10
11
12
13const path = require('path')
const { defineConfig } = require('@vue/cli-service')
module.exports = defineConfig({
publicPath: './',
transpileDependencies: true,
chainWebpack: (config) => {
config.resolve.alias
.set('@', path.resolve(__dirname, 'src'))
.set('components', '@/components')
}
})
2.2. 设置别名
项目模块划分
在使用
Vue进行项目开发的时候,一般会根据项目模块对目录进行划分,比如views、components、common、network等,将各自负责内容进行分类,方便管理和维护设置别名
当目录不在一个层级时,采用../等相对路径来写,这是一个可怕的存在,查看和维护相当不方便
因此,需要对上述设置的目录设置别名,后续可以通过别名的方式来引用。
在项目根目录创建vue.config.js,编写配置:
1
2
3
4
5
6
7
8
9
10
11
12
13
14
15
16
17
18
19const path = require('path')
function resolve(dir) {
return path.resolve(__dirname, dir)
}
const { defineConfig } = require('@vue/cli-service')
module.exports = defineConfig({
publicPath: './',
transpileDependencies: true,
configureWebpack: {
resolve: {
alias: {
views: resolve('src/views'),
components: resolve('src/components')
}
}
}
})路径提示
在完成别名设置后,项目中路径提示不存在了,这是一个可怕的事情,那么该如何把路径提示给添加上呢?
在
VSCode中完成安装Path Intellisense插件,点击插件的设置按钮,选择扩展设置,在打开的settings.json文件中,配置如下1
2
3
4
5"path-intellisense.mappings": {
"@": "${workspaceRoot}/src",
"components": "${workspaceRoot}/src/components",
"views": "${workspaceRoot}/src/views"
}然后重启vscode
在项目根目录下,
tsconfig.json文件中添加配置1
2
3
4
5"paths": {
"@/*": ["src/*"],
"views/*": ["src/views/*"],
"components/*": ["src/components/*"]
}验证效果
这样,在后续导入的时候,就可以根据提示来了,前提是先把前面的目录名输入完成,比如
views/,提示就自然出来了
2.3. vue-router
安装插件
1 | npm i vue-router@next |
新建 router文件夹,index.ts文件
1 | import { createRouter, createWebHistory } from 'vue-router' |
main.ts 中导入 index.ts
1 | import { createApp } from 'vue' |
App.vue中使用路由
1 | <template> |
2.4. vuex
安装插件
1 | npm i vuex@next |
新建 store 文件夹,index.ts文件
1 | import { createStore } from 'vuex' |
main.ts 中导入 index.ts
1 | import store from '@/store' |
App.vue中使用变量
1 | <h2>{{ $store.state.counter }}</h2> |
2.5. element-plus
https://element-plus.org/zh-CN/
Element Plus,一套为开发者,设计师和产品经理准备的基于3.0的桌面端组件库:
- element-plus 正是 element-ui 针对于vue3 开发的一个ui组件库
- 它的使用方式和很多其他的组件库是一样的,其他类似于ant-design-vue,NaiveUI,VantUI都是差不多的
安装 element-plus
1 | npm i element-plus |
2.5.1. 全局引入
一种引入 element-plus 的方式是全局引入,代表的含义是所有的组件和插件都会被自动注册
1 | import ElementPlus from 'element-plus' |
在.vue 使用
1 | <el-button round>login</el-button> |
2.5.2. 局部引入
也就是在开发中用到某个组件对某个组件进行引入
https://github.com/element-plus/unplugin-element-plus/blob/main/README.zh-CN.md
需要安装 unplugin-element-plus 来导入样式
1 | npm i unplugin-element-plus -D |
配置vue.config.js
1 | // vue.config.js |
全局注册组件
1 | import { ElButton, ElForm, ElFormItem, ElRadio } from 'element-plus' |
在vue中可以不注册使用
1 | <template> |
2.6. axios
功能特点:
- 支持 Promise API
- 拦截请求和响应
- 在node.js中发送http请求
- 转换请求和响应数据
- 等等
2.6.1. 安装并测试
模拟数据请求网址: http://httpbin.org
安装插件
1 | npm i axios |
测试连接 src/network/axios.ts
1 | import axios from 'axios' |
导入到main.ts
1 | import '@/network/axois' |
2.6.2. axios请求方式
all()
1 | axios.defaults.baseURL = 'https://httpbin.org' |
get()
1 | axios |
post()
1 | axios |
request()
1 | axios |
2.6.3. 拦截器
1 | axios.interceptors.request.use( |
2.6.4. 封装axios
定义拦截器 network/request/type.ts
1 | import type { AxiosRequestConfig, AxiosResponse } from 'axios' |
创建 请求类 network/request/index.ts
1 | import axios from 'axios' |
创建不同环境下的请求url network/request/config.ts
1 | const env = process.env.NODE_ENV |
创建 请求实例类 network/index.ts
1 | import AdminRequest from './request' |
发起单独请求测试 Main.ts
1 | import adminRequest from '@/network/index' |
3. 区分不同环境
在开发中,需要不同的环境设置不同的环境变量,常见的三种环境:
- 开发环境:development
- 生产环境:production
- 测试环境:test
如何区分环境变量呢?常见有三种方式:
方式一:手动修改不同的变量
1
2
3
4
5
6
7
8// const BASE_URL = 'http://xxx/dev'
// const BASE_NAME = 'aaa'
const BASE_URL = 'http://xxx/prod'
const BASE_NAME = 'bbb'
// const BASE_URL = 'http://xxx/test'
// const BASE_NAME = 'ccc'方式二:根据 process.env.NODE_ENV 的值进行区分
1
2
3
4
5
6
7
8
9
10
11
12
13
14
15
16const env = process.env.NODE_ENV
let BASE_URL = 'http://httpbin.org'
let BASE_NAME = ''
if (env === 'development') {
BASE_URL += '/dev'
BASE_NAME = 'dev'
} else if (env === 'production') {
BASE_URL += '/prod'
BASE_NAME = 'prod'
} else if (env === 'test') {
BASE_URL += '/test'
BASE_NAME = 'test'
}
export { BASE_URL, BASE_NAME }方式三:编写不同的环境变量配置文件
1
2
3.env.development
.env.production
.env.test编写变量
1
2VUE_APP_BASE_URL = https://xx/dev
VUE_APP_BASE_NAME = dev提取变量
1
2
3console.log(process.env.NODE_ENV)
console.log(process.env.VUE_APP_BASE_URL)
4. css样式初始化
安装 normalize.css 进行样式重置
1 | npm i normalize.css |
编写一些初始化代码 assets/css/base.less
安装VSCode插件 Easy Less,可以在编写less文件按保存后自动生成转换好的css文件
1 | * { |
外部引入 assets/css/index.less
1 | @import url(base.less); |
样式引入到项目中 Main.ts
1 | import 'normalize.css' |
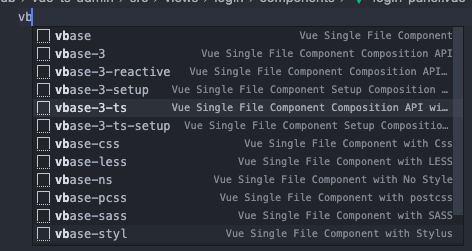
5. Vue VSCode Snippets
快速生成vue文件代码
VSCode中查找插件 Vue VSCode Snippets
快捷键 vbase-3-ts
6. 项目生成树
tree 可以查看文件夹下所有文件
1 | 安装 |
7. 项目打包和自动化部署
7.1. 项目部署和DevOps
7.1.1. 传统的开发模式
在传统的开发模式中,开发的整个过程按部就班进行:
这种模式存在很大的弊端:
- 工作的不协调:开发人员在开发阶段,测试和运维人员其实是处于等待状态。等到测试阶段,开发人员等待测试反馈bug,也会处于等待状态
- 线上bug的隐患:项目准备交付时,突然出现bug,所有人员需要加班,等待问题的处理
7.1.2. DevOps开发模式
DevOps是Development 和 Operations 两个词的结合,将开发和运维结合起来的模式:
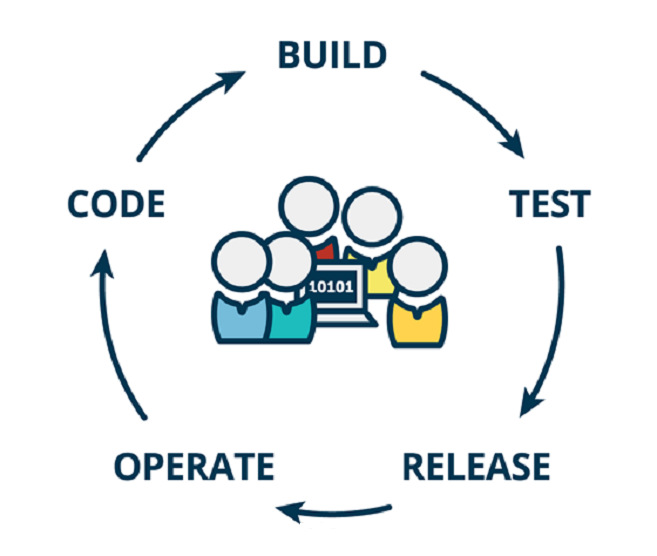
伴随着DevOps一起出现的两个词是持续继承和持续交付(部署):
- CI是 Continuous Integration (持续继承)
- CD是Continuous Delivery(持续交付) 或 Continuous Deployment(持续部署)
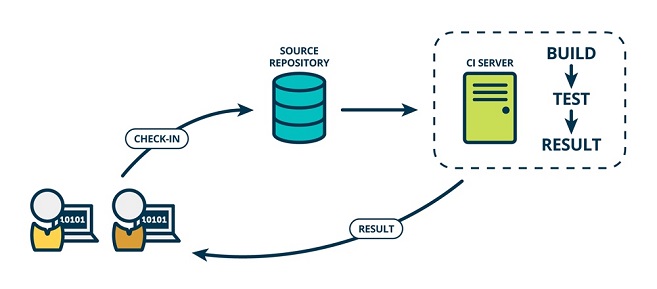
7.1.3. 持续继承CI
- 在传统的软件开发中,项目的整合是在项目开发结束所有人提交了代码之后;而持续集成是在项目的开发过程中不断地进行环境构建、功能的测试与集成
- CI是一种软件开发实践,持续集成强调开发人员提交了新代码之后,立刻进行构建、单元测试。根据测试结果,可以确定新代码和原有代码能否正确地集成在一起
7.1.4. 持续交付CD
- CD在持续集成的基础上,将集成后的代码部署到更贴近真实运行环境的(类生产环境)中
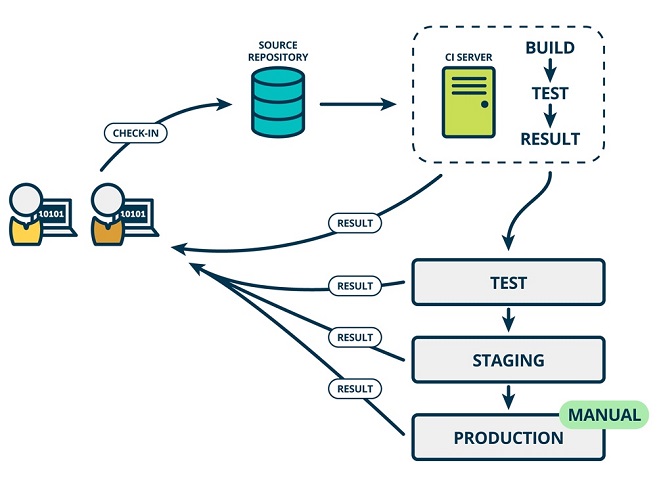
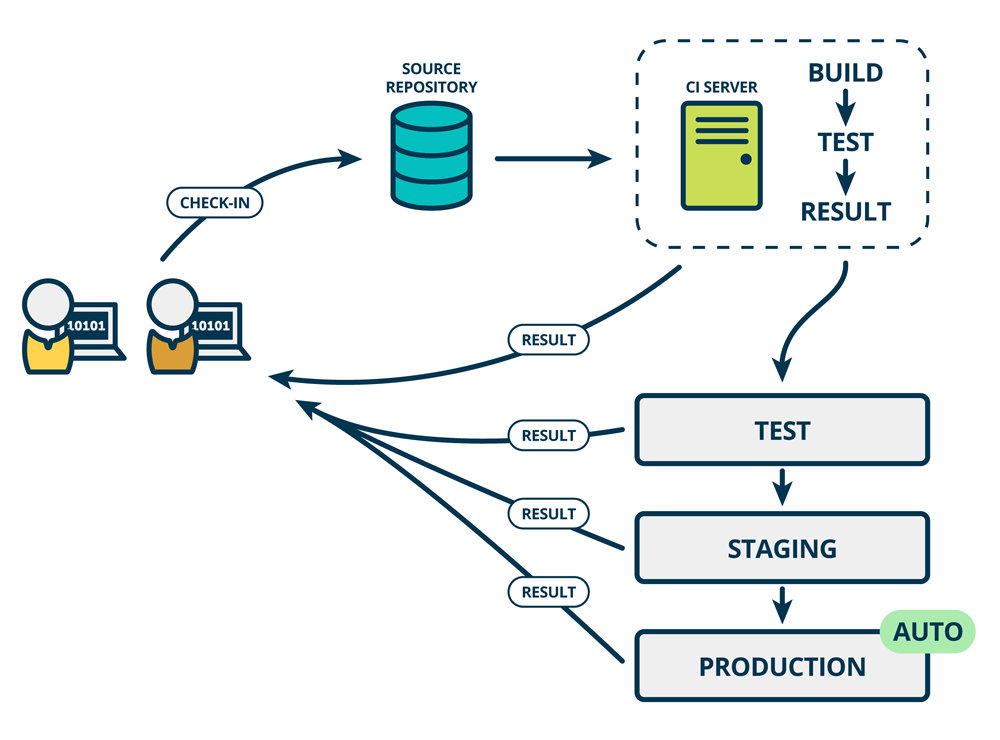
7.1.5. 持续部署CD
- CD是持续交付的下一步,指的是代码通过评审以后自动部署到生产环境
- 一个多人开发的项目中,在**
代码提交(CHECK-IN)到版本库(SOURCE REPOSITORY)**后,集成工具Jenkins能够进行:环境的构建(BUILD)| **测试环境(TEST)的功能测试|过渡环境(STAGING)**的功能测试| **正式环境(PRODUCTION)**的功能测试
7.1.6. 自动化部署流程
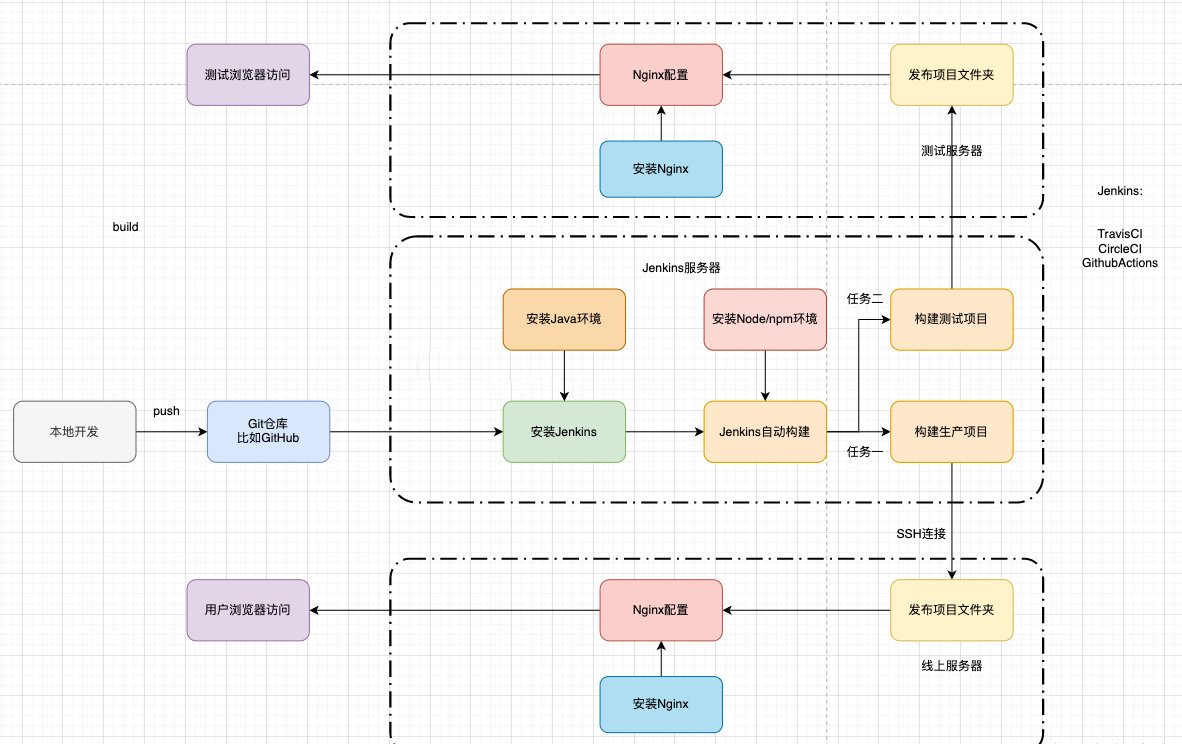
7.2. 搭建服务器环境
7.2.1. 安装 java
jenkins依赖java,需要先安装java环境:
1 | dnf search java-11 |
7.2.2. 安装 jenkins
因为jenkins本身是没有在dnf的软件仓库中,所以需要连接jenkins仓库:
根据官网进行安装 https://pkg.jenkins.io/redhat-stable/
- weget 是Linux中下载文件的一个工具,-O 表示输出到某个文件夹并且命名为什么文件
- rpm:全称为 The RPM Package Manage,是Linux下一个软件包管理器
1 | sudo wget -O /etc/yum.repos.d/jenkins.repo https://pkg.jenkins.io/redhat-stable/jenkins.repo |
安装jenkins
1 | dnf install jenkins |
启动服务
1 | systemctl start jenkins |
对外暴露8080端口,在云服务器ECS安全组中加入8080端口

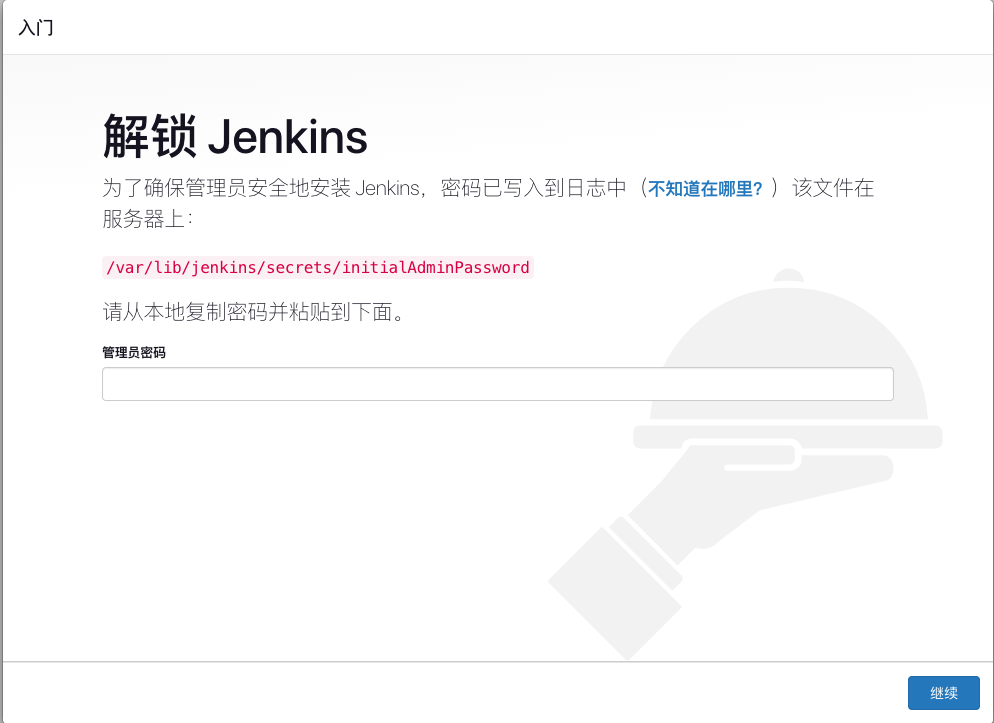
1 | vi /var/lib/jenkins/secrets/initialAdminPassword |
查看密码
【安装推荐的插件】
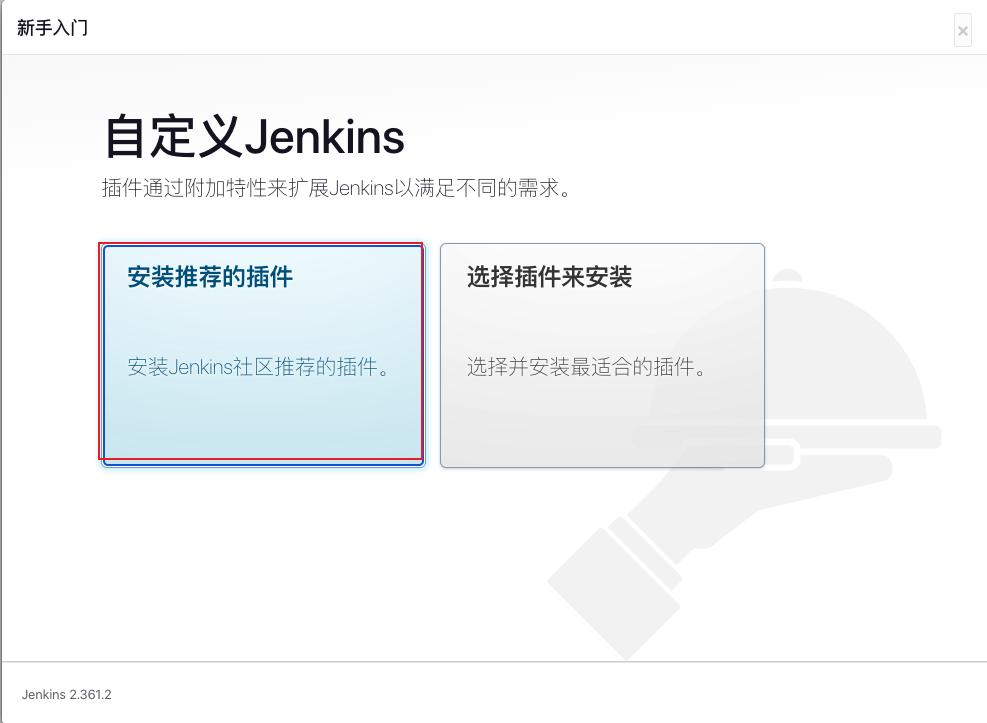
或者手动安装,访问 https://www.jenkins.io/download/,下载对应jdk适用的版本https://get.jenkins.io/war-stable/,并把war文件发送至服务器
- 进入到目录页
- 运行命令
java -jar jenkins.war --httpPort=8080. - 打开浏览器进入链接
http://ip:8080.
7.2.3. 安装 nginx
1 | dnf install nginx |
配置ngnix
1 | systemctl start ngnix |
出现错误❌ nginx: [emerg] bind() to 0.0.0.0:80 failed (98: Address already in use)
干掉占用的程序
1 | sudo fuser -k 80/tcp |
然后重启
访问 http:ip:80 可以得到 /usr/share/nginx/html中的页面内容
查看nginx状态
1 | systemctl status nginx.service |
得知nginx配置文件位于 /etc/nginx/nginx.conf
在配置文件中设置:
静态文件访问路径:访问 ip:80 时,自动加载
/vue/admin_demo下的index.html1
2
3
4
5
6
7
8
9
10http {
server {
# root /usr/share/nginx/html;
location / {
root /project/vue3_admin_demo;
index index.html;
}
}
}
7.2.4. 安装 git
7.2.5. 代码上传至github
本地代码可以通过
npm run build的方式生成dist文件夹,通过传输工具将文件夹下的内容加载到/vue/admin_demo中,但是不利于多人操作将源代码上传至GitHub,由jenkins进行定时下载编译成dist文件,放到
/vue/admin_demo文件夹下,才是实现自动化部署
实现步骤:
在GitHub上新建一个私人项目,不包括 README.md 和 .gitignore
在项目中新建git分支
1
git checkout -b main
上传代码
1
2
3
4git add .
npm run commit
git remote add origin https://github.com/xx/xx.git
git push -u origin main
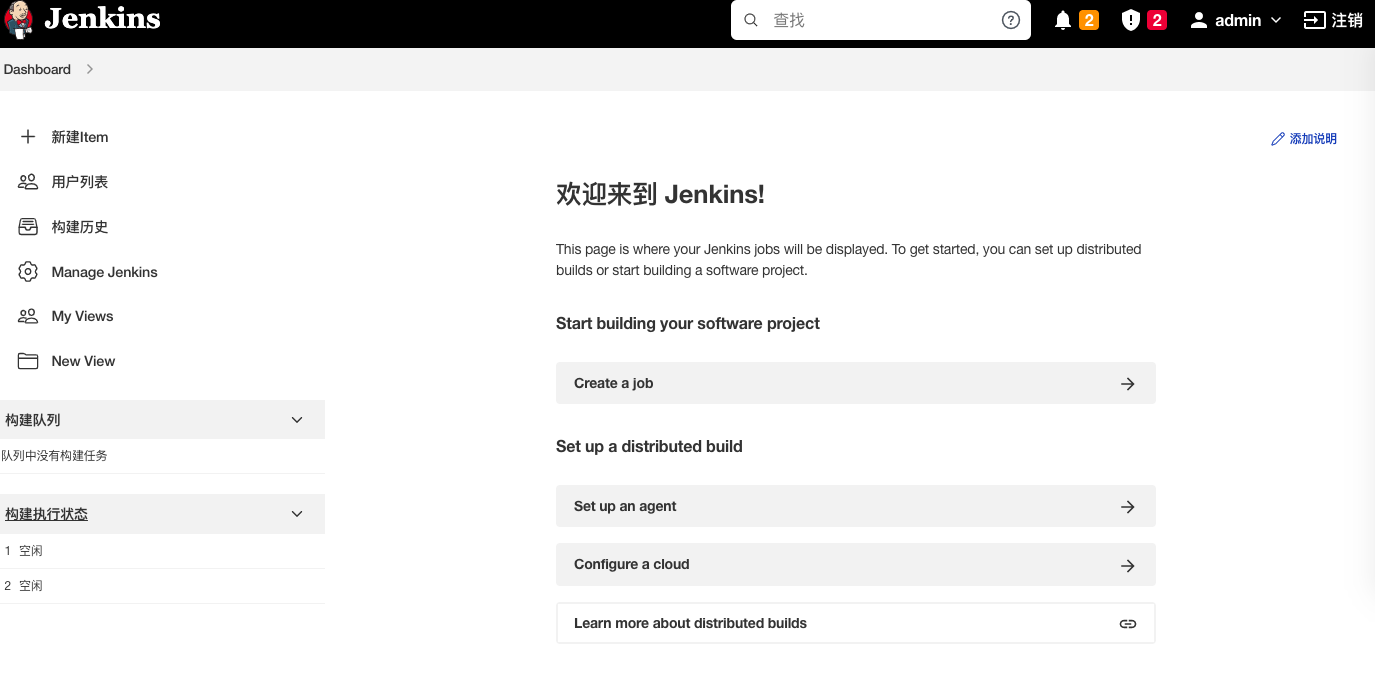
7.2.6. 配置jenkins
进入到jenkins的网址 http://ip:8080
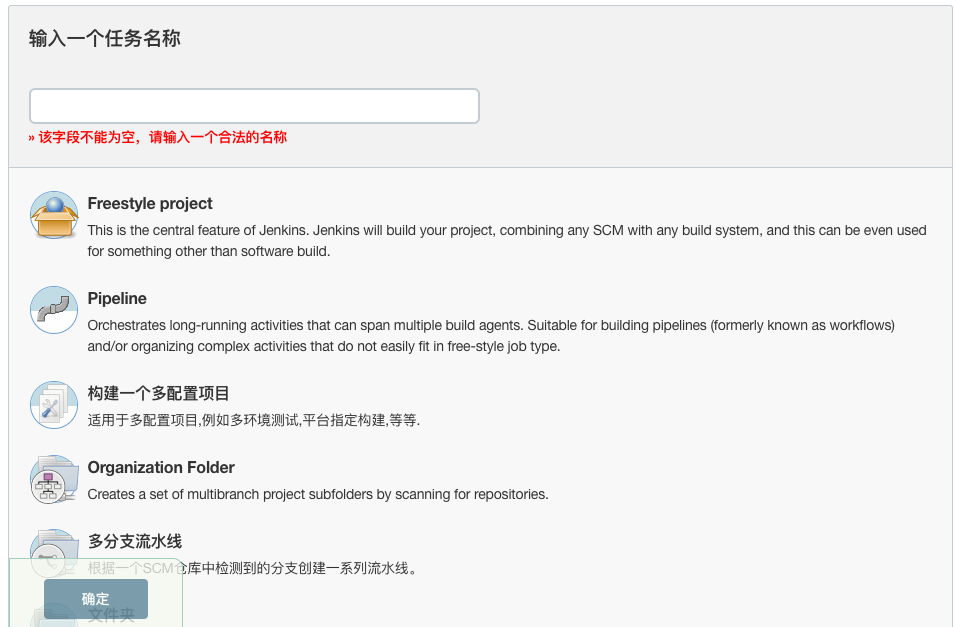
创建一个任务,输入任务名称并选择【Freestyle project】
输入【描述】
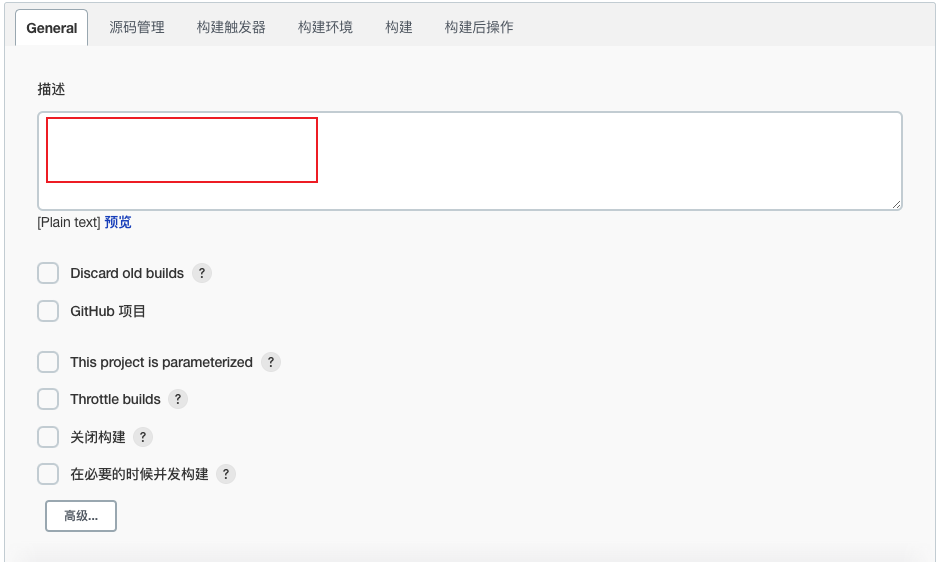
【源码管理】中选择【Git】,输入【仓库地址】
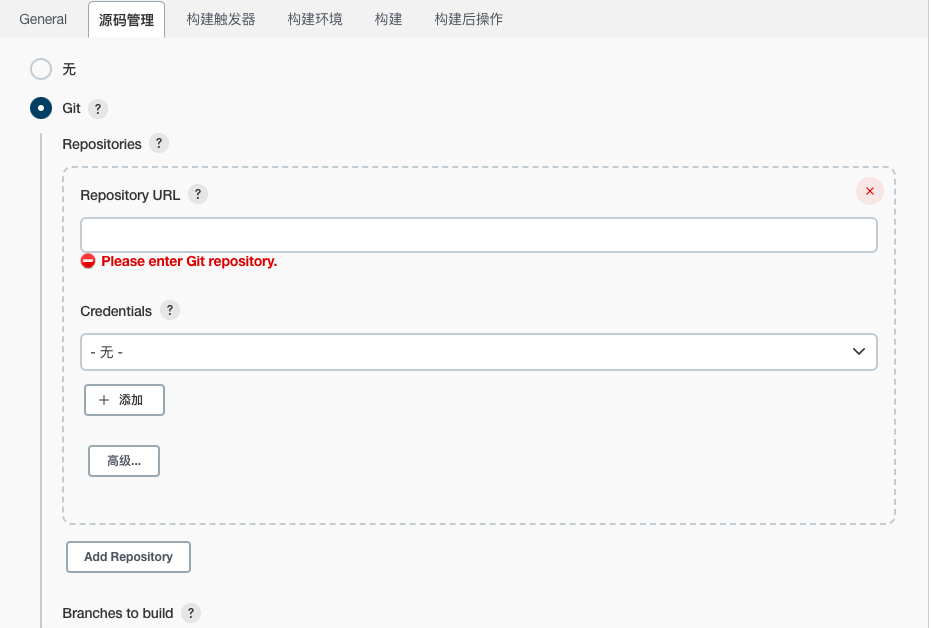
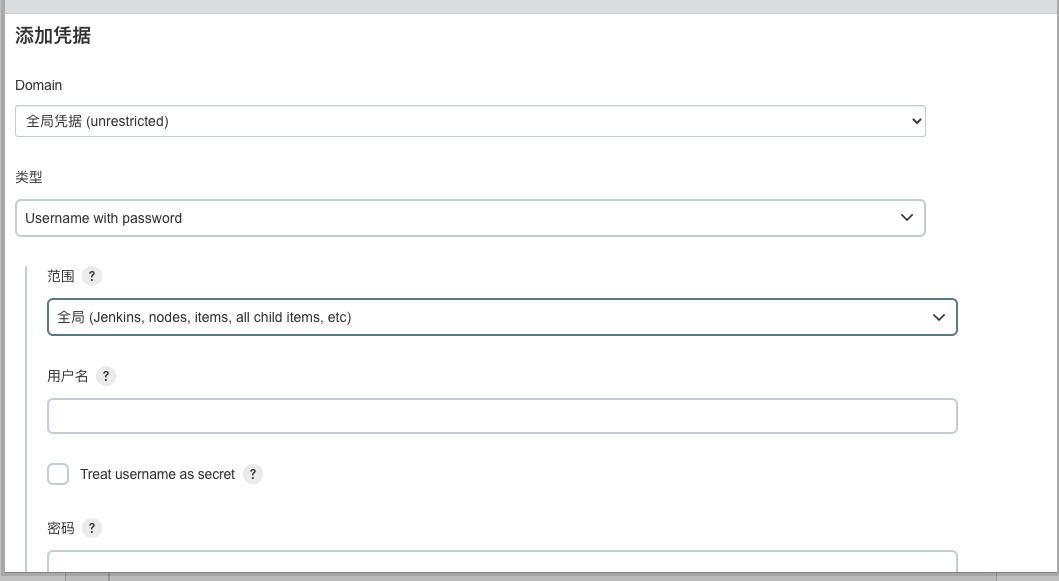
添加凭据,GitHub的用户名和密码,其中密码为【token】
token在 https://github.com/settings/tokens 中进行设置
指定分支为 */main
【构建触发器】选择 【Build periodically】,定时构建
格式为 分 时 日 月 周
写成 0 * * * *的话是每0分的时候构建,会导致当时任务量剧增,不利于分散负载
1 | # 每分都在构建 |
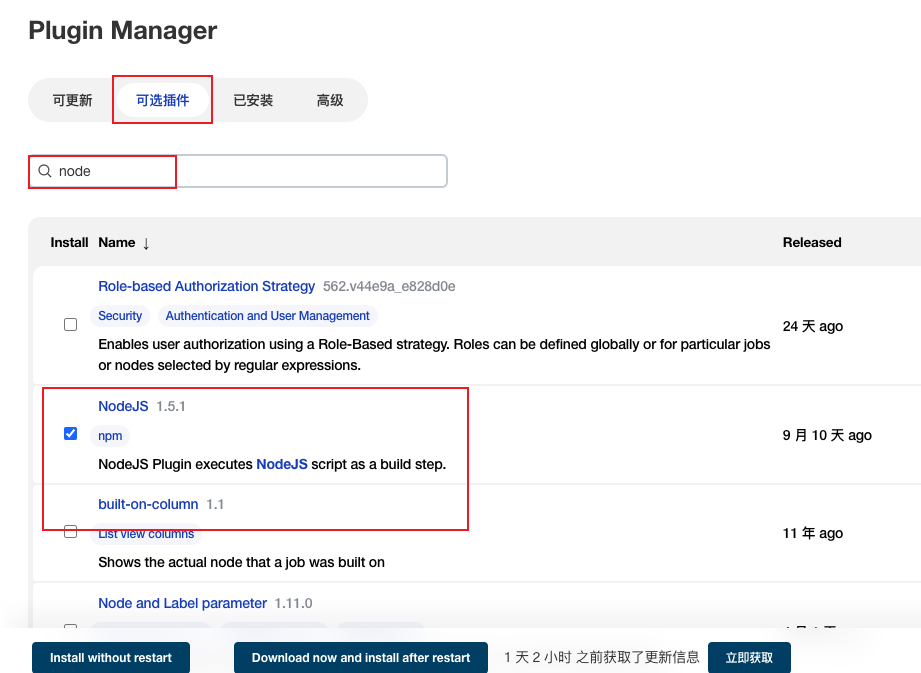
【构建环境】中没有node,需要安装node
返回到首页,选择左边栏的【Manage Jenkins】,选择【Manage Plugins】,选择【可选插件】,搜索【node】,进行安装
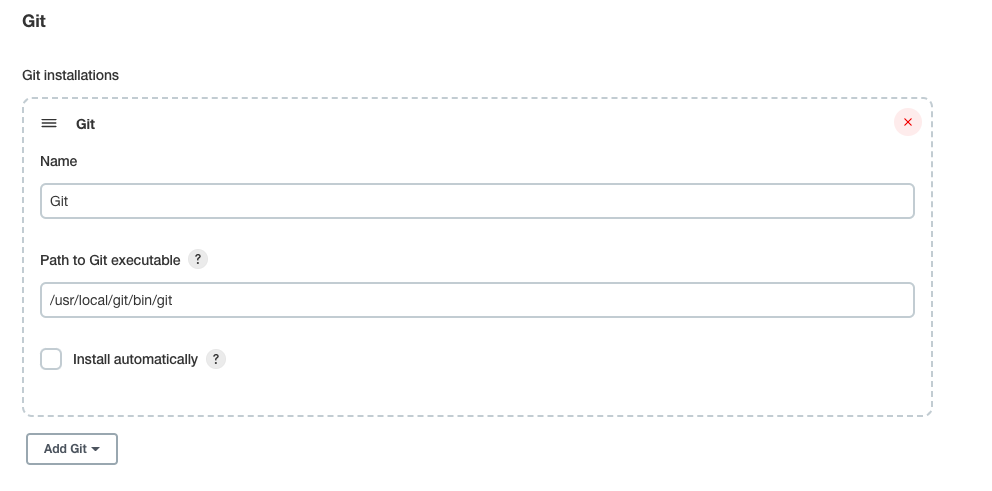
重启后再次点击【Manage Jenkins】,选择【Global Tool Configuration】,下滑至NodeJS栏,设置【别名】,并选择源代码【对应版本的node】
Git栏填写本地git运行路径,通过 whereis git命令查找
重新进入到任务配置中,选择【构建环境】,选中【Provide Node & npm bin/ folder to PATH】
构建选择【Execute shell】
输入命令
1 | git --version |
点击保存后
点击【Build Now】
7.2.7. github无法访问
fatal: unable to access:Encountered end of file
github.com:443; Connection timed out
error: RPC failed; result=35, HTTP code = 0
7.2.8. 改用 gitee
重新构建还出现问题:
1 | npm ERR! code ENOMEM |
清除npm cache
1 | npm cache clean --force |
7.2.9. nginx 显示为403 Forbidden
访问文件夹时,默认jenkins使用的用户是jenkins,可能没有访问权限,需要修改
1 | vi /etc/sysconfig/jenkins |
将用户名修改为 root
1 | JENKINS_USER="root" |