store,mutations,getters,actions,module,nextTick函数
1. 状态管理
1.1. 什么是状态管理
在开发中,应用程序需要处理各种各样的数据,这些数据需要保存在应用程序中的某一个位置,对于这些数据 的管理就称之为是
状态管理如何管理自己的状态
- 在Vue开发中,使用组件化的开发方式;
- 而在组件中我们定义
data或者在setup中返回使用的数据, 这些数据称之为state; - 在模块
template中可以使用这些数据,模块最终会被渲染成DOM,称之为View; - 在模块中会产生一些行为事件,处理这些
行为事件时, 有可能会修改state,这些行为事件称之为actions;
1.2. 复杂的状态管理
JavaScript开发的应用程序,已经变得越来越复杂了:
- JavaScript需要管理的状态越来越多,越来越复杂;
- 这些状态包括服务器返回的数据、缓存数据、用户操作产生的数据等等;
- 也包括一些UI的状态,比如某些元素是否被选中,是否显示加载动效,当前分页;
当应用遇到多个组件共享状态时,单向数据流的简洁性很容易被破坏:
- 多个视图依赖于同一状态;
- 来自不同视图的行为需要变更同一状态;
是否可以通过组件数据的传递来完成呢
对于一些简单的状态,确实可以通过props的传递或者Provide的方式来共享状态;
但是对于复杂的状态管理来说,显然单纯通过传递和共享的方式是不足以解决问题的,比如兄弟组件如何共享数据呢?
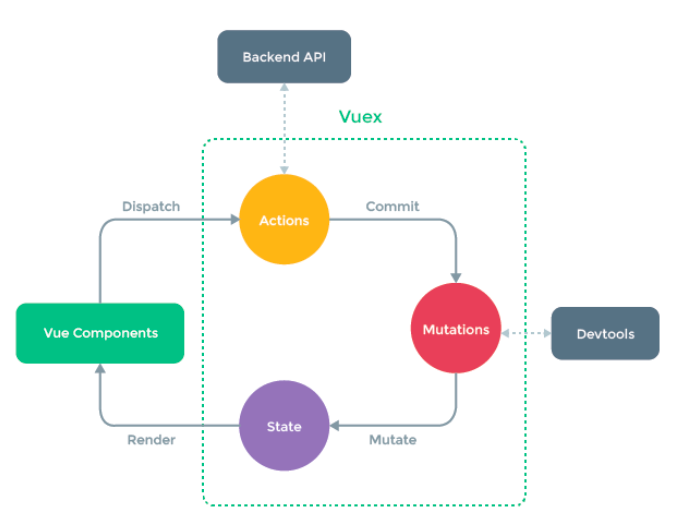
1.3. Vuex的状态管理
管理不断变化的state本身是非常困难的:
- 状态之间相互会存在依赖,一个状态的变化会引起另一个状态的变化,View页面也有可能会引起状态的变化;
- 当应用程序复杂时,state在什么时候,因为什么原因而发生了变化,发生了怎么样的变化,会变得非常难以控 制和追踪;
因此,是否可以考虑将组件的内部状态抽离出来,以一个
全局单例的方式来管理呢?- 在这种模式下,组件树构成了一个巨大的 “试图View”;
- 不管在树的哪个位置,任何组件都能获取状态或者触发行为;
- 通过定义和隔离状态管理中的各个概念,并通过强制性的规则来维护视图和状态间的独立性,代码边会变得更加结构化和易于维护、跟踪;
这就是Vuex背后的基本思想,它借鉴了Flux、Redux、Elm(纯函数语言,redux有借鉴它的思想):
2. Vuex的安装
1 | npm install vuex@next |
3. Store
3.1. 创建Store
每一个Vuex应用的核心就是store(仓库):
- store本质上是一个容器,它包含着你的应用中大部分的状态(state);
Vuex和单纯的全局对象有什么区别呢?
第一:Vuex的状态存储是响应式的
- 当Vue组件从store中读取状态的时候,若store中的状态发生变化,那么相应的组件也会被更新;
第二:你不能直接改变store中的状态
- 改变store中的状态的唯一途径就显示提交 (commit) mutation;
- 这样可以方便的跟踪每一个状态的变化,从而能够通过一些工具更好的管理应用的状态;
使用步骤:
- 创建Store对象;
- 在app中通过插件安装;
3.1.1. store/index.js
1 | import { createStore } from 'vuex'; |
3.1.2. main.js
1 | import { createApp } from 'vue' |
3.2. 使用store
- 在组件中使用store,按照如下的方式:
- 在模板中使用;
$store - 在options api中使用,比如computed;
this.$store - 在setup中使用;
- 在模板中使用;
3.2.1. vue中使用
1 | <template> |
3.2.2. $store中的内容
1 | { |
4. 单一状态树
Vuex 使用单一状态树
- 用一个对象就包含了全部的应用层级的状态;
- 采用的是SSOT,Single Source of Truth,也可以翻译成单一数据源;
- 这也意味着,每个应用将仅仅包含一个 store 实例;
- 单状态树和模块化并不冲突,后面我们会讲到module的概念;
单一状态树的优势:
- 如果状态信息是保存到多个Store对象中的,那么之后的管理和维护等等都会变得特别困难;
- 所以Vuex也使用了单一状态树来管理应用层级的全部状态;
- 单一状态树能够让我们最直接的方式找到某个状态的片段,而且在之后的维护和调试过程中,也可以非常方便 的管理和维护;
5. mapState
5.1. 组件获取状态
在组件中获取状态
1
2
3
4
5
6
7
8
9
10
11
12
13<template>
<div>
<h2>{{$store.state.counter}}</h2>
</div>
</template>
<script>
export default {
created(){
console.log(this.$store);
}
}
</script>当然,也可以使用计算属性
1
2
3
4
5
6
7
8
9
10
11
12
13
14<template>
<div>
<h2>{{counter}}</h2>
</div>
</template>
<script>
export default {
computed: {
counter(){
return this.$store.state.counter;
}
}
</script>但是,如果有很多个状态都需要获取话,可以使用mapState的辅助函数
- mapState的方式一:对象类型;
- mapState的方式二:数组类型;
- 也可以使用展开运算符和来原有的computed混合在一起;
1
2
3
4
5
6
7
8
9
10
11
12
13
14
15
16
17
18
19
20
21
22<template>
<div>
<h2>{{counter}}-{{age}}-{{height}}</h2>
<h2>{{mcounter}}-{{mage}}-{{mheight}}</h2>
</div>
</template>
<script>
import { mapState } from 'vuex';
computed: {
// 数组形式
...mapState(['counter','age','height']),
// 对象形式
...mapState({
mcounter: state=>state.counter,
mage: state=>state.age,
mheight: state=>state.height
})
}
}
</script>
5.2. 在setup中使用mapState
在setup中如果单个获取值是非常简单的:
通过useStore拿到store后去获取某个状态即可;
1
2
3
4
5
6
7
8
9
10
11
12import { useStore } from 'vuex';
import { computed } from 'vue';
export default {
setup(){
const store = useStore();
const counterr = computed(()=>store.state.counter);
return {
counter
}
}
}但是如果需要使用 mapState 的功能呢?
默认情况下,Vuex并没有提供非常方便的使用mapState的方式,需要进行函数的封装:
新建
hooks/useState.js1
2
3
4
5
6
7
8
9
10
11
12
13
14
15
16import { mapState, useStore } from 'vuex';
import { computed } from 'vue';
export function useState(mapper){
const store = useStore();
const stateFns = mapState(mapper);
const state = [];
Object.keys(stateFns).forEach(key=>{
state[key]= computed(stateFns[key].bind({$store:store}))
});
return state;
}应用于vue
1
2
3
4
5
6
7
8
9
10
11
12
13
14
15
16
17
18
19
20
21
22
23
24
25
26
27<template>
<div>
<h2>{{scounter}}-{{sage}}-{{sheight}}</h2>
</div>
</template>
<script>
export default {
setup(){
const state = useState( {
scounter: state=>state.counter,
sage: state=>state.age,
sheight: state=>state.height
});
return {
...state
}
}
}
</script>
<style scoped>
</style>
6. getters
某些属性需要经过变化后来使用,这个时候可以使用getters
6.1. 基本使用
store/index.js
1 | import { createStore } from 'vuex'; |
App.vue
1 | <h2>{{$store.getters.totalPrice}}</h2> |
6.2. 第二个参数
getters的第二个参数可以用于调用其他方法
1 | getters: { |
6.3. 返回函数
getters中的函数本身,可以返回一个函数,那么在使用的地方相当于可以调用这个函数
计算书籍数量大于n的总价
1 | getters: { |
调用
1 | <h2>{{$store.getters.getGreaterN(2)}}</h2> |
6.4. mapGetters
1 | <template> |
或者在setup中使用
hooks/useState.vue
1 | export function useGetters(mapper){ |
App.vue
1 | <template> |
7. Mutations
更改 Vuex 的 store 中的状态的唯一方法是提交 mutation
1 | import { createStore } from 'vuex'; |
7.1. 携带数据
在提交mutation的时候,可以携带一些数据
1
2
3
4
5
6
7
8
9
10
11
12
13
14
15
16import { createStore } from 'vuex';
const store = createStore({
state(){
return {
counter: 0
}
},
mutations:{
incrementN(state,payload){
state.counter += payload;
}
}
});
export default store;vue中调用
1
2
3
4
5methods:{
incrementN(){
this.$store.commit("incrementN",2);
}
}参数也可以是对象类型
1
2
3
4
5
6
7
8methods:{
incrementN(){
this.$store.commit("incrementN",{
count: 2,
price: 120
});
}
}处理数据
1
2
3
4
5mutations:{
incrementN(state,payload){
state.counter += payload.count;
}
}对象风格的提交方式
1
2
3
4
5
6
7
8
9methods:{
incrementN(){
this.$store.commit({
type: "incrementN",
count: 2,
price: 120
});
}
}
7.2. 常量类型
定义常量:mutation-type.js
1
export const INCREMENT_N = 'incrementN';
定义mutation
1
2
3
4
5
6
7
8
9import { INCREMENT_N } from './mutation-type';
const store = createStore({
mutations:{
[INCREMENT_N](state,payload){
state.counter += payload.count;
}
}
})提交mutation
1
2
3
4
5
6
7
8
9
10
11
12
import { INCREMENT_N } from '../store/mutation-type';
export default{
methods: {
incrementN(){
this.$store.commit({
type: INCREMENT_N,
count: 3
});
}
}
}
7.3. mapMutations
可以借助于辅助函数,快速映射到对应的方法中
1
2
3
4
5
6import { mapMutations } from 'vuex';
export default {
methods:{
...mapMutations(['increment','decrement'])
}
}在setup中使用也是一样的
1
2
3
4
5
6
7
8
9
10
11
12
13
14
15<button @click="add">setup+1</button>
<script>
import { mapMutations } from 'vuex';
export default {
setup(){
const mutation = mapMutations({
add: "increment"
})
return {
...mutation
}
}
}
</script>
7.4. 重要原则
- 要记住 mutation 必须是同步函数
- 是因为devtool工具会记录mutation的日记;
- 每一条mutation被记录,devtools都需要捕捉到前一状态和后一状态的快照;
- 但是在mutation中执行异步操作,就无法追踪到数据的变化;
- 所以Vuex的重要原则中要求 mutation必须是同步函数;
8. actions
8.1. 基本使用
Action类似于mutation,不同在于
Action提交的是mutation,而不是直接变更状态;
Action可以包含任意异步操作;
1
2
3
4
5
6
7
8
9
10
11mutations: {
increment(state){
state.count++;
}
},
actions: {
increment(context){
context.commit("increment");
}
}
8.2. 参数context
- context是一个和store实例均有相同方法和属性的
context对象 - 可以从其中获取到commit方法来提交一个mutation
- 或者通过 context.state 和 context.getters 来获取 state 和 getters;
context中包含的内容
1 | { |
8.3. 分发操作
分发使用的是 store 上的dispatch函数
1
2
3
4
5methods: {
add(){
this.$store.dispatch("increment");
}
}它也可以携带参数
1
2
3
4
5methods: {
add(){
this.$store.dispatch("increment",{count: 2});
}
}也可以以对象的形式进行分发
1
2
3
4
5
6
7
8methods: {
add(){
this.$store.dispatch({
type: "increment",
count: 2
});
}
}
8.4. 辅助函数
- action也有对应的辅助函数:
- 对象类型的写法;
- 数组类型的写法;
1 | import { mapActions } from 'vuex'; |
也可以在setup方法中使用
1 | import { mapActions } from 'vuex'; |
8.5. 异步操作
- Action 通常是异步的,那么如何知道 action 什么时候结束呢?
- 可以通过让action返回Promise,在Promise的then中来处理完成后的操作;
1 | actions: { |
调用
1 | methods:{ |
9. module
9.1. 基本使用
- 什么是Module?
- 由于使用单一状态树,应用的所有状态会集中到一个比较大的对象,当应用变得非常复杂时,store 对象就有可能变得相当臃肿;
- 为了解决以上问题,Vuex 允许我们将 store 分割成模块(module);
- 每个模块拥有自己的 state、mutation、action、getter、甚至是嵌套子模块;
9.1.1. modules/index.js
整合模块
1 | import homeModule from './home'; |
9.1.2. modules/home.js
每个模块拥有自己的 state、mutation、action、getter、甚至是嵌套子模块
1 | const homeModule = { |
9.1.3. modules/user.js
每个模块拥有自己的 state、mutation、action、getter、甚至是嵌套子模块
1 | const userModule = { |
9.1.4. index.js
添加模块
1 | import { createStore } from 'vuex'; |
9.1.5. App.vue
$store.state.模块注册名 表示模块的状态
1 | <h1>{{$store.state.home.homeCounter}}</h1> |
9.2. 局部状态
- 对于模块内部的 mutation 和 getter,接收的第一个参数是模块的局部状态对象
- getters 中方法拥有四个参数
state, getters, rootState, rootGetters - actions 中的方法参数为context,其中拥有六个对象
commit, dispatch, state, rootState, getters, rootGetters
1 | const homeModule = { |
9.3. 命名空间
默认情况下,模块内部的action和mutation仍然是注册在
全局的命名空间中使得多个模块能够对同一个 action 或 mutation 作出响应;
Getter 同样也默认注册在全局命名空间;
可以添加
namespaced: true的方式使其成为带命名空间的模块- 添加到具体模块中;
- 当模块被注册后,它的所有 getter、action 及 mutation 都会自动根据模块注册的路径调整命名;
1 | const homeModule = { |
不同的方法调用
1 | <!-- getters --> |
9.4. 修改或派发根组件
在action中修改root中的state
1 | actions: { |
9.5. 辅助函数
mapState, mapMutations, mapGetters, mapActions都可以使用,但只能使用对象形式,必须标明模块
1 | <template> |
或者使用 createNamespacedHelpers,单独标明使用子模块指向的辅助函数
1 | <template> |
9.6. 对useState修改
hooks/useState.js
1 | import { mapState, useStore, mapGetters, createNamespacedHelpers } from 'vuex'; |
vue
1 | import { useState,useGetters } from '../hooks/useState'; |
10. nexttick
官方解释:将回调推迟到下一个 DOM 更新周期之后执行。在更改了一些数据以等待 DOM 更新后立即使用它
比如下面的需求
- 点击一个按钮,修改在h2中显示的message;
- message被修改后,获取h2的高度;
实现上面的案例有三种方式
- 方式一:在点击按钮后立即获取到h2的高度(错误的做法)
- 方式二:在updated生命周期函数中获取h2的高度(但是其他数据更新,也会执行该操作)
- 方式三:使用nexttick函数
nexttick是如何做到的呢
1 | <template> |
11. historyApiFallback
historyApiFallback是开发中一个非常常见的属性,它主要的作用是解决SPA页面在路由跳转之后,进行页面刷新时,返回404的错误。
boolean值:默认是false
- 如果设置为true,那么在刷新时,返回404错误时,会自动返回 index.html 的内容;
object类型的值,可以配置rewrites属性
- 可以配置from来匹配路径,决定要跳转到哪一个页面;
事实上devServer中实现historyApiFallback功能是通过connect-history-api-fallback库的
- 可以查看 connect-history-api-fallback 文档
node_modules/@vue/cli-service/lib/commands/serve.js中配置了
1 | const server = new WebpackDevServer(Object.assign({ |
可以在 vue.config.js中配置
1 | const { defineConfig } = require('@vue/cli-service') |