h函数,mount函数,patch函数,源码解码
1. DOM渲染
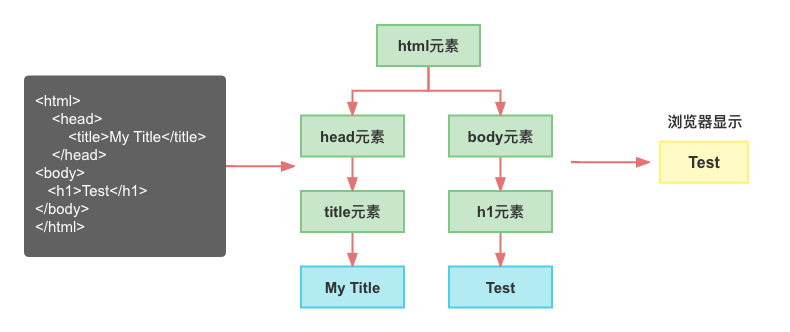
1.1. 真实的DOM渲染
传统的前端开发中,编写自己的HTML,最终被渲染到浏览器上的,那么它是什么样的过程呢?
html代码 -> DOM树 -> 页面内容
1.2. 虚拟DOM的优势
目前框架都会引入虚拟DOM来对真实的DOM进行抽象,这样做有很多的好处
首先是可以对真实的元素节点进行抽象,抽象成VNode(虚拟节点),这样方便后续对其进行各种操作:
- 因为对于直接操作DOM来说是有很多的限制的,比如diff、clone等等,但是使用JavaScript编程语言来操作这些,就变得非常的简单;
- 可以使用JavaScript来
表达非常多的逻辑,而对于DOM本身来说是非常不方便的;
其次是
方便实现跨平台,包括可以将VNode节点渲染成任意想要的节点- 如渲染在canvas、WebGL、SSR、Native(iOS、Android)上;
- 并且Vue允许开发属于自己的渲染器(renderer),在其他的平台上渲染;
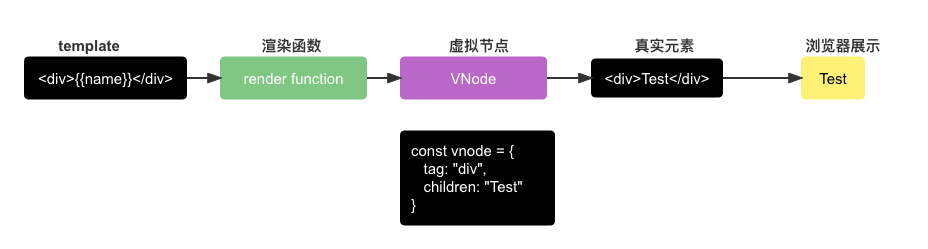
1.3. 虚拟DOM的渲染过程
2. 三大核心系统
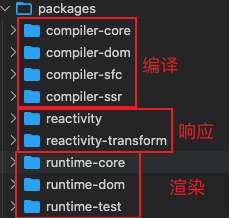
- 事实上Vue的源码包含三大核心:
- Compiler Module:编译模板系统;
- Runtime Module:也可以称之为Renderer模块,真正渲染的模块;
- Reactivity Module:响应式系统;
- Vue源码中的代码分类:
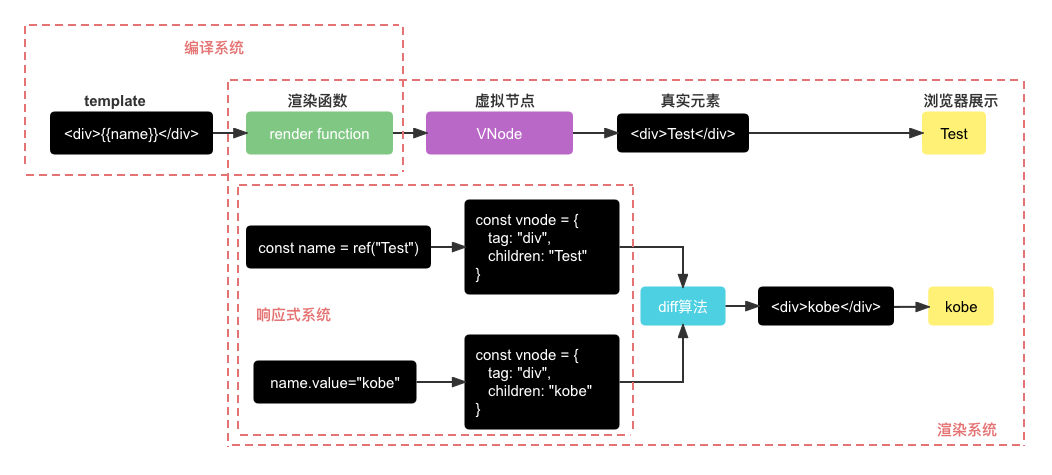
3. 三大系统协同工作
4. 实现Mini-Vue
- 实现一个简洁版的Mini-Vue框架,该Vue包括三个模块:
- 渲染系统模块;
- 可响应式系统模块;
- 应用程序入口模块;
4.1. 渲染系统实现
- 该模块主要包含三个功能:
- 功能一:h函数,用于返回一个VNode对象;
- 功能二:mount函数,用于将VNode挂载到DOM上;
- 功能三:patch函数,用于对两个VNode进行对比,决定如何处理新的VNode;
- 功能函数写于
render.js中
1 |
|
4.1.1. h函数 – 生成VNode
直接返回一个VNode对象即可
1 | const h = (tag,props,children)=>{ |
4.1.2. Mount函数 – 挂载VNode
- 第一步:根据tag,创建HTML元素,并且存储 到vnode的el中;
- 第二步:处理props属性
- 如果以on开头,那么监听事件;
- 普通属性直接通过 setAttribute 添加即可;
- 第三步:处理子节点
- 如果是字符串节点,那么直接设置textContent;
- 如果是数组节点,那么遍历调用 mount 函数;
1 | const mount = (vnode,container)=>{ |
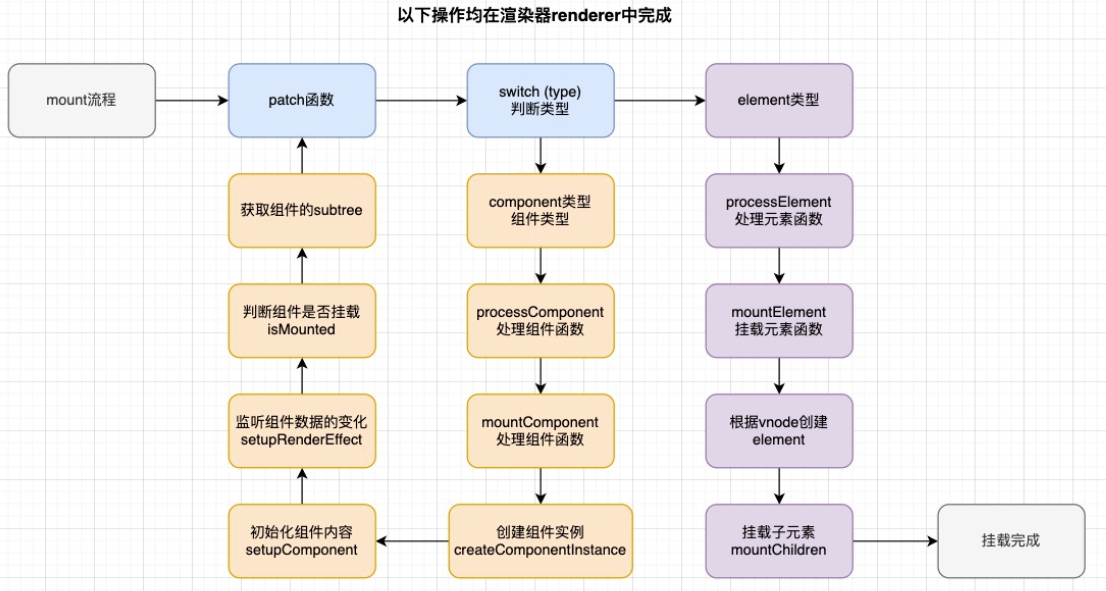
4.1.3. Patch函数 – 对比两个VNode
patch函数的实现,分为两种情况
n1和n2是不同类型的节点:
- 找到n1的el父节点,删除原来的n1节点的el;
- 挂载n2节点到n1的el父节点上;
n1和n2节点是相同的节点:
处理props的情况
- 先将新节点的props全部挂载到el上;
- 判断旧节点的props是否不需要在新节点上,如果不需要,那么删除对应的属性;
处理children的情况
如果新节点是一个字符串类型,那么直接调用 el.textContent = newChildren;
如果新节点不同一个字符串类型:
旧节点是一个字符串类型
将el的textContent设置为空字符串;
就节点是一个字符串类型,那么直接遍历新节点,挂载到el上;
旧节点也是一个数组类型
- 取出数组的最小长度;
- 遍历所有的节点,新节点和旧节点进行path操作;
- 如果新节点的length更长,那么剩余的新节点进行挂载操作;
- 如果旧节点的length更长,那么剩余的旧节点进行卸载操作;
1 | const patch = (n1,n2)=>{ |
4.2. 依赖收集系统
1 | class Dep { |
4.3. 响应式系统
4.3.1. Vue2实现
1 | // weakmap 的key为对象 |
4.3.2. Vue3实现
1 | function reactive(raw){ |
4.3.3. 为什么Vue3选择Proxy呢
Object.definedProperty 是劫持对象的属性时,如果新增元素:
- 那么Vue2需要再次 调用definedProperty,而 Proxy 劫持的是整个对象,不需要做特殊处理;
修改对象的不同:
- 使用 defineProperty 时,修改原来的 obj 对象就可以触发拦截;
- 而使用 proxy,就必须修改代理对象,即 Proxy 的实例才可以触发拦截;
Proxy 能观察的类型比 defineProperty 更丰富
- has:in操作符的捕获器;
- deleteProperty:delete 操作符的捕捉器;
- 等等其他操作;
Proxy 作为新标准将受到浏览器厂商重点持续的性能优化;
缺点:Proxy 不兼容IE,也没有 polyfill, defineProperty 能支持到IE9
4.4. 框架外层API设计
- 从框架的层面来说,需要有两部分内容
- createApp用于创建一个app对象;
- 该app对象有一个mount方法,可以将根组件挂载到某一个dom元素上;
1 | const createApp = (rootComponent)=>{ |
4.5. html调用整体设计
1 |
|
5. 源码阅读
5.1. createApp
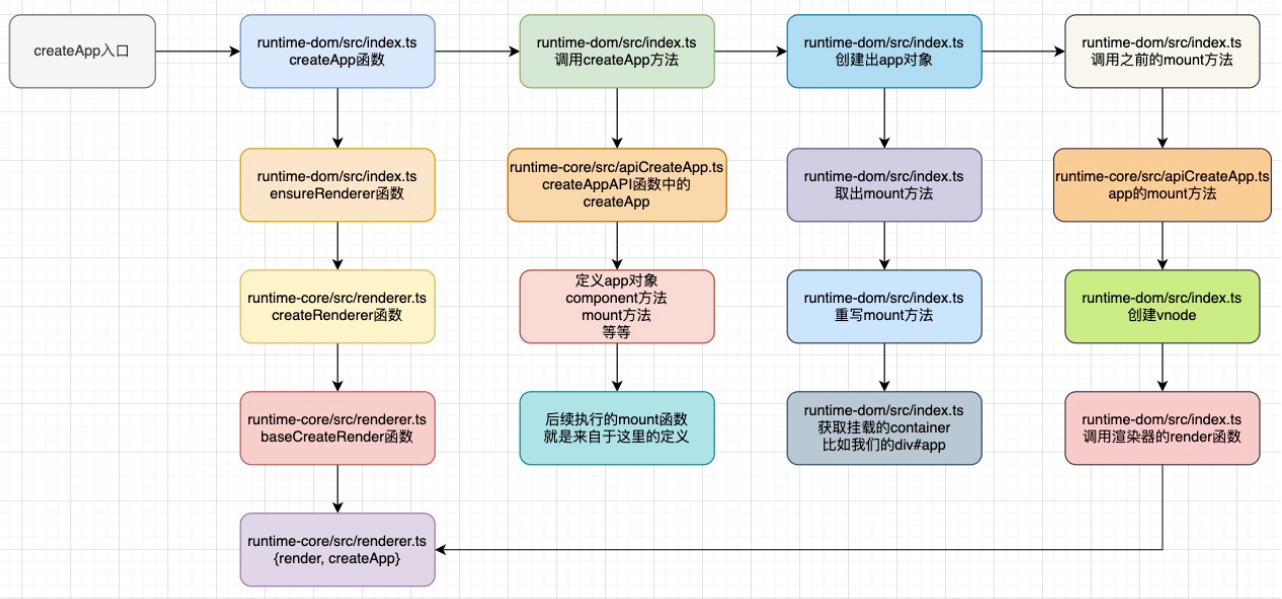
5.2. 挂载根组件
5.3. instance
1 | // runtime-core/src/component.ts |
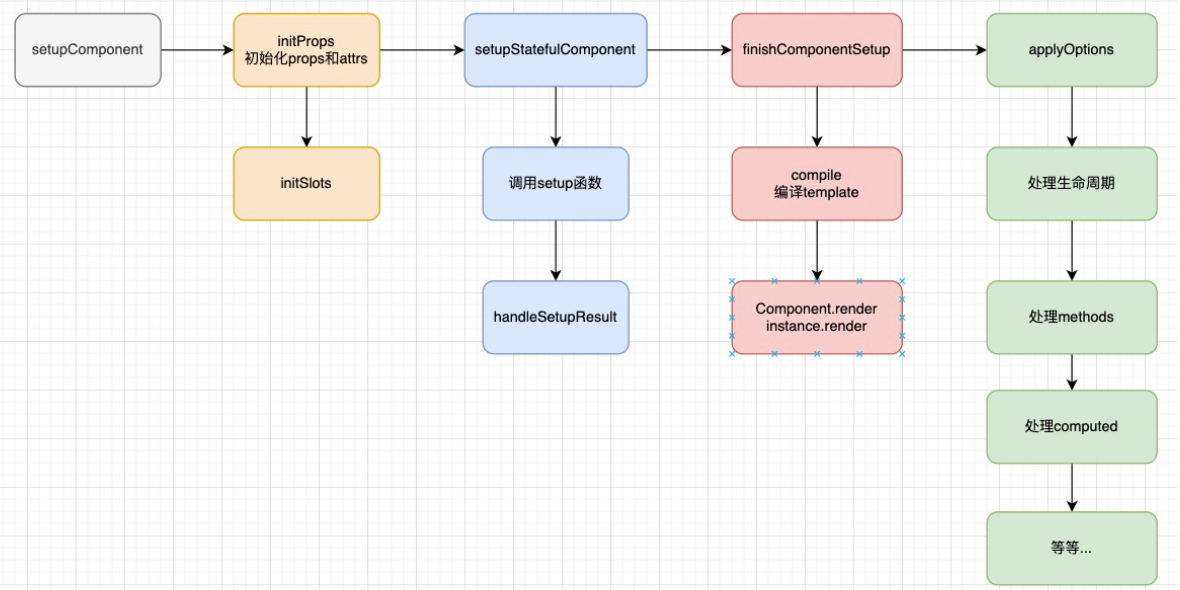
5.4. 组件化的初始化
5.5. Compile过程
1 | // compiler-core/src/compile.ts |
5.6. 生命周期回调

5.7. template中数据的使用顺序
下列案列中最终使用的是setup中的counter值0
1 |
|
源码
5.7.1. render.ts
runtime-core/render.ts/baseCreateRenderer/setupRenderEffect 中的 renderComponentRoot
1 | const setupRenderEffect: SetupRenderEffectFn = ( |
5.7.2. componentRenderUtil.ts
1 | export function renderComponentRoot( |
5.7.3. componentPublicInstance.ts
数据使用顺序决定先取setup中的数据
1 | export const PublicInstanceProxyHandlers: ProxyHandler<any> = { |