transition组件,animation动画,animate.css,gsap库,transition-group,mixin,extends
1. 认识动画
- 在开发中,一个组件的显示和消失添加某种过渡动画,可以很好的增加用户体验:
React框架本身并没有提供任何动画相关的API,所以在React中使用过渡动画需要使用一个第三方库react-transition-group;Vue中提供一些内置组件和对应的API来完成动画,可以方便的实现过渡动画效果;- 给单元素或者组件实现过渡动画,可以使用
transition 内置组件来完成动画;
2. transition动画
https://vuejs.org/guide/built-ins/transition.html#the-transition-component
- Vue 提供了 transition 的封装组件,在下列情形中,可以给任何元素和组件添加进入/离开过渡:
条件渲染(使用 v-if)条件展示 (使用 v-show)动态组件组件根节点
1 | <template> |
2.1. transition组件的原理
Vue自动给h2元素添加了动画,这是什么原因呢?
当插入或删除包含在 transition 组件中的元素时,Vue 将会做以下处理:
- 自动嗅探目标元素
是否应用了CSS过渡或者动画,如果有,那么在恰当的时机添加/删除 CSS类名; - 如果 transition 组件提供了
JavaScript钩子函数,这些钩子函数将在恰当的时机被调用; - 如果没有找到 JavaScript 钩子并且也没有检测到CSS过渡/动画,DOM插入、删除操作将会立即执行;
- 自动嗅探目标元素
那么都会添加或者删除哪些class呢?
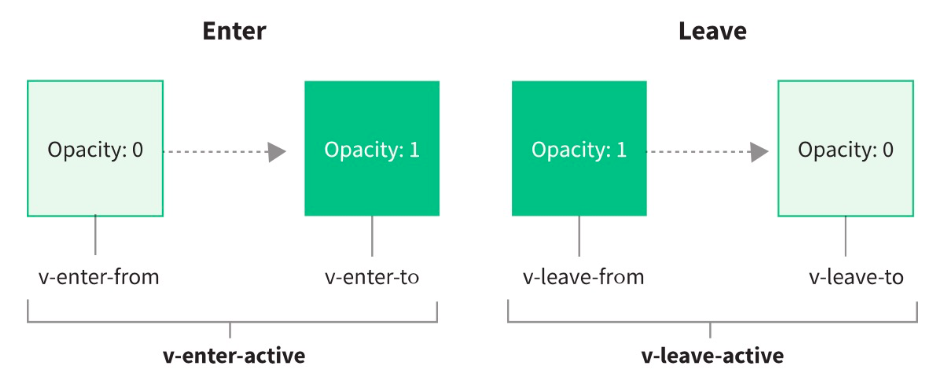
2.2. 过渡动画class
事实上Vue就是在这些class之间来回切换完成的动画:
v-enter-from:定义进入过渡的开始状态。在元素被插入之前生效,在元素被插入之后的下一帧移除。v-enter-active:定义进入过渡生效时的状态。在整个进入过渡的阶段中应用,在元素被插入之前生效,在过渡/动画完成之后移除。这个类可以被用来定义进入过渡的过程时间,延迟和曲线函数。v-enter-to:定义进入过渡的结束状态。在元素被插入之后下一帧生效 (与此同时 v-enter-from 被移除),在过渡/ 动画完成之后移除。v-leave-from:定义离开过渡的开始状态。在离开过渡被触发时立刻生效,下一帧被移除。v-leave-active:定义离开过渡生效时的状态。在整个离开过渡的阶段中应用,在离开过渡被触发时立刻生效,在过渡/动画完成之后移除。这个类可以被用来定义离开过渡的过程时间,延迟和曲线函数。v-leave-to:定义离开过渡的结束状态。在离开过渡被触发之后下一帧生效 (与此同时 v-leave-from 被删除),在过渡/动画完成之后移除。
2.3. class添加的时机和命名规则
- class的name命名规则如下:
- 如果使用的是一个没有name的transition,那么所有的class是以 v- 作为默认前缀;
- 如果添加了一个name属性,比如
<transition name="why">,那么所有的class会以 why- 开头;
3. 过渡css动画
通过animation来实现动画效果
1 | <template> |
4. 同时设置过渡和动画
- Vue为了知道过渡的完成,内部是在监听
transitionend或animationend,到底使用哪一个取决于元素应用的CSS规则:- 如果只是使用了其中的一个,那么Vue能自动识别类型并设置监听;
- 如果同时使用了过渡和动画呢?
- 并且在这个情况下可能某一个动画执行结束时,另外一个动画还没有结束;
- 在这种情况下,可以设置
type 属性为 animation 或者 transition来明确的告知Vue监听的类型;(一般设置时间较长者)
1 | <template> |
5. 显示的指定动画时间
通过 duration 属性来指定过渡的时间
duration可以设置两种类型的值:
number类型:同时设置进入和离开的过渡时间;object类型:分别设置进入和离开的过渡时间;
1 | <!-- number --> |
6. 过渡的模式mode
- 多个元素在同一个transition组件中时 ,元素之间切换的时候存在着问题
- 默认情况下进入和离开动画是同时发生的
- 但是如果不希望同时执行进入和离开动画,需要设置transition的过渡模式:
in-out: 新元素先进行过渡,完成之后当前元素过渡离开;out-in: 当前元素先进行过渡,完成之后新元素过渡进入;
1 | <template> |
7. 动态组件的切换
1 | <template> |
8. appear初次渲染
默认情况下,首次渲染的时候是没有动画的,如果希望添加上动画,那么就可以增加另外一个属性 appear
1 | <transition name="bounce" mode="out-in" appear> |
9. animate.css
- 手动一个个来编写这些动画,效率是比较低的,在开发中可能会引用一些第三方库的动画库,比如animate.css
- 什么是 animate.css呢?
Animate.cssis a library of ready-to-use, cross-browser animations for use in your web projects. Great for emphasis, home pages, sliders, and attention-guiding hints.- Animate.css 是一个已经准备好的、跨平台的动画库为web项目,对于强调、主页、滑动、注意力引导 非常有用;
9.1. 自定义过渡class
通过以下 attribute 来自定义过渡类名:
- enter-from-class
- enter-active-class
- enter-to-class
- leave-from-class
- leave-active-class
- leave-to-class
其优先级高于普通的类名,这对于Vue 的过渡系统和其他第三方 CSS 动画库,如 Animate.css. 结合使用十分有用
9.2. animate.css库的使用
安装animate.css:
1
npm install animate.css
在main.js中导入animate.css:
1
import "animate.css";
两种用法:
- 用法一:直接使用animate库中定义的 keyframes 动画;
- 用法二:直接使用animate库提供给我们的类;
9.2.1. 使用 keyframes 动画
1 | <template> |
9.2.2. 使用提供的类
https://animate.style/ 直接复制粘贴
1 | <template> |
10. gsap库
通过 JavaScript来实现一些动画的效果,可以选择使用gsap库来完成
什么是gsap呢?
- GSAP是The GreenSock Animation Platform(GreenSock动画平台)的缩写;
- 它可以通过JavaScript
为CSS属性、SVG、Canvas等设置动画,并且是浏览器兼容的;
这个库应该如何使用呢?
第一步:需要安装gsap库;
1
npm install gsap
第二步:导入gsap库;
第三步:使用对应的api即可;
10.1. JavaScript钩子
- 在使用动画之前,先来看一下 transition组件提供的JavaScript钩子,这些钩子可以监听动画执行到什么阶段了
- 当使用JavaScript来执行过渡动画时,需要 进行 done 回调,否则它们将会被同步调用,过渡会立即完成
- 添加 :css=”false”,也会让 Vue 会跳过 CSS 的检测,除了性能略高之外,这可以避免过渡过程中 CSS 规则的影响
1 | <template> |
10.2. gsap库的使用
https://greensock.com/get-started/
1 | <template> |
10.3. gsap实现数字变化
1 | <template> |
11. 列表的过渡
如果希望渲染的是一个列表,并且该列表中添加删除数据也希望有动画执行呢?
- 这个时候要使用
<transition-group>组件来完成;
- 这个时候要使用
使用
<transition-group>有如下的特点:- 默认情况下,它不会渲染一个元素的
包裹器,但是可以指定一个元素并以tag进行渲染; - 过渡模式不可用,因为不再相互切换特有的元素;
- 内部元素总是需要提供唯一的 key attribute 值;
- CSS 过渡的类将会应用在内部的元素中,而不是这个组/容器本身;
- 默认情况下,它不会渲染一个元素的
11.1. 列表过渡的基本使用
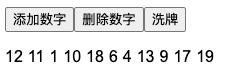
- 来做一个案例:
- 案例是一列数字,可以继续添加或者删除数字;
- 在添加和删除数字的过程中,对添加的或者移除的数字添加动画;
11.2. 列表过渡的移动动画
- 虽然新增的或者删除的节点是有动画的,但是对于哪些其他需要移动的节点是没有动画的:
- 通过使用一个新增的
v-move的class来完成动画; - 它会在元素改变位置的过程中应用;
- 像之前的名字一样,可以通过name来自定义前缀;
- 通过使用一个新增的
1 | <template> |
11.3. 列表的交错过渡案例
通过gsap的延迟delay属性,做一个交替消失的动画
1 | <template> |
12. Mixin
https://vuejs.org/api/options-composition.html#mixins
组件和组件之间有时候会存在相同的代码逻辑,希望对相同的代码逻辑进行抽取
在Vue2和Vue3中都支持的一种方式就是
使用Mixin来完成:- Mixin提供了一种非常灵活的方式,来
分发Vue组件中的可复用功能; - 一个Mixin对象可以
包含任何组件选项; - 当组件使用Mixin对象时,所有Mixin对象的选项将被
混合进入该组件本身的选项中;
- Mixin提供了一种非常灵活的方式,来
12.1. 基本使用
12.1.1. sayHello.js
1 | export const sayHello= { |
12.1.2. Home.vue
1 | <template> |
12.1.3. Hello.vue
1 | <template> |
12.1.4. App.vue
1 | <template> |
12.2. 合并规则
如果Mixin对象中的选项和组件对象中的选项发生了冲突,那么Vue会如何操作呢?
情况一:如果是
data函数的返回值对象- 返回值
对象默认情况下会进行合并; - 如果data返回值对象的
属性发生了冲突,那么会保留组件自身的数据;
- 返回值
情况二:如何
生命周期钩子函数- 生命周期的钩子函数会被
合并到数组中,都会被调用;
- 生命周期的钩子函数会被
情况三:值为对象的选项,例如 methods、components 和 directives,将被合并为同一个对象
- 比如都有
methods选项,并且都定义了方法,那么它们都会生效; - 但是如果
对象的key相同,那么会取组件对象的键值对;
- 比如都有
12.3. 全局混入Mixin
- 如果组件中的某些选项,是所有的组件都需要拥有的,这个时候可以使用全局的mixin:
- 全局的Mixin可以使用
应用app的方法 mixin来完成注册; - 一旦注册,那么
全局混入的选项将会影响每一个组件;
- 全局的Mixin可以使用
1 | import { createApp } from 'vue' |
13. extends
另外一个类似于Mixin的方式是通过extends属性:
- 允许声明扩展另外一个组件,类似于Mixins;
在开发中extends用的非常少,在Vue2中比较推荐大家使用Mixin,而在Vue3中推荐使用
Composition API
13.1. BasePage.vue
1 | <template> |
13.2. About.vue
1 | <template> |
13.3. Home.vue
1 | <template> |
13.4. App.vue
1 | <template> |