props,emits,Provide/Inject,mitt,slot,动态组件,异步组件,生命周v-model
1. 基础认知
1.1. 组件化思想
现在可以说整个的大前端开发都是组件化的天下,无论从三大框架(Vue、React、Angular),还是跨平台方案的Flutter,甚至是移动端都在转向组件化开发,包括小程序的开发也是采用组件化开发的思想
所以,学习组件化最重要的是它的思想,每个框架或者平台可能实现方法不同,但是思想都是一样的
通过组件化的思想来思考整个应用程序:
- 将一个完整的页面分成很多个组件;
- 每个组件都用于实现页面的一个功能块;
- 而每一个组件又可以进行细分;
- 而组件本身又可以在多个地方进行复用;
1.2. Vue的组件化
组件化是Vue、React、Angular的核心思想:
- createApp函数传入了一个对象App,这个对象其实本质上就是一个组件,也是应用程序的根组件;
- 组件化提供了一种抽象,开发出一个个独立可复用的小组件来构造应用;
- 任何的应用都会被抽象成一颗组件树;
1.3. 注册组件的方式
如果现在有一部分内容(模板、逻辑等),希望将这部分内容抽取到一个独立的组件中去维护,这个时候如何注册一个组件呢?
从简单的开始谈起,比如下面的模板希望抽离到一个单独的组件:
1
2<h2>{{title}}</h2>
<p>{{message}}</p>注册组件分成两种:
全局组件:在任何其他的组件中都可以使用的组件;局部组件:只有在注册的组件中才能使用的组件;
1.4. 注册全局组件
- 全局组件需要使用全局创建的app来注册组件;
- 通过component方法传入组件名称、组件对象即可注册一个全局组件了;
- 之后,可以在App组件的template中直接使用这个全局组件
- 组件本身也可以有自己的代码逻辑:
- 比如data、computed、methods等等
1 | <body> |
1.5. 组件的名称
在通过app.component注册一个组件的时候,第一个参数是组件的名称,定义组件名的方式有两种:
方式一:使用kebab-case(短横线分割符)
- 当使用 kebab-case (短横线分隔命名) 定义一个组件时,必须在引用这个自定义元素时使用 kebab-case, 例如
<my-component-name>;
- 当使用 kebab-case (短横线分隔命名) 定义一个组件时,必须在引用这个自定义元素时使用 kebab-case, 例如
方式二:使用PascalCase(驼峰标识符)
- 当使用 PascalCase (首字母大写命名) 定义一个组件时,在引用这个自定义元素时两种命名法都可以使用
- 也就是说
<my-component-name>和<MyComponentName>都是可接受的;
1.6. 注册局部组件
全局组件往往是在应用程序一开始就会全局组件完成,那么就意味着如果某些组件并没有用到,也会一起被注册:
- 比如注册了三个全局组件:ComponentA、ComponentB、ComponentC;
- 在开发中只使用了ComponentA、ComponentB,如果ComponentC没有用到但是依然在全局进行了注册,那么就意味着类似于webpack这种打包工具在打包项目时,依然会对其进行打包;
- 这样最终打包出的JavaScript包就会有关于ComponentC的内容,用户在下载对应的JavaScript时也会增加包的大小;
所以在开发中通常使用组件的时候采用的都是局部注册:
- 局部注册是在需要使用到的组件中,通过components属性选项来进行注册;
- 比如之前的App组件中,有data、computed、methods等选项了,事实上还可以有一个components选 项;
- 该components选项对应的
是一个对象,对象中的键值对是组件的名称: 组件对象;
1 | <body> |
2. Vue的开发模式
目前使用vue的过程都是在html文件中,通过
template编写自己的模板、脚本逻辑、样式等。但是随着项目越来越复杂,采用组件化的方式来进行开发:
- 就意味着每个组件都会有自己的
模板、脚本逻辑、样式等; - 当然依然可以把它们
抽离到单独的js、css文件中,但是它们还是会分离开来; - 也包括script是在
一个全局的作用域下,很容易出现命名冲突的问题; - 并且代码为了适配一些浏览器,必须使用
ES5的语法; - 在编写代码完成之后,依然需要
通过工具对代码进行构建、代码;
- 就意味着每个组件都会有自己的
所以在真实开发中,通过一个后缀名为 .vue 的
single-file components (单文件组件)来解决,并且可以使用webpack或者vite或者rollup等构建工具来对其进行处理
2.1. 单文件的特点
- 在这个组件中可以获得非常多的特性:
- 代码的高亮;
- ES6、CommonJS的模块化能力;
- 组件作用域的CSS;
- 可以使用预处理器来构建更加丰富的组件,比 如TypeScript、Babel、Less、Sass等;
1 | <template> |
2.2. 如何支持SFC
如果想要使用这一的SFC的.vue文件,比较常见的是两种方式:
- 方式一:使用
Vue CLI来创建项目,项目会默认配置好所有的配置选项,可以在其中直接使用.vue文件; - 方式二:自己使用
webpack或rollup或vite这类打包工具,对其进行打包处理;
- 方式一:使用
最终,无论是后期做项目,还是在公司进行开发,通常都会采用
Vue CLI的方式来完成
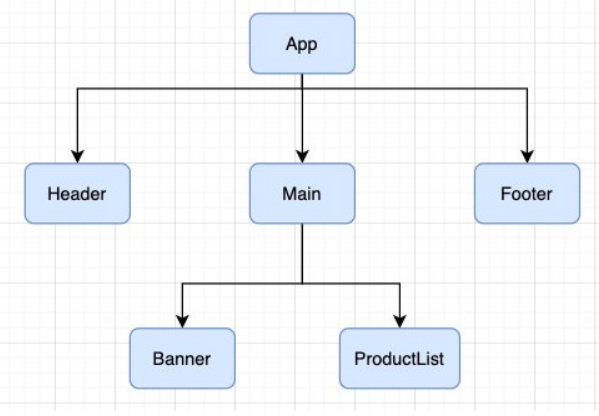
3. 组件的嵌套与拆分
3.1. 组件的嵌套
- 假如将所有的代码逻辑都放到一个App.vue 组件中:
- 代码是非常的臃肿和难以维护的
- 并且在真实开发中,会有更多的内容和代码逻辑,对于扩展性和可维护性来说都是非常差的
- 所以,在真实的开发中,会对组件进行拆分,拆分成一个个功能的小组件
- 再将这些组件组合嵌套在一起,最终形成完整的应用程序;
1 | <template> |
3.2. VSCode 协助开发
安装插件:
- Vetur
- Vue VSCode Snippets
vue文件生成快捷键
vbase-css
3.3. 组件的拆分
3.3.1. Header.vue
1 | <template> |
3.3.2. Main.vue
1 | <template> |
3.3.3. Footer.vue
1 | <template> |
3.3.4. App.vue
1 | <template> |
4. 组件的通信
上面的嵌套逻辑如下,它们存在如下关系:
- App组件是Header、Main、Footer组件的父组件;
- Main组件是Banner、ProductList组件的父组件;
在开发过程中,经常遇到需要组件之间相互进行通信:
- 比如App可能使用了多个Header,每个地方的Header展示的内容不同,需要使用者传递给Header一些数据,让其进行展示;
- 又比如在Main中一次性请求了Banner数据和ProductList数据,那么就需要传递给它们来进行展示;
- 也可能是子组件中发生了事件,需要由父组件来完成某些操作,那就需要子组件向父组件传递事件;
总之,在一个Vue项目中,组件之间的通信是非常重要的环节;
4.1. 父子组件之间通信的方式
父组件传递给子组件:通过
props属性;子组件传递给父组件:通过
$emit触发事件;
4.1.1. 父组件传递给子组件
在开发中很常见的就是父子组件之间通信,比如父组件有一些数据,需要子组件来进行展示:
- 通过props来完成组件之间的通信;
什么是Props呢?
- Props 可以在组件上注册一些自定义的attribute;
- 父组件给这些attribute赋值,子组件通过attribute的名称获取到对应的值;
Props有两种常见的用法:
- 方式一:字符串数组,数组中的字符串就是attribute的名称;
- 方式二:对象类型,对象类型可以在指定attribute名称的同时,指定它需要传递的类型、是否是必须的、 默认值等等;
4.1.2. Props的数组用法
Main.vue
1 | <template> |
MainBanner.vue
1 | <template> |
4.1.3. Props的对象用法
数组用法中 只能说明传入的attribute的名称,并不能对其进行任何形式的限制,对象的写法可以让props变得更加完善
当使用对象语法的时候,可以对传入的内容限制更多:
- 比如指定传入的
attribute的类型; - 比如指定传入的
attribute是否是必传的; - 比如指定没有传入时,
attribute的默认值;
- 比如指定传入的
MainBanner.vue
1 | <template> |
4.1.4. type的类型
- String
- Number
- Boolean
- Array
- Object
- Date
- Function
- Symbol
4.1.5. 对象类型的其他写法
1 | props: { |
4.1.6. Prop 的大小写命名
- Prop 的大小写命名(camelCase vs kebab-case)
- HTML 中的 attribute 名是
大小写不敏感的,所以浏览器会把所有大写字符解释为小写字符; - 使用 DOM 中的模板时,camelCase (驼峰命名法) 的 prop 名需要使用其等价的
kebab-case(短横线分隔命名) 命名;
- HTML 中的 attribute 名是
1 | <template> |
4.1.7. 非Prop的Attribute
什么是非Prop的Attribute呢?
- 传递一个组件某个属性,但是该属性并没有定义对应的props或者emits时,就称之为非Prop的Attribute;
- 常见的包括class、style、id属性等;
Attribute继承
- 当组件有单个根节点时,非Prop的Attribute将自动添加到根节点的Attribute中
1 | <!-- Main.vue --> |
显示的效果
1 | <div class="titleStyle"><h2>Banner</h2></div> |
4.1.8. 禁用Attribute继承和多根节点
如果不希望组件的根元素继承attribute**,可以在组件中设置 **
inheritAttrs: false:禁用attribute继承的常见情况是需要将attribute应用于根元素之外的其他元素;
可以通过 $attrs来访问所有的非props的attribute;
1
2
3
4
5
6
7
8
9
10
11
12
13
14<!-- MainBanner.vue -->
<template>
<div>
<h2 :class="$attrs.class">{{title}}</h2>
</div>
</template>
<script>
export default {
inheritAttrs: false,
props: ["title"]
}
</script>
多个根节点的attribute
多个根节点的attribute如果没有显示的绑定,那么会报警告,必须手动的指定要绑定到哪一个属性上:
使用
v-bind="$attrs"1
2
3
4
5
6
7
8
9
10
11
12
13
14
15
16
17
18
19
20
21
22
23
24
25
26
27
28
29
30
31
32
33
34
35
36
37
38<!-- Main.vue -->
<template>
<div class="main">
<main-banner :title="message.title" id="banner" class="main">
</div>
</template>
<script>
import MainBanner from './MainBanner.vue';
import MainProductList from './MainProductList.vue';
export default {
components: {
MainBanner,
MainProductList
},
data(){
return {
message: {
title: "banner"
}
}
}
}
</script>
<!-- MainBanner.vue -->
<template>
<div>
<h2 v-bind="$attrs">{{title}}</h2>
</div>
</template>
<script>
export default {
inheritAttrs: false,
props: ["title"]
}
</script>显示结果
1
<h2 id="banner" class="main">banner</h2>
4.2. 子组件传递给父组件
什么情况下子组件需要传递内容到父组件呢?
- 当子组件有一些事件发生的时候,比如在组件中发生了点击,父组件需要切换内容;
- 子组件有一些内容想要传递给父组件的时候;
如何完成上面的操作呢?
- 首先,在子组件中定义好在某些情况下触发的事件名称;
- 其次,在父组件中以v-on的方式传入要监听的事件名称,并且绑定到对应的方法中;
- 最后,在子组件中发生某个事件的时候,根据事件名称触发对应的事件
4.2.1. 自定义事件的流程
封装一个CounterOperation.vue的组件:
- 内部其实是监听两个按钮的点击,点击之后通过 this.$emit的方式发出去事件;
CounterOperation.vue
1 | <template> |
Main.vue
1 | <template> |
4.2.2. 自定义事件的参数和验证
自定义事件的时候,也可以传递一些参数给父组件
CounterOperation.vue
1
2
3
4
5
6
7
8
9
10
11
12
13
14
15
16<template>
<div>
<button @click= "addTen">+10</button>
</div>
</template>
<script>
export default {
emits: ["addTen"],
methods: {
addTen(){
this.$emit("addTen",10);
}
}
}
</script>Main.vue
1
2
3
4
5
6
7
8
9
10
11
12
13
14
15
16
17
18
19
20
21
22
23
24
25
26
27<template>
<div>
<h2>{{counter}}</h2>
<counter-operation @addTen="ten"></counter-operation>
</div>
</template>
<script>
import CounterOperation from './CounterOperation.vue';
export default {
components: {
CounterOperation
},
data(){
return {
counter: 0
}
},
methods:{
ten(num){
// console.log(num);
this.counter+=num;
}
}
}
</script>还可以对传递的参数进行验证
CounterOperation.vue
1
2
3
4
5
6
7
8
9
10
11
12
13
14
15
16
17
18
19
20
21
22
23
24
25
26
27
28
29
30
31
32
33
34
35
36
37
38
39
40
41
42
43
44
45<template>
<div>
<button @click= "increment">+1</button>
<button @click= "decrement">-1</button>
<button @click= "addTen">+10</button>
<input type="text" v-model.number="num">
<button @click= "addN">+N</button>
</div>
</template>
<script>
export default {
emits: {
addOne: null,
subOne: null,
addTen: null,
addN: function(n){
if(n%2==0){
return true;
}else{
return false;
}
}
},
data(){
return {
num: 0
}
},
methods: {
increment(){
this.$emit("addOne",10);
},
decrement(){
this.$emit("subOne");
},
addTen(){
this.$emit("addTen",10);
},
addN(){
this.$emit("addN",this.num);
}
}
}
</script>Main.vue
1
2
3
4
5
6
7
8
9
10
11
12
13
14
15
16
17
18
19
20
21
22
23
24
25
26
27
28
29
30
31
32
33
34
35
36
37
38
39
40
41
42<template>
<div>
<h2>{{counter}}</h2>
<counter-operation
@addOne="add"
@subOne="sub"
@addTen="ten"
@addN="addN"
>
</counter-operation>
</div>
</template>
<script>
import CounterOperation from './CounterOperation.vue';
export default {
components: {
CounterOperation
},
data(){
return {
counter: 0
}
},
methods:{
add(){
this.counter++;
},
sub(){
this.counter--;
},
ten(num){
// console.log(num);
this.counter+=num;
},
addN(num){
this.counter+=num;
}
}
}
</script>浏览器显示警告信息
1
[Vue warn]: Invalid event arguments: event validation failed for event "addN".
4.3. 组件间通信案例练习
App.vue
1 | <template> |
TabControl.vue
1 | <template> |
4.4. 非父子组件的通信
4.4.1. Provide和Inject
Provide/Inject用于非父子组件之间共享数据:
- 比如有一些深度嵌套的组件,子组件想要获取父组件的部分内容;
- 在这种情况下,如果仍然将props沿着组件链逐级传递下去,就会非常的麻烦;
对于这种情况下,使用 Provide 和 Inject :
- 论层级结构有多深,父组件都可以作为其所有子组件的依赖提供者;
父组件有一个 provide选项来提供数据;子组件有一个 inject选项来开始使用这些数据;
实际上,可以将依赖注入看作是“long range props”,除了:
- 父组件不需要知道哪些子组件使用它 provide 的 property
- 子组件不需要知道 inject 的 property 来自哪里
4.4.1.1. 基本使用
开发这样的结构:App.vue -> Home.vue -> HomeContent.vue
App.vue
1 | <template> |
Home.vue
1 | <template> |
HomeContent.vue
1 | <template> |
4.4.1.2. 处理响应式数据
Main.vue
1 | import { computed } from 'vue'; |
HomeContent.vue
1 | export default { |
Main.js
1 | const app = createApp(App); |
4.4.2. Mitt全局事件总线
Vue3从实例中移除了
$on、$off 和 $once方法,如果希望 继续使用全局事件总线,要通过第三方的库:Vue3官方有推荐一些库,例如 mitt 或 tiny-emitter;
首先,安装这个库:
1
npm install mitt
其次,封装一个工具eventbus.js:
1
2
3import mitt from 'mitt';
const emitter = mitt();
export default emitter;
4.4.2.1. 使用事件总线工具
在App.vue中触发事件;
1
2
3
4
5
6
7
8
9
10
11
12
13
14
15
16
17
18
19
20
21
22
23
24
25
26
27
28
29
30
31
32
33
34
35
36
37<template>
<div>
<button @click="click">click</button>
<hello></hello>
</div>
</template>
<script>
import emitter from './util/eventbus';
import Hello from './Home.vue';
export default {
components: {
Hello
},
methods: {
click(){
emitter.emit("click1",{
name: "Hello vue1",
id: '0001'
}),
emitter.emit("click2",{
name: "Hello vue2",
id: '0002'
}),
emitter.emit("click3",{
name: "Hello vue3",
id: '0003'
})
}
}
}
</script>
<style scoped>
</style>在Home.vue中监听事件;
*表示监听所有1
2
3
4
5
6
7
8
9
10
11
12
13
14
15
16
17
18
19
20
21
22
23<template>
<div>
</div>
</template>
<script>
import emitter from './util/eventbus';
export default {
created(){
emitter.on("click1",(info)=>{
console.log(info);
}),
emitter.on("*",(type,info)=>{
console.log(type,info);
})
}
}
</script>
<style scoped>
</style>
4.4.2.2. Mitt的事件取消
1 | // 取消所有的监听 |
5. 插槽Slot
5.1. 认识插槽
在开发中,经常会封装一个个可复用的组件:
- 通过props传递给组件一些数据,让组件来进行展示;但是为了让这个组件具备更强的通用性,不能将组件中的内容限制为固定的div、span等等这些元素;
- 比如某种情况下使用组件,希望组件显示的是一个按钮,一张图片;
- 应该是让使用者决定某一块区域到底存放什么内容和元素;
举个例子:定制一个通用的导航组件 - NavBar
这个组件分成三块区域:左边-中间-右边,每块区域的内容是不固定;
左边区域可能显示一个菜单图标,也可能显示一个返回按钮,可能什么都不显示;
中间区域可能显示一个搜索框,也可能是一个列表,也可能是一个标题,等等;
右边可能是一个文字,也可能是一个图标,也可能什么都不显示;

5.2. 使用插槽slot
定义插槽slot:
- 插槽的使用过程其实是
抽取共性、预留不同; - 将共同的元素、内容依然在组件内进行封装;
- 同时会将不同的元素使用slot作为占位,让外部决定到底显示什么样的元素;
- 插槽的使用过程其实是
如何使用slot呢?
- Vue中将
<slot>元素作为承载分发内容的出口; - 在封装组件中,使用特殊的元素
<slot>就可以为封装组件开启一个插槽; - 该插槽插入什么内容取决于父组件如何使用;
- Vue中将
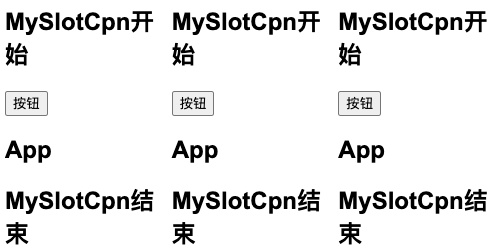
案例:
MySlotCpn.vue:该组件中有一个插槽,可以在插槽中放入需要显示的内容;
App.vue中使用它们:可以插入普通的内容、html元素、组件元素等;
1
2
3
4
5
6
7
8
9
10
11
12
13
14
15
16
17
18
19
20
21
22
23
24
25
26
27
28
29
30<!-- MySlotCpn.vue -->
<template>
<div>
<h2>MySlotCpn开始</h2>
<slot></slot>
<h2>MySlotCpn结束</h2>
</div>
</template>
<!-- App.vue -->
<template>
<div>
<my-slot-cpn>
<button>按钮</button>
<h2>App</h2>
</my-slot-cpn>
</div>
</template>
<script>
import MySlotCpn from './MySlotCpn.vue';
export default {
components: {
MySlotCpn
}
}
</script>
5.3. 插槽的默认内容
没有插入对应的内容,显示一个默认的内容
1 | <template> |
5.4. 多个插槽的效果
- 如果一个组件中含有多个插槽,插入多个内容时是什么效果?
- 默认情况下每个插槽
都会获取到插入的内容来显示;
- 默认情况下每个插槽
MySlotCpn.vue
1 | <template> |
App.vue
1 | <template> |
效果
5.5. 具名插槽的使用
具名插槽顾名思义就是给插槽起一个名字,
<slot>元素有一个特殊的属性name;- 一个不带 name 的slot,会带有隐含的名字 default;
匹配采用
v-slot:name
MySlotCpn.vue
1 | <template> |
App.vue
1 | <template> |
5.6. 动态插槽名
- 什么是动态插槽名呢?
- 比如 v-slot:left、v-slot:center等等;
- 可以通过
v-slot:[dynamicSlotName]方式动态绑定一个名称;
App.vue
1 | <template> |
5.7. 具名插槽使用的时候缩写
即把参数之前的所有内容 (v-slot:) 替换为字符 #;
App.vue
1 | <template> |
5.8. 渲染作用域
在Vue中有渲染作用域的概念:
- 父级模板里的所有内容都是在父级作用域中编译的;
- 子模板里的所有内容都是在子作用域中编译的;
如何理解这句话呢?
- 来看一个案例
- 在案例中 MySlotCpn 自然是可以让问自己作用域中的title内容的;
- 但是在App中,是访问不了 MySlotCpn 中的内容的,因为它们是跨作用域的访问;
1 | <!-- MySlotCpn.vue --> |
浏览器警告
1 | [Vue warn]: Property "title" was accessed during render but is not defined on instance. |
5.8.1. 认识作用域插槽
希望插槽可以访问到子组件中的内容是非常重要的:
- 当一个组件被用来渲染一个数组元素时,使用插槽,并且希望插槽中没有显示每项的内容;
- Vue给我们提供了作用域插槽;
案例
- 定义数据
- 遍历names数据
- 定义插槽的prop
- 通过 v-slot:default 的方式获取到slot的props
- 使用slotProps中的item和index
MySlotCpn.vue
1 | <template> |
App.vue
1 | <template> |
5.8.2. 独占默认插槽的缩写
v-slot:default=”slotProps”可以简写为v- slot=”slotProps”:
1
2
3
4
5
6
7
8
9<template>
<div>
<my-slot-cpn>
<template v-slot="slotProps">
<span>{{slotProps.item}}-{{slotProps.index}}</span><br>
</template>
</my-slot-cpn>
</div>
</template>并且
如果插槽只有默认插槽时,组件的标签可以被当做插槽的模板来使用,可以将 v-slot 直接用在组件上:1
2
3
4
5
6
7<template>
<div>
<my-slot-cpn v-slot="slotProps">
<span>{{slotProps.item}}-{{slotProps.index}}</span><br>
</my-slot-cpn>
</div>
</template>
5.8.3. 默认插槽和具名插槽混合
如果有默认插槽和具名插槽,那么按照完整的template来编写
1
2
3
4
5
6<my-slot-cpn v-slot="slotProps">
<span>{{slotProps.item}}-{{slotProps.index}}</span><br>
<template v-slot:why>
<h2>why</h2>
</template>
</my-slot-cpn>❌
1
2
[vue/valid-v-slot]
Default slot must use '<template>' on a custom element when there are other named slots.只要出现多个插槽,请始终为所有的插槽使用完整的基于
<template>的语法:1
2
3
4
5
6
7
8<my-slot-cpn>
<template v-slot="slotProps">
<span>{{slotProps.item}}-{{slotProps.index}}</span><br>
</template>
<template v-slot:why>
<h2>why</h2>
</template>
</my-slot-cpn>
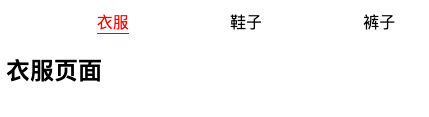
6. 动态组件
- 点击一个tab-bar,切换不同的组件显示;
- 这个案例可以通过两种不同的实现思路来实现:
- 方式一:通过v-if来判断,显示不同的组件;
- 方式二:动态组件的方式;
6.1. v-if显示不同的组件
1 | <template> |
6.2. 动态组件方式
动态组件是使用
component 组件,通过一个特殊的attribute is来实现:1
2
3
4
5
6
7
8
9
10
11
12
13<template>
<div>
<button
v-for="(item) in tabs" :key="item"
:class="{active: currentTab==item}"
@click="itemClick(item)"
>
{{item}}
</button>
<component :is="currentTab"></component>
</div>
</template>这个currentTab的值需要是什么内容呢?
- 可以是通过component函数注册的组件;
- 在一个组件对象的components对象中注册的组件;
6.3. 动态组件的传值
可以将属性和监听事件放到component上来使用
App.vue
1 | <template> |
Home.vue
1 | <template> |
6.4. keep-alive
先对之前的案例中About组件进行改造:
- 在其中增加了一个按钮,点击可以递增的功能;
将counter点到10,那么在切换到home再切换回来about时,状态是否可以保持呢?
- 答案是否定的;
- 这是因为默认情况下,在切换组件后,about组件会被销毁掉,再次回来时会重新创建组件;
但是,在开发中希望继续保持组件的状态,而不是销毁掉,这个时候就可以使用一个内置组件: keep-alive
6.4.1. 属性
- keep-alive有一些属性:
include- string | RegExp | Array。只有名称匹配的组件会被缓存;- 组件的值通过 name属性指定
exclude- string | RegExp | Array。任何名称匹配的组件都不会被缓存;max- number | string。最多可以缓存多少组件实例,一旦达 到这个数字,那么缓存组件中最近没有被访问的实例会被销毁;
- include 和 exclude prop 允许组件有条件地缓存:
- 二者都可以用
逗号分隔字符串、正则表达式或一个数组来表示; - 匹配首先检查组件自身的
name 选项;
- 二者都可以用
6.4.2. include
1 | <!-- 逗号分隔字符串 --> |
6.4.3. 案例
App.vue:点击按钮,数字++
1 | <template> |
App.vue:keep-alive
1 | <template> |
7. 异步组件
如果项目过大了,对于某些组件希望通过异步的方式来进行加载(目的是可以对其进行分包处理),那么Vue中提供了一个函数:
defineAsyncComponentdefineAsyncComponent接受两种类型的参数:
- 类型一:工厂函数,该工厂函数需要返回一个Promise对象;
- 类型二:接受一个对象类型,对异步函数进行配置;
7.1. 工厂函数写法
1 | <template> |
7.2. 对象类型写法二
1 | <template> |
7.3. Suspense
- Suspense是一个内置的全局组件,该组件有两个插槽:
- default:如果default可以显示,那么显示default的内容;
- fallback:如果default无法显示,那么会显示fallback插槽的内容;
1 | <template> |
8. 获取元素
8.1. $refs
某些情况下,想要直接获取到元素对象或者子组件实例:
- 在Vue开发中不推荐进行DOM操作的;
- 可以给元素或者组件
绑定一个ref 属性;
组件实例有一个$refs属性:
- 一个对象Object,
持有注册过 ref 的所有 DOM 元素和组件实例
- 一个对象Object,
1 | <template> |
8.2. $parent
通过$parent来访问父元素
NavBar.vue
1 | <template> |
8.3. $root
1 | <template> |
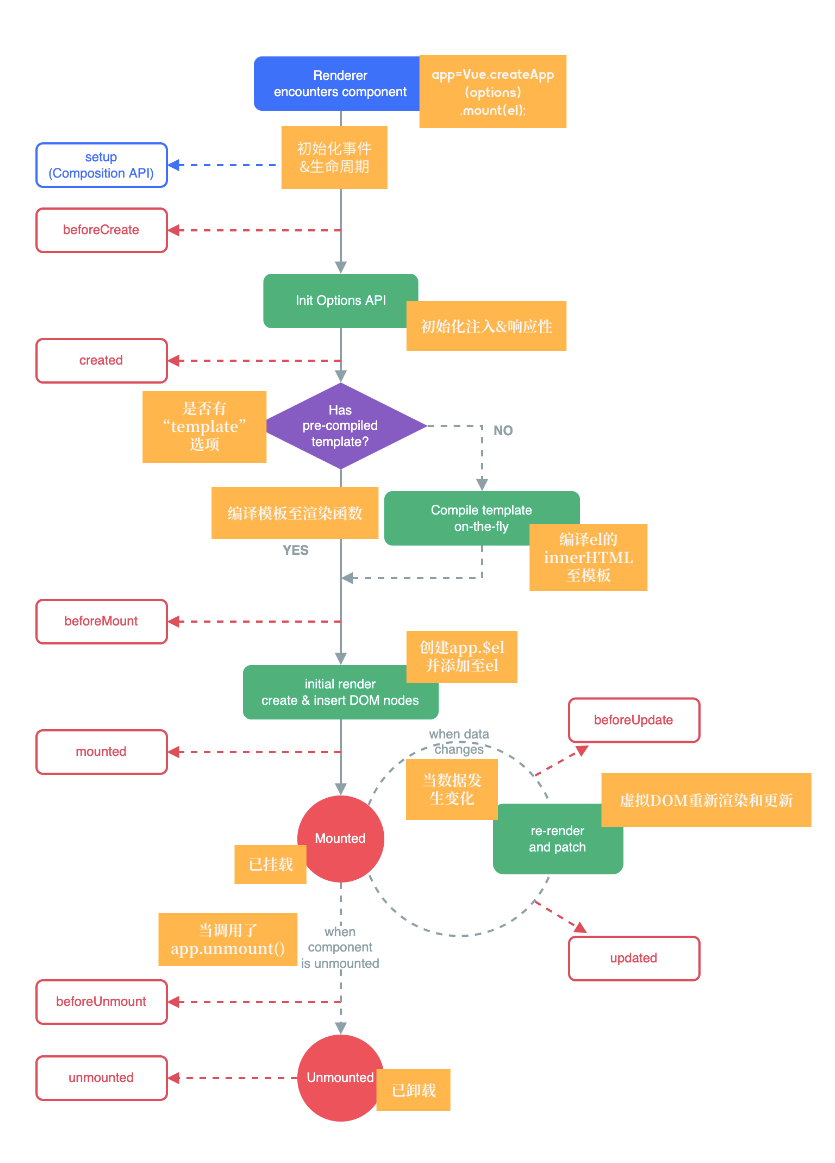
9. 生命周期
9.1. 认识生命周期
什么是生命周期呢?
- 每个组件都可能会经历从
创建、挂载、更新、卸载等一系列的过程; - 在这个过程中的某一个阶段,用于可能会想要添加一些属于自己的代码逻辑(比如组件创建完后就请求一些服务器数据);
- 但是如何可以知道目前组件正在哪一个过程呢?
- Vue提供了组件的生命周期函数;
- 每个组件都可能会经历从
生命周期函数:
- 生命周期函数是一些
钩子函数,在某个时间会被Vue源码内部进行回调; - 通过对生命周期函数的回调,可以知道目前组件正在经历什么阶段;
- 就可以在该生命周期中编写属于自己的逻辑代码了
- 生命周期函数是一些
9.2. 生命周期的流程
https://vuejs.org/guide/essentials/lifecycle.html#lifecycle-diagram
9.3. 案例
Home.vue
1 | <template> |
App.vue
1 | <template> |
浏览器控制台
1 | Home.vue?ec5c:26 unmounted - 卸载 |
9.4. 缓存组件的生命周期
- 对于缓存的组件来说,再次进入时,是不会执行created或者mounted等生命周期函数的:
- 但是有时候确实希望监听到何时重新进入到了组件,何时离开了组件;
- 这个时候可以使用
activated和deactivated这两个生命周期钩子函数来监听;
10. 组件的v-model
在 input 中可以使用 v-model 来完成双向绑定:
- v-model默认完成了两件事;
v-bind:value的数据绑定和@input的事件监听;
如果封装了一个组件,在使用这个组件时,是否也可以使用v-model来同时完成这两个功能呢?
- 也是可以的,vue也支持在组件上使用v-model;
在组件上使用的时候,等价于如下的操作:
input元素不同的只是属性的名称和事件触发的名称而已;
10.1. 案例
App.vue
1 | <template> |
NavBar.vue
1 | <template> |
InputBar.vue
1 | <template> |
10.2. computed实现
在组件内部按照双向绑定的做法去完成,可以使用计算属性的 setter 和 getter 完成
input.vue
1 | <template> |
10.3. 绑定多个属性
通过v-model是直接绑定了一个属性,如果
希望绑定多个属性呢?- 在一个组件上使用多个v-model是否可以实现呢?
默认情况下的v-model其实是绑定了modelValue属性和@update:modelValue的事件;- 如果希望绑定更多,可以给v-model传入一个参数,那么这个参数的名称就是绑定属性的名称;
注意:这里绑定了两个属性的
1
<input-bar v-model="message2" v-model:title="title"></input-bar>
v-model:title相当于做了两件事:- 绑定了title属性;
- 监听了 @update:title的事件;
1 | <template> |