双括号,v-once,v-text,v-html,v-pre,v-cloak,v-bind,v-on,v-model,computed,watch
1. 模板语法
React的开发模式:
React使用的jsx,所以对应的代码都是编写的类似于js的一种语法;
之后通过Babel将jsx编译成 React.createElement 函数调用;
Vue也支持jsx的开发模式):
但是大多数情况下,使用基于HTML的模板语法;
在模板中,允许开发者以声明式的方式将DOM和底层组件实例的数据绑定在一起;
在底层的实现中,Vue将模板编译成虚拟DOM渲染函数;
2. Mustache双大括号语法
如果希望把数据显示到模板(template)中,使用最多的语法是 “Mustache”语法 (双大括号) 的文本插值。
并且data返回的对象是有添加到Vue的响应式系统中;
当data中的数据发生改变时,对应的内容也会发生更新。
当然,Mustache中不仅仅可以是data中的属性,也可以是一个JavaScript的表达式。
正确写法
1 2 3 4 5 6 7 8 9 10 11 12 13 14 15 16 17 18 19 20 21 22 23 24 25 26 27 28 29 30 31 32 <body > <div id ="app" > </div > <template id = "vue" > <h2 > {{message}}</h2 > <h2 > {{counter*2}}</h2 > <h2 > {{message.split(" ").reverse().join(" ")}}</h2 > <h2 > {{getMessage(message)}}</h2 > <h2 > {{flag? '1':'0'}}</h2 > </template > <script src ="https://unpkg.com/vue@next" > </script > <script > Vue .createApp ({ template : '#vue' , data : function ( return { message : 'Hello Vue' , counter : 10 , flag : true } }, methods : { getMessage (msg ){ return msg.split (" " ).reverse ().join ("-" ); } } }).mount ("#app" ); </script > </body >
错误写法
3. v-once
v-once用于指定元素或者组件只渲染一次:
如果是子节点,也是只会渲染一次:
1 2 3 4 5 6 7 8 9 10 11 12 13 14 15 16 17 18 19 20 21 22 23 24 25 26 <body > <div id ="app" > </div > <template id ="vue" > <div v-once > <h2 > current:{{counter}}</h2 > <h2 > {{counter}}</h2 > <button @click = 'increment' > +1</button > </div > </template > <script src ="https://unpkg.com/vue@next" > </script > <script > Vue .createApp ({ template : '#vue' , data : function ( return { counter : 10 , } }, methods : { increment ( this .counter ++; } } }).mount ("#app" ); </script > </body >
4. v-text 用于更新元素的 textContent:
1 2 3 4 5 6 7 8 9 10 11 12 13 14 15 16 17 18 19 20 21 <body > <div id ="app" > </div > <template id ="vue" > <div > <h2 v-text ="counter" > </h2 > <h2 > {{counter}}</h2 > </div > </template > <script src ="https://unpkg.com/vue@next" > </script > <script > Vue .createApp ({ template : '#vue' , data : function ( return { counter : 10 , } } }).mount ("#app" ); </script > </body >
5. v-html
默认情况下,如果展示的内容本身是 html 的,那么vue并不会对其进行特殊的解析。
如果希望这个内容被Vue可以解析出来,那么可以使用 v-html 来展示;
1 2 3 4 5 6 7 8 9 10 11 12 13 14 15 16 17 18 19 20 <body > <div id ="app" > </div > <template id ="vue" > <div > <h2 > {{info}}</h2 > <h2 v-html ="info" > </h2 > </div > </template > <script src ="https://unpkg.com/vue@next" > </script > <script > Vue .createApp ({ template : '#vue' , data : function ( return { info : '<h2>Hello</h2>' } } }).mount ("#app" ); </script > </body >
6. v-pre
用于跳过元素和它的子元素的编译过程,显示原始的Mustache标签:
1 2 3 4 5 6 7 8 9 10 11 12 13 14 15 16 17 18 19 <body > <div id ="app" > </div > <template id ="vue" > <div > <h2 v-pre > {{info}}</h2 > </div > </template > <script src ="https://unpkg.com/vue@next" > </script > <script > Vue .createApp ({ template : '#vue' , data : function ( return { info : '<h2>Hello</h2>' } } }).mount ("#app" ); </script > </body >
7. v-cloak
这个指令保持在元素上直到关联组件实例结束编译
和 CSS 规则如 [v-cloak] { display: none } 一起用时,这个指令可以隐藏未编译的 Mustache 标签直到组件实例准备完毕
<div> 不会显示,直到编译结束
1 2 3 4 5 6 7 8 9 10 11 12 13 14 15 16 17 18 19 20 21 22 23 24 25 26 27 28 29 30 31 32 33 <!DOCTYPE html > <html lang ="en" > <head > <meta charset ="UTF-8" > <meta http-equiv ="X-UA-Compatible" content ="IE=edge" > <meta name ="viewport" content ="width=device-width, initial-scale=1.0" > <title > Document</title > <style > [v-cloak] { display : none; } </style > </head > <body > <div id ="app" > </div > <template id ="vue" > <div v-cloak > <h2 > {{message}}</h2 > </div > </template > <script src ="https://unpkg.com/vue@next" > </script > <script > Vue .createApp ({ template : '#vue' , data : function ( return { message : 'Hello' } } }).mount ("#app" ); </script > </body > </html >
8. v-bind的绑定属性
8.1. 绑定基本属性
v-bind用于绑定一个或多个属性值,或者向另一个组件传递props值
在开发中,有哪些属性需要动态进行绑定呢?
比如图片的链接src、网站的链接href、动态绑定一些类、样式等等
1 2 3 4 5 6 7 8 9 10 11 12 13 14 15 16 17 18 19 20 21 22 23 24 25 26 <body > <div id ="app" > </div > <template id ="vue" > <div > <a v-bind:href ="href" > 跳转</a > <img v-bind:src ="imgUrl" alt ="" > <a :href ="href" > 链接</a > <img :src ="imgUrl" alt ="" > </div > </template > <script src ="https://unpkg.com/vue@next" > </script > <script > Vue .createApp ({ template : '#vue' , data : function ( return { href : 'https://www.baidu.com' , imgUrl : './photo.jpg' } } }).mount ("#app" ); </script > </body >
8.2. 绑定class
在开发中,元素class也是动态的,比如:
当数据为某个状态时,字体显示红色。
当数据另一个状态时,字体显示黑色。
绑定class有两种方式:
8.2.1. 对象语法 传给 :class (v-bind:class 的简写) 一个对象,以动态地切换 class
1 2 3 4 5 6 7 8 9 10 11 12 13 14 15 16 17 18 19 20 21 22 23 24 25 26 27 28 29 30 31 32 33 34 35 36 37 38 39 40 41 42 43 44 45 46 47 48 49 50 51 52 53 54 55 56 57 58 59 60 61 62 63 64 65 66 67 68 <!DOCTYPE html > <html lang ="en" > <head > <meta charset ="UTF-8" > <meta http-equiv ="X-UA-Compatible" content ="IE=edge" > <meta name ="viewport" content ="width=device-width, initial-scale=1.0" > <title > Document</title > <style > div { width : 200px ; height : 200px ; } .active { background-color : red; } </style > </head > <body > <div id ="app" > </div > <template id ="vue" > <div > <div :class = "className" > </div > <div :class ="{'active':isActive}" > </div > <button @click ="toggle" > 转换</button > <div :class ="{active : isActive, title : true}" > </div > <div :class = "classObj" > </div > <div :class ="getClassObj()" > </div > </div > </template > <script src ="https://unpkg.com/vue@next" > </script > <script > Vue .createApp ({ template : '#vue' , data : function ( return { className : 'active' , isActive : false , classObj :{ active : true , title : true } } }, methods : { toggle ( this .isActive = !this .isActive ; }, getClassObj ( return { active : true , title : true } } } }).mount ("#app" ); </script > </body > </html >
8.2.2. 数组语法 把一个数组传给 :class,以应用一个 class 列表;
1 2 3 4 5 6 7 8 9 10 11 12 13 14 15 16 17 18 19 20 21 22 23 24 25 26 27 28 29 30 31 32 33 34 35 36 37 38 39 40 41 42 43 44 45 46 47 48 49 50 51 <!DOCTYPE html > <html lang ="en" > <head > <meta charset ="UTF-8" > <meta http-equiv ="X-UA-Compatible" content ="IE=edge" > <meta name ="viewport" content ="width=device-width, initial-scale=1.0" > <title > Document</title > <style > div { width : 200px ; height : 200px ; } .active { background-color : red; } .black { border : 2px solid black; } </style > </head > <body > <div id ="app" > </div > <template id ="vue" > <div > <div :class = "['class1',className]" > </div > <div :class ="['class1',className,isActive? 'active':'']" > </div > <div :class ="['class1',className,{'active':isActive}]" > </div > </div > </template > <script src ="https://unpkg.com/vue@next" > </script > <script > Vue .createApp ({ template : '#vue' , data : function ( return { className : 'black' , isActive : true } } }).mount ("#app" ); </script > </body > </html >
8.3. 绑定style
8.3.1. 对象语法 1 2 3 4 5 6 7 8 9 10 11 12 13 14 15 16 17 18 19 20 21 22 23 24 25 26 27 28 29 30 31 32 33 34 35 36 37 38 39 40 41 42 43 44 45 46 47 48 49 50 51 52 53 54 55 <!DOCTYPE html > <html lang ="en" > <head > <meta charset ="UTF-8" > <meta http-equiv ="X-UA-Compatible" content ="IE=edge" > <meta name ="viewport" content ="width=device-width, initial-scale=1.0" > <title > Document</title > <style > div { width : 150px ; height : 50px ; } </style > </head > <body > <div id ="app" > </div > <template id ="vue" > <div > <div :style = "{color:'red', fontSize: '30px'}" > {{message}}</div > <div :style ="{color:'yellow', fontSize: size+'px'}" > {{message}}</div > <div :style = "styleObj" > {{message}}</div > <div :style = "getStyleObj()" > {{message}}</div > </div > </template > <script src ="https://unpkg.com/vue@next" > </script > <script > Vue .createApp ({ template : '#vue' , data : function ( return { message : 'Hello style' , size : 20 } }, methods : { styleObj ( return { color : 'purple' , fontSize : '15px' } } } }).mount ("#app" ); </script > </body > </html >
8.3.2. 数组语法 可以将多个样式对象应用到同一个元素上
1 2 3 4 5 6 7 8 9 10 11 12 13 14 15 16 17 18 19 20 21 22 23 24 25 26 27 28 29 30 31 32 33 34 35 36 37 38 39 40 41 42 43 <!DOCTYPE html > <html lang ="en" > <head > <meta charset ="UTF-8" > <meta http-equiv ="X-UA-Compatible" content ="IE=edge" > <meta name ="viewport" content ="width=device-width, initial-scale=1.0" > <title > Document</title > <style > div { width : 150px ; height : 50px ; } </style > </head > <body > <div id ="app" > </div > <template id ="vue" > <div > <div :style ="[styleObj1,styleObj2]" > {{message}} - array</div > </div > </template > <script src ="https://unpkg.com/vue@next" > </script > <script > Vue .createApp ({ template : '#vue' , data : function ( return { message : 'Hello style' , styleObj1 :{ 'border-bottom' : '1px solid #354' , 'text-align' : 'center' }, styleObj2 : { 'border-top' : '1px solid #354' } } } }).mount ("#app" ); </script > </body > </html >
8.4. 动态绑定属性
在某些情况下,属性的名称可能也不是固定的:
无论绑定src、href、class、style,属性名称都是固定的;
如果属性名称不是固定的,可以使用 :[属性名]="值" 的格式来定义;
这种绑定的方式,称之为动态绑定属性;
1 2 3 4 5 6 7 8 9 10 11 12 13 14 15 16 17 18 19 20 21 22 23 <body > <div id ="app" > </div > <template id ="vue" > <div : [name ]="value" > {{message}} </div > </template > <script src ="https://unpkg.com/vue@next" > </script > <script > Vue .createApp ({ template : '#vue' , data : function ( return { message : 'Hello' , name : 'style' , value : { color : 'red' } } } }).mount ("#app" ); </script > </body >
8.5. 绑定对象
1 2 3 4 5 6 7 8 9 10 11 12 13 14 15 16 17 18 19 20 21 22 23 24 <body > <div id ="app" > </div > <template id ="vue" > <div v-bind ="info" > {{message}} </div > </template > <script src ="https://unpkg.com/vue@next" > </script > <script > Vue .createApp ({ template : '#vue' , data : function ( return { message : 'Hello' , info : { name : 'mac' , age : 17 , height : 1.8 } } } }).mount ("#app" ); </script > </body >
得到结果
1 <div name ="mac" age ="17" height ="1.8" > Hello</div >
9. v-on
在前端开发中,需要经常和用户进行各种各样的交互:
监听用户发生的事件,比如点击、拖拽、键盘事件等等
在Vue中如何监听事件呢? 使用v-on指令
9.1. v-on的用法
v-on的使用:
缩写:@
预期:Function | Inline Statement | Object
参数:event
修饰符:
.stop - 调用 event.stopPropagation()。
.prevent - 调用 event.preventDefault()
.capture - 添加事件侦听器时使用 capture 模式
.self - 只当事件是从侦听器绑定的元素本身触发时才触发回调
.{keyAlias} - 仅当事件是从特定键触发时才触发回调
.once - 只触发一次回调
.left - 只当点击鼠标左键时触发
.right - 只当点击鼠标右键时触发
.middle - 只当点击鼠标中键时触发
.passive - { passive: true } 模式添加侦听器
用法:绑定事件监听
9.2. v-on的基本使用
使用v-on来监听一下点击的事件
v-on:click可以写成@click,是它的语法糖写法
也可以绑定其他的事件
如果希望一个元素绑定多个事件,可以传入一个对象
1 2 3 4 5 6 7 8 9 10 11 12 13 14 15 16 17 18 19 20 21 22 23 24 25 26 27 28 29 30 31 32 33 34 35 36 37 38 39 40 41 42 43 44 45 46 47 48 49 50 51 52 53 54 55 56 <!DOCTYPE html > <html lang ="en" > <head > <meta charset ="UTF-8" > <meta http-equiv ="X-UA-Compatible" content ="IE=edge" > <meta name ="viewport" content ="width=device-width, initial-scale=1.0" > <title > Document</title > <style > .active { width : 200px ; height : 100px ; background-color : pink; margin : 10px ; } </style > </head > <body > <div id ="app" > </div > <template id ="vue" > <h2 > {{counter}}</h2 > <button v-on:click ="counter++" > 绑定表达式</button > <button v-on:click = "btnClick" > 绑定methods方法</button > <button @click ="btnClick" > 语法糖</button > <div class ="active" @mousemove ="mouseMove" > 鼠标事件</div > <div class ="active" v-on ="{click:btnClick, mousemove:mouseMove}" > 绑定多个事件</div > </template > <script src ="https://unpkg.com/vue@next" > </script > <script > Vue .createApp ({ template : '#vue' , data : function ( return { counter : 10 } }, methods : { btnClick ( this .counter --; }, mouseMove ( console .log ("div区域" ); } } }).mount ("#app" ); </script > </body > </html >
9.3. v-on参数传递
当通过methods中定义方法,以供@click调用时,需要注意参数问题 :
情况一:如果该方法不需要额外参数,那么方法后的()可以不添加
但是注意:如果方法本身中有一个参数,那么会默认将原生事件event参数传递进去
情况二:如果需要同时传入某个参数,同时需要event时,可以通过$event传入事件
1 2 3 4 5 6 7 8 9 10 11 12 13 14 15 16 17 18 19 20 21 22 23 24 25 <body > <div id ="app" > </div > <template id ="vue" > <button @click ="btnClick" > 默认</button > <button @click = "btnClick2($event,'vue')" > 传入多个参数</button > </template > <script src ="https://unpkg.com/vue@next" > </script > <script > Vue .createApp ({ template : '#vue' , methods : { btnClick (event ){ console .log (event); }, btnClick2 (event,name ){ console .log (event,name); } } }).mount ("#app" ); </script > </body >
9.4. v-on的修饰符 v-on支持修饰符,修饰符相当于对事件进行了一些特殊的处理
.stop - 调用 event.stopPropagation()。
.prevent - 调用 event.preventDefault()
.capture - 添加事件侦听器时使用 capture 模式
.self - 只当事件是从侦听器绑定的元素本身触发时才触发回调
.{keyAlias} - 仅当事件是从特定键触发时才触发回调
.once - 只触发一次回调
.left - 只当点击鼠标左键时触发
.right - 只当点击鼠标右键时触发
.middle - 只当点击鼠标中键时触发
.passive - { passive: true } 模式添加侦听器
1 2 3 4 5 6 <template id ="vue" > <div > <button @click.stop ="btnClick" > 默认</button > </div > </template >
10. 条件渲染
10.1. v-if、v-else、v-else-if
v-if、v-else、v-else-if 用于根据条件来渲染某一块的内容:
这些内容只有在条件为true时,才会被渲染出来;
这三个指令与JavaScript的条件语句if、else、else if类似;
v-if的渲染原理:
v-if是惰性的;
当条件为false时,其判断的内容完全不会被渲染或者会被销毁掉;
当条件为true时,才会真正渲染条件块中的内容;
1 2 3 4 5 6 7 8 9 10 11 12 13 14 15 16 17 18 19 20 21 22 23 24 25 26 27 28 29 30 <!DOCTYPE html > <html lang ="en" > <head > <meta charset ="UTF-8" > <meta http-equiv ="X-UA-Compatible" content ="IE=edge" > <meta name ="viewport" content ="width=device-width, initial-scale=1.0" > <title > Document</title > </head > <body > <div id ="app" > </div > <template id ="vue" > <input type ="text" v-model.number ="score" > <h2 v-if ="score>90" > 优秀</h2 > <h2 v-else-if ="score>80" > 良好</h2 > <h2 v-else-if ="score>60" > 及格</h2 > <h2 v-else > 不及格</h2 > </template > <script src ="https://unpkg.com/vue@next" > </script > <script > Vue .createApp ({ template : '#vue' , data : function ( return { score : 90 } } }).mount ("#app" ); </script > </body > </html >
10.2. template元素
1 2 3 4 5 6 7 8 9 10 11 12 13 14 15 16 17 18 19 20 21 22 <body > <div id ="app" > </div > <template id ="vue" > <template v-if ="isShow" > <h2 > 哈哈哈</h2 > </template > <template v-else > <h2 > 呵呵呵</h2 > </template > </template > <script src ="https://unpkg.com/vue@next" > </script > <script > Vue .createApp ({ template : '#vue' , data : function ( return { isShow : false } } }).mount ("#app" ); </script > </body >
10.3. v-show v-show和v-if的用法看起来是一致的,也是根据一个条件决定是否显示元素或者组件:
1 2 3 4 5 6 7 8 9 10 11 12 13 14 15 16 17 <body > <div id ="app" > </div > <template id ="vue" > <h2 v-show ="isShow" > 哈哈哈</h2 > </template > <script src ="https://unpkg.com/vue@next" > </script > <script > Vue .createApp ({ template : '#vue' , data : function ( return { isShow : false } } }).mount ("#app" ); </script > </body >
v-show 修饰的元素表现为 <h2 style="display: none;">哈哈哈</h2>
10.4. v-show和v-if的区别
首先,在用法上的区别:
v-show是不支持template;
v-show不可以和v-else一起使用;
其次,本质的区别:
v-show元素无论是否需要显示到浏览器上,它的DOM实际都是有渲染的,只是通过CSS的display属性来进行切换;
v-if当条件为false时,其对应的原生压根不会被渲染到DOM中;
开发中如何进行选择呢?
如果原生需要在显示和隐藏之间频繁的切换,那么使用v-show;
如果不会频繁的发生切换,那么使用v-if;
11. 列表渲染
在真实开发中,往往会从服务器拿到一组数据,并且需要对其进行渲染。
这个时候可以使用v-for来完成;
v-for类似于JavaScript的for循环,可以用于遍历一组数据;
11.1. v-for基本使用
v-for的基本格式是 item in 数组:
在遍历一个数组的时候会经常需要拿到数组的索引:
11.2. v-for支持的类型
11.3. template元素
类似于v-if,使用 template 元素来循环渲染一段包含多个元素的内容:
使用template来对多个元素进行包裹,而不是使用div来完成;
1 2 3 4 5 6 7 8 9 10 11 12 13 14 15 16 17 18 19 20 21 22 23 24 25 26 27 28 29 30 31 <body > <div id ="app" > </div > <template id ="vue" > <ul > <template v-for ="(value,key) in info" > <li > {{key}}</li > <li > {{value}}</li > <hr > </template > </ul > </template > <script src ="https://unpkg.com/vue@next" > </script > <script > Vue .createApp ({ template : '#vue' , data : function ( return { info : { name : 'uname' , age : 18 , height : 1.8 } } } }).mount ("#app" ); </script > </body >
11.4. 数组更新检测
1 2 3 4 5 6 7 8 9 10 11 12 13 14 15 16 17 18 19 20 21 22 23 24 25 26 27 28 29 30 31 32 33 34 <body > <div id ="app" > </div > <template id ="vue" > <ul > <li v-for ="(value,index) in movies" > {{index}}-{{value}} </li > </ul > <input type ="text" v-model ="txt" > <button @click ="addMovie" > 添加</button > </template > <script src ="https://unpkg.com/vue@next" > </script > <script > Vue .createApp ({ template : '#vue' , data : function ( return { movies : [ "战狼" , "盗梦空间" , "当幸福来敲门" ], txt : "" } }, methods : { addMovie ( this .movies .push (this .txt ); this .txt = "" ; } } }).mount ("#app" ); </script > </body >
11.5. v-for中的key是什么作用?
11.6. 认识VNode
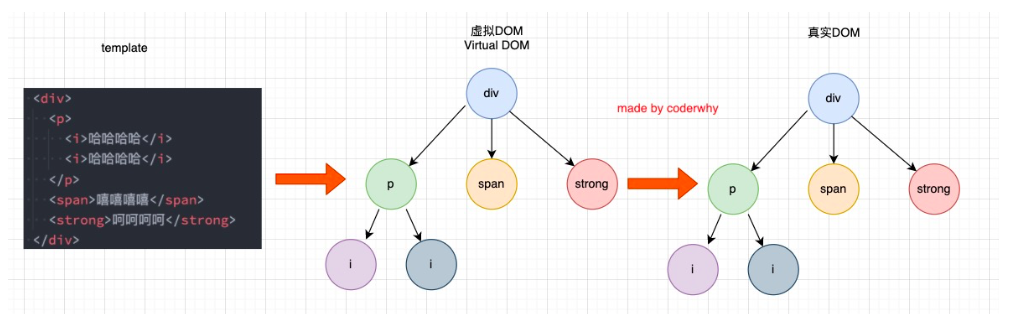
先来解释一下VNode的概念:
先理解HTML元素创建出来的VNode;
VNode的全称是Virtual Node,也就是虚拟节点;
事实上,无论是组件还是元素,它们最终在Vue中表示出来的都是一个个VNode;
VNode的本质是一个JavaScript的对象;
流程图为:template -> VNode -> 真实DOM
1 <div class ="title" style ="font-size:30px; color:red;" > 哈哈哈</div >
对应 VNode
1 2 3 4 5 6 7 8 9 10 11 const vnode = { type : "div" , props : { class : "title" , style : { "font-size" : "30px" , color : "red" } }, children : "哈哈哈" }
11.7. 虚拟DOM 如果不只是一个简单的div,而是有一大堆的元素,那么它们应该会形成一个VNode Tree:
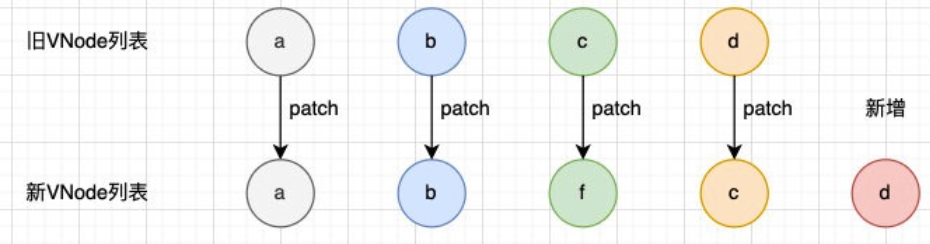
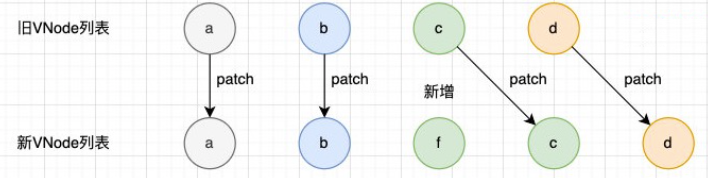
11.8. 插入F的案例 先来看一个案例—这个案例是当点击按钮时会在中间插入一个f;
可以确定的是,这次更新对于ul和button是不需要进行更新,需要更新的是li的列表:
在Vue中,对于相同父元素的子元素节点并不会重新渲染整个列表;
因为对于列表中 a、b、c、d 它们都是没有变化的;
在操作真实DOM的时候,我们只需要在中间插入一个f的li即可;
那么Vue中对于列表的更新究竟是如何操作的呢?
Vue事实上会对于有key和没有key会调用两个不同的方法;
有key,那么就使用 patchKeyedChildren方法;
没有key,那么久使用 patchUnkeyedChildren方法;
1 2 3 4 5 6 7 8 9 10 11 12 13 14 15 16 17 18 19 20 21 22 23 24 25 26 27 28 29 30 31 32 33 34 <body > <div id ="app" > </div > <template id ="vue" > <ul > <li v-for ="item in letters" > {{item}}</li > </ul > <button @click ="insertF" > 插入 f</button > </template > <script src ="https://unpkg.com/vue@next" > </script > <script > Vue .createApp ({ template : '#vue' , data : function ( return { letters : ["a" ,"b" ,"c" ,"d" ] } }, methods : { insertF ( this .letters .splice (2 ,0 ,'f' ); } } }).mount ("#app" ); </script > </body >
11.9. Vue源码对于key的判断 packages/runtime-core/src/renderer.ts
1 2 3 4 5 6 7 8 9 10 11 12 13 14 15 16 17 18 19 20 21 22 23 24 25 26 27 28 29 30 if (patchFlag & PatchFlags .KEYED_FRAGMENT ) { patchKeyedChildren ( c1 as VNode [], c2 as VNodeArrayChildren , container, anchor, parentComponent, parentSuspense, isSVG, slotScopeIds, optimized ) return } else if (patchFlag & PatchFlags .UNKEYED_FRAGMENT ) { patchUnkeyedChildren ( c1 as VNode [], c2 as VNodeArrayChildren , container, anchor, parentComponent, parentSuspense, isSVG, slotScopeIds, optimized ) return }
11.9.1. 没有key的操作(源码) 1 2 3 4 5 6 7 8 9 10 11 12 13 14 15 16 17 18 19 20 21 22 23 24 25 26 27 28 29 30 31 32 33 34 35 36 37 const patchUnkeyedChildren = ( c1: VNode[], c2: VNodeArrayChildren const oldLength = c1.length const newLength = c2.length const commonLength = Math .min (oldLength, newLength) let i for (i = 0 ; i < commonLength; i++) { const nextChild = (c2[i] = optimized ? cloneIfMounted (c2[i] as VNode ) : normalizeVNode (c2[i])) patch ( c1[i], nextChild ) } if (oldLength > newLength) { unmountChildren ( c1 ) } else { mountChildren ( c2 ) } }
会发现上面的diff算法效率并不高:
c和d来说事实上并不需要有任何的改动;
但是因为c被f所使用了,所有后续所有的内容都要一次进行改动,并且最后进行新增;
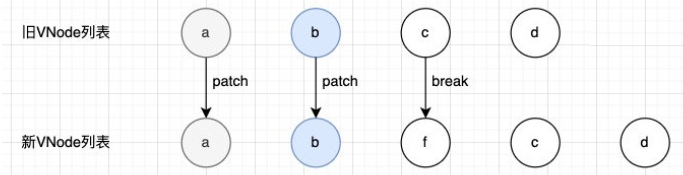
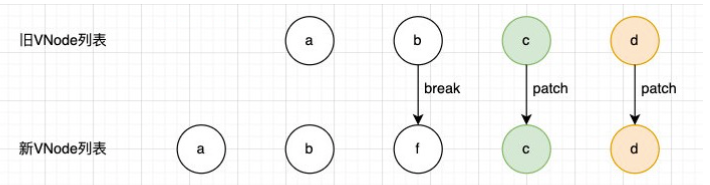
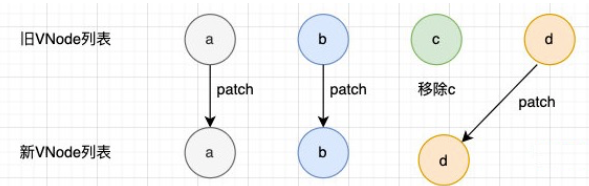
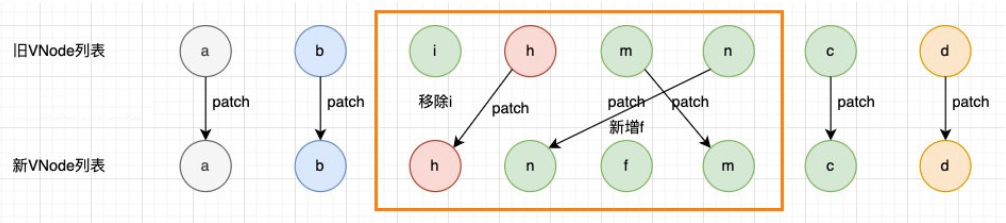
11.9.2. 有key执行操作(源码) 1 2 3 4 5 6 7 8 9 10 11 12 13 14 15 16 17 18 19 20 21 22 23 24 25 26 27 28 29 30 31 32 33 34 35 36 37 38 39 40 41 42 43 44 45 46 47 48 49 50 51 52 53 54 55 56 57 58 59 60 61 62 const patchKeyedChildren = ( c1: VNode[], c2: VNodeArrayChildren let i = 0 const l2 = c2.length let e1 = c1.length - 1 let e2 = l2 - 1 while (i <= e1 && i <= e2) { const n1 = c1[i] const n2 = c2[i] if (isSameVNodeType (n1, n2)) { patch () } else { break } i++ } while (i <= e1 && i <= e2) { const n1 = c1[e1] const n2 = c2[e2] if (isSameVNodeType (n1, n2)) { patch () } else { break } e1-- e2-- } if (i > e1) { if (i <= e2) { const nextPos = e2 + 1 const anchor = nextPos < l2 ? (c2[nextPos] as VNode ).el : parentAnchor while (i <= e2) { patch () i++ } } } else if (i > e2) { while (i <= e1) { unmount (c1[i], parentComponent, parentSuspense, true ) i++ } } else { } }
第一步的操作是从头开始进行遍历、比较:
第二步的操作是从尾部开始进行遍历、比较:
第三步是如果旧节点遍历完毕,但是依然有新的节点,那么就新增节点:
第四步是如果新的节点遍历完毕,但是依然有旧的节点,那么就移除旧节点:
第五步是最特色的情况,中间还有很多未知的或者乱序的节点:
可以发现,Vue在进行diff算法的时候,会尽量利用key来进行优化操作:
在没有key的时候效率是非常低效的;
在进行插入或者重置顺序的时候,保持相同的key可以让diff算法更加的高效;
12. 计算属性 computed 12.1. 复杂data的处理方式
在模板中可以直接通过插值语法 显示一些data中的数据 。
但是在某些情况,可能需要对数据进行一些转化后 再显示,或者需要将多个数据结合起来 进行显示;
比如需要对多个data数据进行运算、三元运算符来决定结果、数据进行某种转化后显示;
在模板中使用表达式,可以非常方便的实现,但是设计它们的初衷是用于简单的运算;
在模板中放入太多的逻辑会让模板过重和难以维护;
并且如果多个地方都使用到,那么会有大量重复的代码;
有没有什么方法可以将逻辑抽离出去呢?
可以,其中一种方式就是将逻辑抽取到一个method中,放到methods的options中;
但是,这种做法有一个直观的弊端,就是所有的data使用过程都会变成了一个方法的调用;
另外一种方式就是使用计算属性computed;
12.2. 认识计算属性computed
12.3. 案例实现思路
案例一:两个变量:firstName和lastName,希望它们拼接之后在界面上显示;
案例二:有一个分数:score
当score大于60的时候,在界面上显示及格;
当score小于60的时候,在界面上显示不及格;
案例三:有一个变量message,记录一段文字:比如Hello World
某些情况下我们是直接显示这段文字;
某些情况下我们需要对这段文字进行反转;
有三种实现思路:
思路一:在模板语法中直接使用表达式;
思路二:使用method对逻辑进行抽取;
思路三:使用计算属性computed;
12.3.1. 实现思路一:模板语法
缺点一:模板中存在大量的复杂逻辑,不便于维护(模板中表达式的初衷是用于简单的计算);
缺点二:当有多次一样的逻辑时,存在重复的代码;
缺点三:多次使用的时候,很多运算也需要多次执行,没有缓存;
1 2 3 4 5 6 7 8 9 10 11 12 13 14 15 16 17 18 19 20 21 22 <body > <div id ="app" > </div > <template id ="vue" > <h2 > {{firstName + lastName}}</h2 > <h2 > {{score>60?'及格':'不及格'}}</h2 > <h2 > {{message.split("").reverse().join("")}}</h2 > </template > <script src ="https://unpkg.com/vue@next" > </script > <script > Vue .createApp ({ template : '#vue' , data : function ( return { firstName : 'John' , lastName : 'H' , message : 'Hello World' , score : 80 } } }).mount ("#app" ); </script > </body >
12.3.2. 实现思路二:method实现
缺点一:事实上先显示的是一个结果,但是都变成了一种方法的调用;
缺点二:多次使用方法的时候,没有缓存,也需要多次计算;
1 2 3 4 5 6 7 8 9 10 11 12 13 14 15 16 17 18 19 20 21 22 23 24 25 26 27 28 29 30 31 32 33 <body > <div id ="app" > </div > <template id ="vue" > <h2 > {{getName()}}</h2 > <h2 > {{getScore()}}</h2 > <h2 > {{getMessage()}}</h2 > </template > <script src ="https://unpkg.com/vue@next" > </script > <script > Vue .createApp ({ template : '#vue' , data : function ( return { firstName : 'John' , lastName : 'H' , message : 'Hello World' , score : 80 } }, methods : { getName ( return this .firstName + this .lastName ; }, getScore ( return this .score >60 ?'及格' :'不及格' ; }, getMessage ( return this .message .split ("" ).reverse ().join ("" ); } } }).mount ("#app" ); </script > </body >
12.3.3. 实现思路三:computed实现
注意:计算属性看起来像是一个函数,但是在使用的时候不需要加();
无论是直观上,还是效果上计算属性都是更好的选择;
并且计算属性是有缓存的;
1 2 3 4 5 6 7 8 9 10 11 12 13 14 15 16 17 18 19 20 21 22 23 24 25 26 27 28 29 30 31 32 33 <body > <div id ="app" > </div > <template id ="vue" > <h2 > {{getName}}</h2 > <h2 > {{getScore}}</h2 > <h2 > {{getMessage}}</h2 > </template > <script src ="https://unpkg.com/vue@next" > </script > <script > Vue .createApp ({ template : '#vue' , data : function ( return { firstName : 'John' , lastName : 'H' , message : 'Hello World' , score : 80 } }, computed : { getName ( return this .firstName + this .lastName ; }, getScore ( return this .score >60 ?'及格' :'不及格' ; }, getMessage ( return this .message .split ("" ).reverse ().join ("" ); } } }).mount ("#app" ); </script > </body >
12.3.4. 计算属性 vs methods
计算属性和methods的实现看起来是差别是不大的,而且 计算属性有缓存的
同一个计算多次使用,计算属性和methods的差异:
1 2 3 4 5 6 7 8 9 10 11 12 13 14 15 16 17 18 19 20 21 22 23 24 25 26 27 28 29 30 31 32 33 34 35 <body > <div id ="app" > </div > <template id ="vue" > <h2 > {{result}}</h2 > <h2 > {{result}}</h2 > <h2 > {{result}}</h2 > <h2 > {{getScore()}}</h2 > <h2 > {{getScore()}}</h2 > <h2 > {{getScore()}}</h2 > </template > <script src ="https://unpkg.com/vue@next" > </script > <script > Vue .createApp ({ template : '#vue' , data : function ( return { score : 80 } }, methods : { getScore ( console .log ("调用了getScore方法" ); return this .score >60 ?'及格' :'不及格' ; } }, computed : { result ( console .log ("调用了计算属性result的getter" ); return this .score >60 ?'及格' :'不及格' ; } } }).mount ("#app" ); </script > </body >
结果
1 2 3 4 computer-methods.html:40 调用了计算属性result的getter computer-methods.html:34 调用了getScore方法 computer-methods.html:34 调用了getScore方法 computer-methods.html:34 调用了getScore方法
12.4. 计算属性的缓存
这是什么原因呢?
这是因为计算属性会基于它们的依赖关系进行缓存;
在数据不发生变化时,计算属性是不需要重新计算的;
但是如果依赖的数据发生变化,在使用时,计算属性依然会重新进行计算;
12.5. 计算属性的setter和getter
计算属性在大多数情况下,只需要一个getter方法 即可,会将计算属性直接写成一个函数 。
但是,如果确实想设置计算属性的值 呢?
1 2 3 4 5 6 7 8 9 10 11 12 13 14 15 16 17 18 19 20 21 22 23 24 25 26 27 28 29 30 31 32 33 34 <body > <div id ="app" > </div > <template id ="vue" > <h2 > {{fullName="getter setter"}}</h2 > <h2 > {{firstName}}</h2 > <h2 > {{lastName}}</h2 > </template > <script src ="https://unpkg.com/vue@next" > </script > <script > Vue .createApp ({ template : '#vue' , data : function ( return { firstName : '' , lastName : '' } }, computed : { fullName :{ get :function ( return this .firstName +" " +this .lastName ; }, set :function (value ){ const name = value.split (" " ); this .firstName = name[0 ]; this .lastName = name[1 ]; } } } }).mount ("#app" ); </script > </body >
12.6. 源码如何对setter和getter处理呢?
Vue内部是如何对传入的是一个getter,还是说是一个包含setter和getter的对象进行处理的呢?
事实上非常的简单,Vue源码内部只是做了一个逻辑判断而已;
/packages/runtime-core/src/componentOptions.ts
1 2 3 4 5 6 7 8 9 10 11 12 13 14 15 16 17 18 19 20 21 22 23 24 25 26 27 28 29 30 31 32 33 34 35 36 37 38 if (computedOptions) { for (const key in computedOptions) { const opt = (computedOptions as ComputedOptions )[key] const get = isFunction (opt) ? opt.bind (publicThis, publicThis) : isFunction (opt.get ) ? opt.get .bind (publicThis, publicThis) : NOOP if (__DEV__ && get === NOOP ) { warn (`Computed property "${key} " has no getter.` ) } const set = !isFunction (opt) && isFunction (opt.set ) ? opt.set .bind (publicThis) : __DEV__ ? () => { warn ( `Write operation failed: computed property "${key} " is readonly.` ) } : NOOP const c = computed ({ get, set }) Object .defineProperty (ctx, key, { enumerable : true , configurable : true , get : () => c.value , set : v =>value = v) }) if (__DEV__) { checkDuplicateProperties!(OptionTypes .COMPUTED , key) } } }
13. watch 13.1. 认识侦听器watch
在data返回的对象中定义了数据,这个数据通过插值语法等方式绑定到template中;
当数据变化时,template会自动进行更新来显示最新的数据;
但是在某些情况下,希望在代码逻辑中监听某个数据的变化,这个时候就需要用侦听器watch来完成了;
侦听器的用法如下:
选项:watch
类型:{ [key: string]: string | Function | Object | Array}
13.2. 侦听器案例
举个例子:
每当用户输入了最新的内容,获取到最新的内容;
那么,就需要实时的去获取最新的数据变化;
1 2 3 4 5 6 7 8 9 10 11 12 13 14 15 16 17 18 19 20 21 22 <body > <div id ="app" > </div > <template id = "vue" > <input type ="text" v-model ="question" > </template > <script src ="https://unpkg.com/vue@next" > </script > <script > Vue .createApp ({ template : '#vue' , data : function ( return { question : "" } }, watch : { question (newValue,oldValue ){ console .log (newValue,oldValue); } } }).mount ("#app" ); </script > </body >
13.3. 侦听器watch的配置选项
例子:
当点击按钮的时候会修改info.name的值;
这个时候使用watch来侦听info,可以侦听到吗?答案是不可以。
这是因为默认情况下,watch只是在侦听info的引用变化 ,对于内部属性的变化是不会做出响应 的:
这个时候可以使用一个选项deep进行更深层的侦听;
watch里面侦听的属性对应的也可以是一个Object;
还有另外一个属性 ,是希望一开始的就会立即执行一次 :
这个时候使用immediate选项;
这个时候无论后面数据是否有变化,侦听的函数都会有限执行一次;
对象中的对象采用的是浅拷贝,指向同一个地址,info的newValue,oldValue中 hobbies是一样的值
1 2 3 4 5 6 7 8 9 10 11 12 13 14 15 16 17 18 19 20 21 22 23 24 25 26 27 28 29 30 31 32 33 34 35 36 37 38 39 <body > <div id ="app" > </div > <template id = "vue" > <input type ="text" v-model ="info.hobbies.name" > <h2 > {{info}}</h2 > </template > <script src ="https://unpkg.com/vue@next" > </script > <script > Vue .createApp ({ template : '#vue' , data : function ( return { info : { name : 'H John' , age : 18 , hobbies : { name : 'ball' } } } }, watch : { info : { handler : function (newValue,oldValue ){ console .log (newValue,oldValue); }, deep : true , immediate : true }, 'info.hobbies.name' : function (newValue,oldValue ){ console .log (newValue,oldValue); }, } }).mount ("#app" ); </script > </body >
13.4. 侦听器watch的其他方式 13.4.1. 回调数组 1 2 3 4 5 6 7 8 9 10 11 12 13 14 15 16 17 18 19 20 21 22 23 24 25 26 27 28 29 30 31 32 33 34 35 36 37 <body > <div id ="app" > </div > <template id = "vue" > <input type ="text" v-model ="info" > </template > <script src ="https://unpkg.com/vue@next" > </script > <script > Vue .createApp ({ template : '#vue' , data : function ( return { info : "" } }, watch : { info : [ "handle1" , function handle2 (val, oldVal) { console .log ("handle2 trigger" ); }, { handler : function handle3 (val,oldVal ){ console .log ("handle3 trigger" ); } } ] }, methods : { handle1 : function (val,oldVal ){ console .log (val,oldVal); } } }).mount ("#app" ); </script > </body >
13.4.2. $watch
在created的生命周期)中,使用 this.$watchs 来侦听;
第一个参数是要侦听的源;
第二个参数是侦听的回调函数callback;
第三个参数是额外的其他选项,比如deep、immediate;
1 2 3 4 5 6 7 8 created ( this .$watch('message' ,(newValue,oldValue )=> { console .log (newValue,oldValue); },{ deep : true , imediate : true }) }
14. v-model
表单提交 是开发中非常常见的功能,也是和用户交互的重要手段:
比如用户在登录、注册时需要提交账号密码;
比如用户在检索、创建、更新信息时,需要提交一些数据;
这些都要求在代码逻辑中获取到用户提交的数据 ,通常会使用v-model指令 来完成:
v-model指令可以在表单 input、textarea以及select元素上创建双向数据绑定;
它会根据控件类型自动选取正确的方法来更新元素;
尽管有些神奇,但 v-model 本质上不过是语法糖,它负责监听用户的输入事件来更新数据,并在某种极端场景 下进行一些特殊处理;
1 2 3 4 <template > <input type ="text" v-model ="message" > <h2 > {{message}}</h2 > </template >
14.1. v-model的原理
官方有说到,v-model的原理 其实是背后有两个操作:
v-bind绑定value属性的值;
v-on绑定input事件监听到函数中,函数会获取最新的值赋值到绑定的属性中;
1 2 3 <input type ="text" v-model ="message" > <input type ="text" :value ="message" @input ="message=$event.target.value" >
14.2. v-model 源码 /packages/runtime-dom/src/directives/vModel.ts
1 2 3 4 5 6 7 8 9 10 11 12 13 14 15 16 17 18 19 20 21 22 23 24 25 26 27 28 29 export const vModelText : ModelDirective <HTMLInputElement | HTMLTextAreaElement > = { created (el, { modifiers: { lazy, trim, number } }, vnode ) { el._assign = getModelAssigner (vnode) const castToNumber = number || (vnode.props && vnode.props .type === 'number' ) addEventListener (el, lazy ? 'change' : 'input' , e => if ((e.target as any ).composing ) return let domValue : string | number = el.value if (trim) { domValue = domValue.trim () } if (castToNumber) { domValue = toNumber (domValue) } el._assign (domValue) }) }, beforeUpdate (el, { value, modifiers: { lazy, trim, number } }, vnode ) { el._assign = getModelAssigner (vnode) } } const getModelAssigner = (vnode : VNode ): AssignerFn => const fn = vnode.props !['onUpdate:modelValue' ] || (__COMPAT__ && vnode.props !['onModelCompat:input' ]) return isArray (fn) ? value =>invokeArrayFns (fn, value) : fn }
14.3. v-model绑定textarea 1 2 3 <label for ="intro" > <textarea id ="intro" v-model ="article" > </textarea > </label >
14.4. v-model绑定checkbox
14.5. v-model绑定radio 用于选择其中一项,选择的是input的value值
1 2 3 4 5 6 7 8 9 <div > <label for ="male" > <input type ="radio" value ="male" id ="male" v-model ="gender" > male </label > <label for ="female" > <input type ="radio" value ="female" id ="female" v-model ="gender" > female </label > <h2 > {{gender}}</h2 > </div >
14.6. v-model绑定select
14.7. v-model的值绑定
在真实开发中,数据是来自服务器的,先将值请求下来,绑定到data返回的对象中, 再通过v-bind来进行值的绑定,这个过程就是值绑定
14.8. v-model修饰符 14.8.1. lazy
默认情况下,v-model在进行双向绑定时,绑定的是 input事件,那么会在每次内容输入后就将最新的值和绑定 的属性进行同步;
如果在v-model后跟上lazy修饰符,那么会将绑定的事件切换为 change 事件,只有在提交时(比如回车) 才会触发;
1 <input type ="text" v-model.lazy ="message" >
14.8.2. number
14.8.3. trim 如果要自动过滤用户输入的空白字符,可以给v-model添加 trim 修饰符:
1 <input type ="text" v-model.trim ="message" >