http模块,express,koa
1. Http模块
1.1. Web服务器
什么是Web服务器?
当应用程序(客户端)需要某一个资源时,可以向一个台服务器,通过Http请求获取到这个资源;
提供资源的这个服务器,就是一个Web服务器;
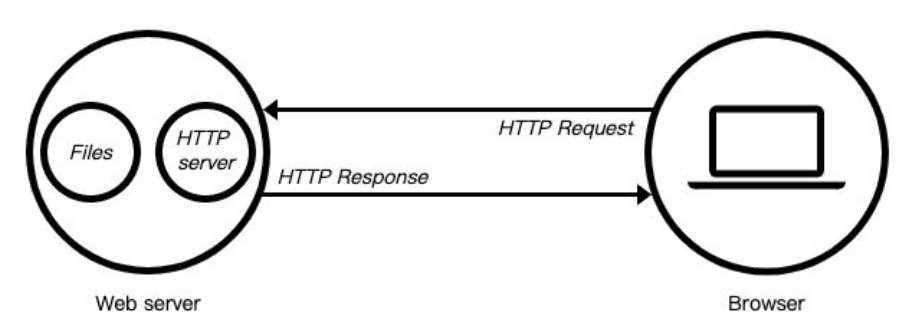
目前有很多开源的Web服务器:Nginx、Apache(静态)、Apache Tomcat(静态、动态)、Node.js
1.2. Web服务器初体验
1 | const http = require("http"); |
1.3. 创建服务器
创建服务器对象,通过 createServer 来完成
http.createServer会返回服务器的对象;
底层其实使用直接 new Server 对象
1
2
3
4
5
6
7
8
9
10function createServer(opts, requestListener) {
return new Server(opts, requestListener);
}
type RequestListener = (req: IncomingMessage, res: ServerResponse) => void;
// 故request,response本质还是stream
class IncomingMessage extends stream.Readable {}
class ServerResponse extends OutgoingMessage {}
class OutgoingMessage extends stream.Writable {}创建Server时会传入一个回调函数,这个回调函数在被调用时会传入两个参数:
- req:request请求对象,包含请求相关的信息;
- res:response响应对象,包含要发送给客户端的信息;
也可以通过new方式创建web服务器
1
2
3
4
5
6
7
8const http = require("http");
const server2 = new http.Server((req,res)=>{
res.end("server2");
})
server2.listen("5501",()=>{
console.log("开启 http://localhost:5501/");
});
1.4. 监听主机和端口号
1 | // ?表示可选参数 |
- Server通过listen方法来开启服务器,并且在某一个主机和端口上监听网络请求:
- 也就是通过
ip:port的方式发送到监听的Web服务器上时,就可以对其进行相关的处理; - listen函数有三个参数:
端口port:可以不传, 系统会默认分配端,通过server.adderss().port获取当前端口号;主机host:通常可以传入localhost、ip地址127.0.0.1、或者ip地址0.0.0.0,默认是0.0.0.0;- localhost:本质上是一个域名,通常情况下会被解析成127.0.0.1;
- 127.0.0.1:回环地址(Loop Back Address),表达的意思其实是主机自己发出去的包,直接被自己接收;
- 正常的数据库包经常 应用层 - 传输层 - 网络层 - 数据链路层 - 物理层 ;
- 而回环地址,是在网络层直接就被获取到了,是不会经常数据链路层和物理层的;
- 比如监听 127.0.0.1时,在同一个网段下的主机中,通过ip地址是不能访问的;
- 0.0.0.0:
- 监听IPV4上所有的地址,再根据端口找到不同的应用程序;
- 比如监听 0.0.0.0时,在同一个网段下的主机中,通过ip地址是可以访问的;
回调函数:服务器启动成功时的回调函数;
1.5. request对象
在向服务器发送请求时,会携带很多信息,比如:
- 本次请求的URL,服务器需要根据不同的URL进行不同的处理;
- 本次请求的请求方式,比如GET、POST请求传入的参数和处理的方式是不同的;
- 本次请求的headers中也会携带一些信息,比如客户端信息、接受数据的格式、支持的编码格式等;
- …
这些信息,Node会封装到一个request的对象中,可以直接来处理这个request对象:
1
2
3
4
5
6
7
8
9
10
11
12const http = require("http");
const server = http.createServer((request,response)=>{
console.log(request.url);
console.log(request.method);
console.log(request.headers);
response.end("Hello Node");
})
server.listen("5500",()=>{
console.log("开启 http://localhost:5500/");
});
1.6. URL的处理
客户端在发送请求时,会请求不同的数据,那么会传入不同的请求地址:
服务器端需要根据不同的请求地址,作出不同的响应:
1
2
3
4
5
6
7
8
9
10
11
12
13
14
15
16
17
18const http = require("http");
const server = http.createServer((request,response)=>{
const url = request.url;
if(url === '/login'){
response.end("Hello login");
}
else if( url === '/products'){
response.end("Hello products");
}else{
response.end("error message");
}
})
server.listen("5500",()=>{
console.log("开启 http://localhost:5500/");
});
1.7. URL的解析
如果用户发送的地址中还携带一些额外的参数呢?
- http://localhost:5500/login?username=why&password=123
- 这个时候,url的值是 /login?username=why&password=123;
如何对它进行解析呢?
使用内置模块url
1
2
3
4
5
6
7
8
9
10
11
12const http = require("http");
const url = require("url");
const server = http.createServer((request,response)=>{
const info = url.parse(request.url);
console.log(info);
response.end("Hello");
})
server.listen("5500",()=>{
console.log("开启 http://localhost:5500/");
});得到数据
1
2
3
4
5
6
7
8
9
10
11
12
13
14Url {
protocol: null,
slashes: null,
auth: null,
host: null,
port: null,
hostname: null,
hash: null,
search: '?username=why&password=123',
query: 'username=why&password=123',
pathname: '/login',
path: '/login?username=why&password=123',
href: '/login?username=why&password=123'
}
但是 query 信息如何可以获取呢?
1
2
3
4
5
6
7
8
9
10
11const http = require("http");
const url = require("url");
const qs = require("querystring");
const server = http.createServer((request,response)=>{
const {query} = url.parse(request.url);
const {name,password} = qs.parse(query);
response.end(name+" "+password);
});
1.8. method的处理
在Restful规范(设计风格)中,对于数据的增删改查应该通过不同的请求方式
GET:查询数据;
POST:新建数据;
PATCH:更新数据;
DELETE:删除数据;
所以,可以通过判断不同的请求方式进行不同的处理,比如创建一个用户:
- 请求接口为 /login;
- 请求方式为 POST 请求;
- 携带数据 username 和 password;
1.9. 创建用户接口
在程序中如何进行判断以及获取对应的数据呢?
需要判断接口是 /users,并且请求方式是POST方法去获取传入的数据;
获取这种body携带的数据,需要通过监听 req 的 data事件来获取;
将JSON字符串格式化转成对象类型,通过JSON.parse方法即可;
1
2
3
4
5
6
7
8
9
10
11
12
13
14
15
16
17
18
19
20
21
22
23
24
25
26
27
28
29
30
31const http = require("http");
const server = http.createServer((request,response)=>{
const {pathname,query} = url.parse(request.url);
const method = request.method;
// console.log(method);
if(pathname === '/users'){
if(method === 'GET'){
const {username,password} = qs.parse(query);
response.end(method+" "+username+" "+password);
}
else{
request.setEncoding("utf8");
request.on("data",(data)=>{
// console.log(data);
const {username,password} = JSON.parse(data);
response.end(method+" "+username+" "+password);
console.log(username+" "+password);
});
request.on("end",()=>{
console.log("传输结束");
});
}
}
else{
response.end("error message");
}
})
1.10. headers属性
在request对象的header中包含很多有用的信息,客户端会默认传递过来一些信息
1 | { |
content-type是这次请求携带的数据的类型:- application/json表示是一个json类型;
- text/plain表示是文本类型;
- application/xml表示是xml类型;
- multipart/form-data表示是上传文件;
content-length:文件的大小和长度keep-alive:http是基于TCP协议的,但是通常在进行一次请求和响应结束后会立刻中断;
在http1.0中,如果想要继续保持连接:
- 浏览器需要在请求头中添加 connection:keep-alive;
- 服务器需要在响应头中添加 connection:keey-alive;
- 当客户端再次放请求时,就会使用同一个连接,直接一方中断连接;
在http1.1中,所有连接默认是 connection:keep-alive的;
不同的Web服务器会有不同的保持 keep-alive的时间;
Node中默认是5s中;
https://nodejs.org/dist/latest-v16.x/docs/api/http.html#serverkeepalivetimeout
Default:
5000(5 seconds).
accept-encoding:告知服务器,客户端支持的文件压缩格式,比如js文件可以使用gzip编码,对应 .gz文件;accept:告知服务器,客户端可接受文件的格式类型;user-agent:客户端相关的信息;
1.11. 返回响应结果
如果希望给客户端响应的结果数据,可以通过两种方式:
Write方法:这种方式是直接写出数据,但是并没有关闭流;
1
2response.write("Hello write()");
response.end();end方法:这种方式是写出最后的数据,并且写出后会关闭流;
1
response.end("Hello end()");
如果没有调用 end,客户端将会一直等待结果:
- 所以客户端在发送网络请求时,都会设置超时时间。
1.12. 返回状态码
Http状态码(Http Status Code)是用来表示Http响应状态的数字代码:
Http状态码非常多,可以根据不同的情况,给客户端返回不同的状态码;
常见的状态码
状态代码 状态描述 说明 200 OK 客户端请求成功 400 Bad Request 由于客户端请求有语法错误,不能被服务器理解 401 Unauthorized 请求未经授权。这个状态代码必须和www-Authenticate报头域一起使用 403 Forbidden 服务器收到请求,但是拒绝提供服务。服务器通常会在响应正文中给出不提供服务的原因 404 Not Found 请求的资源不存在,例如,输入了错误的URL 500 Internal Server Error 服务器发生不可预期的错误,导致无法完成客户端的请求 503 Service Unavailable 服务器当前不能够处理客户端的请求,在一段时间之后,服务器可能会恢复正常 设置状态码常见的有两种方式
1
2
3response.statusCode = 404;
response.writeHead(400);
1.13. 响应头文件
返回头部信息,主要有两种方式:
res.setHeader:一次写入一个头部信息;
1
response.setHeader("Content-Type","application/json;charaset=utf8");
res.writeHead:同时写入header和status;
1
2
3response.writeHead(200,{
"Content-Type":"application/json;charaset=utf8"
})Header设置 Content-Type有什么作用呢?
默认客户端接收到的是字符串,客户端会按照自己默认的方式进行处理;
1
2response.setHeader("Content-Type","text/html;charaset=utf8");
response.end("<h1>why 123</h1>");
1
2response.setHeader("Content-Type","application/json;charaset=utf8");
response.end("<h1>why 123</h1>");
1.14. http请求
axios库可以在浏览器中使用,也可以在Node中使用:
在浏览器中,axios使用的是封装xhr;
在Node中,使用的是http内置模块;
1
2
3
4
5
6
7
8
9
10
11
12
13const http = require("http");
const server = http.createServer((request,response)=>{
const obj = {
username: 'root',
password: '123'
}
response.end(JSON.stringify(obj));
}
server.listen("5500",()=>{
console.log("开启 "+server.address().port);
});发送请求
1
2
3
4
5
6
7
8const http = require("http");
http.get("http://localhost:5500/",(res)=>{
res.on("data",data=>{
console.log(data.toString());
console.log(JSON.parse(data));
});
});或者是
1
2
3
4
5
6
7
8
9
10
11const req = http.request({
path: '/login?username=root&&password=132',
port: 5500,
hostname: 'localhost',
method: 'GET'
},res=>{
res.on("data",data=>{
console.log(data.toString());
});
});
req.end();
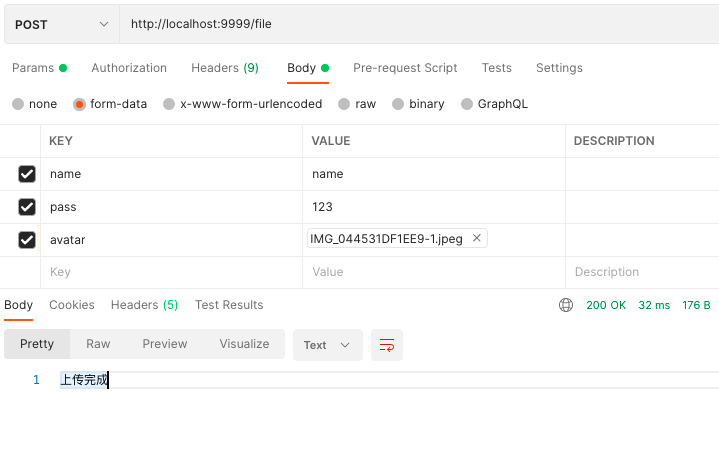
1.15. 文件上传
1.15.1. 错误示范
如果是一个很大的文件需要上传到服务器端,服务器端进行保存应该如何操作呢?
1 | const http = require("http"); |
写入的数据并不只有图片信息
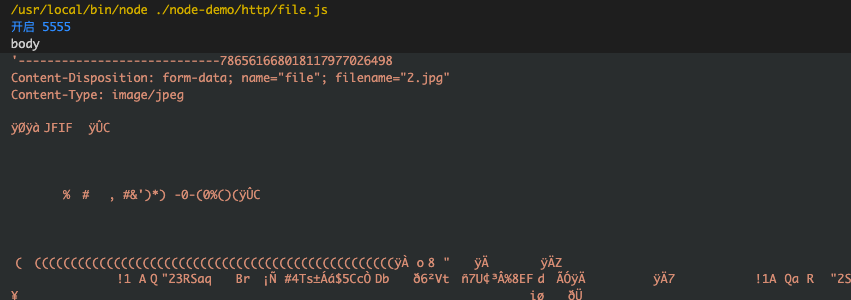
1.15.2. 实际数据
1 | const http = require("http"); |
断点调试
shift+command+D 选择运行和调试 node.js
得到body的数据中是含有文件信息
1.15.3. 正确做法
可以传入任何类型的文件
1 | const http = require("http"); |
2. Express框架
中文:https://www.expressjs.com.cn
2.1. 认识Web框架
- 使用http内置模块来搭建Web服务器,为什么还要使用框架?
- 原生http在进行很多处理时,会较为复杂;
- 有URL判断、Method判断、参数处理、逻辑代码处理等,都需要自己来处理和封装;
- 并且所有的内容都放在一起,会非常的混乱;
- 目前在Node中比较流行的Web服务器框架是
express、koa; - express早于koa出现,并且在Node社区中迅速流行起来:
- 可以基于express快速、方便的开发自己的Web服务器;
- 并且可以通过一些实用工具和中间件来扩展功能;
Express整个框架的核心就是中间件,理解了中间件其他一切都非常简单!
2.2. Express安装
express的使用过程有两种方式
- 通过express提供的脚手架,直接创建一个应用的骨架;
- 从零搭建自己的express应用结构;
方式一:安装express-generator
安装脚手架
1
npm install -g express-generator
创建项目
1
express express-demo
安装依赖
1
npm install
启动项目
1
node bin/www
方式二:从零搭建自己的express应用结构;
1
2npm init -y
npm install express
2.3. Express的基本使用
1 | const express = require("express"); |
创建express项目
- 在开发过程中,可以方便的将请求进行分离:
- 无论是不同的URL,还是get、post等请求方式;
- 这样的方式非常方便进行维护、扩展;
请求的路径中如果有一些参数,可以这样表达:
/users/:userId;
在request对象中获取可以通过 req.params.userId;
返回数据,可以方便的使用json:
res.json(数据)方式;
可以支持其他的方式,可以自行查看文档;
2.4. 认识中间件
Express是一个路由和中间件的Web框架,它本身的功能非常少
Express应用程序本质上是一系列中间件函数的调用;
中间件是什么呢?
中间件的本质是传递给express的一个回调函数;- 这个回调函数接受三个参数:
- 请求对象(request对象);
- 响应对象(response对象);
- next函数(在express中定义的用于执行骗一个中间件的函数);
中间件中可以执行哪些任务呢?
执行任何代码;
更改请求(request)和响应(response)对象;
结束请求-响应周期(返回数据);
调用栈中的下一个中间件;
如果当前中间件功能没有结束请求-响应周期,则必须调用next()将控制权传递给下一个中间件功能,否则,请求将被挂起。
2.5. 应用中间件
那么,如何将一个中间件应用到应用程序中呢?
- express主要提供了两种方式:app/router.use和app/router.methods;
- 可以是 app,也可以是router
- methods指的是常用的请求方式,比如: app.get或app.post等;
先来学习use的用法,因为methods的方式本质是use的特殊情况;
路由只会匹配第一个可以处理请求的中间件,除非有next调用下一个匹配的中间件
2.5.1. 案例一:最普通的中间件
1 | const express = require("express"); |
1 | const express = require("express"); |
1 | const express = require("express"); |
1 | const express = require("express"); |
2.5.2. 案例二:path匹配中间件
1 | const express = require("express"); |
1 | const express = require("express"); |

2.5.3. 案例三:path和method匹配中间件
1 | const express = require("express"); |
2.5.4. 案例四:注册多个中间件
1 | const express = require("express"); |
2.6. 应用中间件 – body解析
- 并非所有的中间件都需要从零去编写:
- express有内置一些帮助完成对request解析的中间件;
- registry仓库中也有很多可以辅助我们开发的中间件;
- 在客户端发送post请求时,会将数据放到body中:
- 客户端可以通过json的方式传递;
- 也可以通过form表单的方式传递;
2.6.1. 编写解析request body中间件
1 | const express = require("express"); |
2.6.2. 解析body - expres内置json()
1 | const express = require("express"); |
2.6.3. 解析application/x-www-form-urlencoded
1 | const express = require("express"); |
2.7. 应用中间件 – 第三方中间件
2.7.1. morgan记录日志
1 | const app = new express(); |
2.7.2. multer 上传文件
https://github.com/expressjs/multer
https://github.com/expressjs/multer/blob/master/doc/README-zh-cn.md
1 | const express = require("express"); |
2.7.3. multer解析form-data
1 | const express = require("express"); |
2.8. 客户端发送请求的方式
客户端传递到服务器参数的方法常见的是5种:
- 方式一:通过get请求中的URL的params;
- 方式二:通过get请求中的URL的query;
- 方式三:通过post请求中的body的json格式;
- 方式四:通过post请求中的body的x-www-form-urlencoded格式;
- 方式五:通过post请求中的form-data格式;
2.8.1. URL的params
req.params
1 | const express = require("express"); |
访问 http://localhost:5860/login/1/a
得到的是json
1 | { id: '1', path: 'a' } |
2.8.2. URL的query
req.query
1 | const express = require("express"); |
访问 http://localhost:5860/login?name=root&pass=123
得到的是json
1 | { name: 'root', pass: '123' } |
2.8.3. body的json
req.body
1 | const express = require("express"); |
访问 http://localhost:5860/login
1 | { |
得到的是json
1 | { name: 'root', pass: '123' } |
2.8.4. body的x-www-form-urlencoded
req.body
1 | const express = require("express"); |
2.8.5. body的form-data
req.body
1 | const express = require("express"); |
2.9. 响应数据
- end方法
- 类似于http中的response.end方法,用法是一致的
- json方法
- json方法中可以传入很多的类型:object、array、string、boolean、number、null等,它们会被转换成json格式返回;
- status方法
- 用于设置状态码;
- 更多响应的方式:https://www.expressjs.com.cn/4x/api.html#res
2.10. Express的路由
- 如果将所有的代码逻辑都写在app中,那么app会变得越来越复杂:
- 一方面完整的Web服务器包含非常多的处理逻辑;
- 另一方面有些处理逻辑其实是一个整体,应该将它们放在一起:
- 比如对users相关的处理:
- 获取用户列表; get /users
- 获取某一个用户信息; get /users/:id
- 创建一个新的用户; post /users/add
- 删除一个用户; delete /users/:id
- 更新一个用户; patch /users/:id
- 使用
express.Router来创建一个路由处理程序:- 一个Router实例拥有完整的中间件和路由系统;
- 因此,它也被称为迷你应用程序(mini-app);
1 | const express = require("express"); |
2.11. 静态资源服务器
- 部署静态资源我们可以选择很多方式:
- Node也可以作为静态资源服务器,并且express提供了方便部署静态资源的方法;
- 在 uploads 文件夹下放置 index.html 文件
1 | const express = require("express"); |
访问 http://localhost:8888/,直接打开index.html
2.12. 服务端的错误处理
将错误通过next传递给中间件函数
1 | const express = require("express"); |
2.13. 源码
- 调用express创建的是什么
- app.listen启动服务器
- 如何结合原生http启动服务器
- express -> http.createServer.listen
- app.use(中间件)时,内部发生了什么?
- 用户发送请求,中间件是如何被回调的?
- next为什么会执行下一个中间件?
2.13.1. 创建app的过程
https://github.com/expressjs/express/blob/master/lib/express.js
express函数的本质其实是createApplication
1 | var proto = require('./application'); |
https://github.com/expressjs/express/blob/master/lib/application.js
1 | app.listen = function listen() { |
2.13.2. 注册中间件
- 比如通过use来注册一个中间件,源码中发生了什么?
- 无论是app.use还是app.methods都会注册一个主路由;
- app本质上会将所有的函数,交给这个主路由去处理的;
https://github.com/expressjs/express/blob/master/lib/application.js
1 | app.use = function use(fn) { |
app.lazyrouter中创建的 new Router() 传递给 var router = this._router
1 | app.lazyrouter = function lazyrouter() { |
https://github.com/expressjs/express/blob/master/lib/router/index.js
把中间件放在 router.stack = []; 数组中 this.stack.push(layer);
1 | var proto = module.exports = function(options) { |
2.13.3. 请求的处理过程
- 如果有一个请求过来,那么从哪里开始呢?
- app函数被调用开始的;
https://github.com/expressjs/express/blob/master/lib/express.js
1 | function createApplication() { |
https://github.com/expressjs/express/blob/master/lib/application.js
1 | app.handle = function handle(req, res, callback) { |
https://github.com/expressjs/express/blob/master/lib/router/index.js
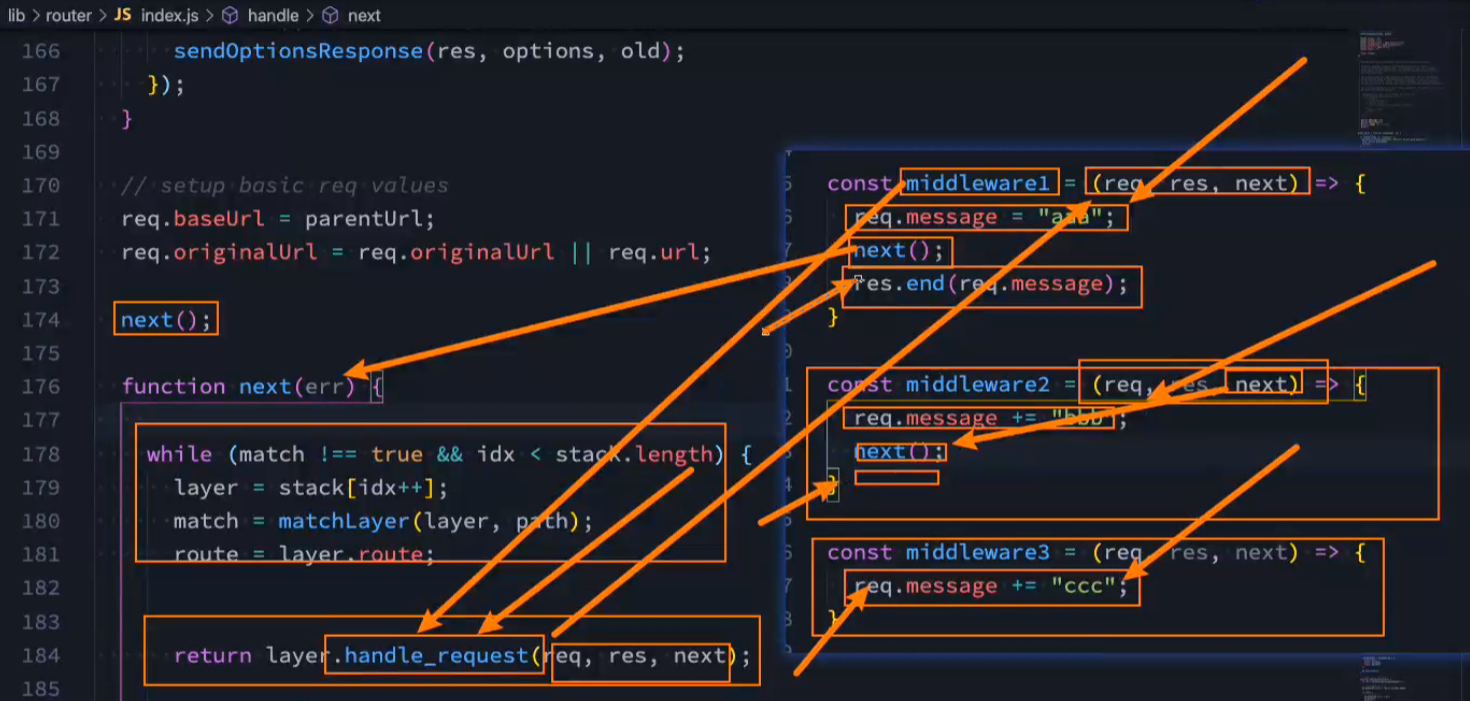
next为什么会执行下一个中间件?
1 | proto.handle = function handle(req, res, out) { |
3. Koa框架
3.1. 认识Koa
Koa也是非常流行的Node Web服务器框架
Koa官方的介绍:
- koa:next generation web framework for node.js;
- koa:node.js的下一代web框架;
事实上,koa是express同一个团队开发的一个新的Web框架:
目前团队的核心开发者TJ的主要精力也在维护Koa,express已经交给团队维护了;
Koa旨在为Web应用程序和API提供更小、更丰富和更强大的能力;
相对于express具有更强的异步处理能力;
Koa的核心代码只有1600+行,是一个更加轻量级的框架,可以根据需要安装和使用中间件;
3.2. Koa初体验
安装模块 npm i koa
- koa注册的中间件提供了两个参数
ctx:上下文(Context)对象;- koa并没有像express一样,将req和res分开,而是将它们作为ctx的属性;
- ctx代表依次请求的上下文对象;
- ctx.request:获取请求对象;
- ctx.response:获取响应对象;
next:本质上是一个dispatch,类似于之前的next;
1 | const koa = require("koa"); |
ctx内容
1 | { |
3.3. Koa中间件
koa通过创建的app对象,注册中间件只能通过use方法:
Koa并没有提供methods的方式来注册中间件;也没有提供path中间件来匹配路径;但是真实开发中我们如何将路径和method分离呢?
方式一:根据request的url来判断;
1
2
3
4
5
6
7
8
9
10
11
12
13
14
15const koa = require("koa");
const app = new koa();
app.use((ctx,next)=>{
if(ctx.request.url === '/login'){
ctx.response.body = "Hello Koa login";
}else{
ctx.response.body = "Hello Koa";
}
});
app.listen(9999,()=>{
console.log("开启 koa 9999");
})方式二:使用第三方路由中间件;
1
npm i koa-router
3.4. 路由的使用
先封装一个 user.js 的文件;
在app中将router.routes()注册为中间件;
注意:allowedMethods用于判断某一个method是否支持:
- 如果请求 get,那么是正常的请求,因为有实现get;
- 如果请求 put、delete、patch,那么自动报错: Method Not Allowed,状态码:405;
- 如果请求 link、copy、lock,那么自动报错: Not Implemented,状态码:501;
1 | // ==================【router/user.js】 ====================== |
在index.js中添加方法判断
1 | app.use(userRouter.routes()); |


3.5. 参数解析
3.5.1. params
ctx.request.params
http://localhost:9999/users/get/1
1 | const Router = require("koa-router"); |
3.5.2. query
ctx.request.query
http://localhost:9999/users/login?name=root
1 | const Router = require("koa-router"); |
3.5.3. json
body是json格式:
1
2
3
4{
"name": "root",
"pass": "123"
}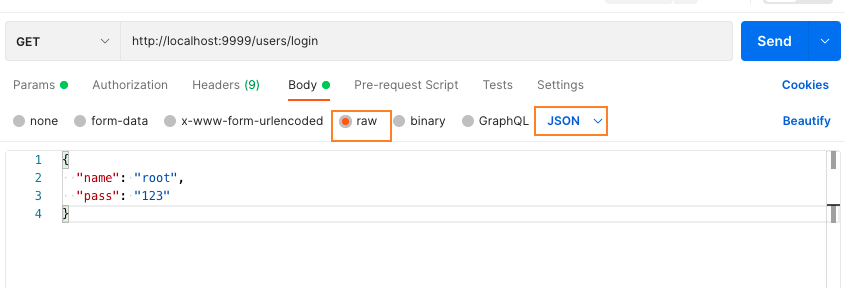
获取json数据:
安装依赖
1
npm install koa-bodyparser
使用 koa-bodyparser的中间件;
const bodyparser = require("koa-bodyparser");app.use(bodyparser());1
2
3
4
5
6
7
8
9
10
11
12
13
14
15
16const koa = require("koa");
const bodyparser = require("koa-bodyparser");
const userRouter = require("./router/user");
const app = new koa();
app.use(bodyparser());
app.use(userRouter.routes());
app.use(userRouter.allowedMethods());
app.listen(9999,()=>{
console.log("开启 koa 9999");
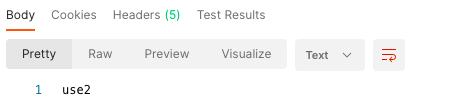
})现在 user.js 中可以通过
ctx.request.body得到JSON格式数据1
2
3
4
5
6
7
8
9
10const Router = require("koa-router");
const userRouter = new Router({prefix: '/users'});
userRouter.get("/login",(ctx,next)=>{
console.log(ctx.request.body);
ctx.response.body = "欢迎";
});
module.exports = userRouter;
3.5.4. x-www-form-urlencoded
body是x-www-form-urlencoded格式:
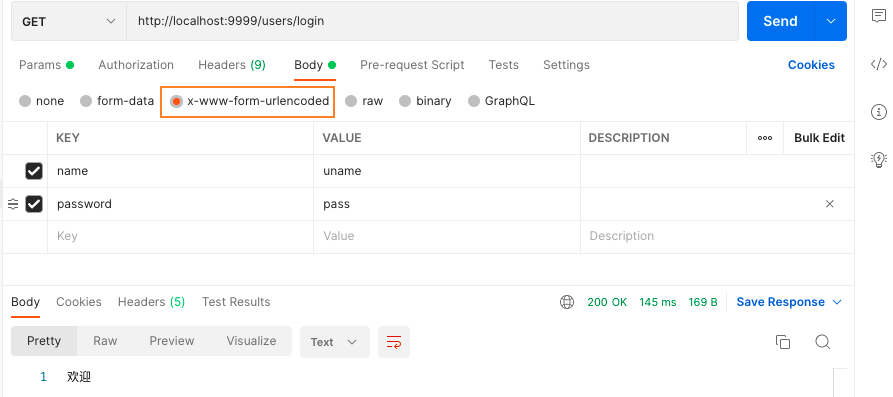
获取 x-www-form-urlencoded 数据:
安装依赖 - 跟json一样
1
npm install koa-bodyparser
使用 koa-bodyparser的中间件;
const bodyparser = require("koa-bodyparser");app.use(bodyparser());user.js 中可以通过
ctx.request.body得到x-www-form-urlencoded格式数据
3.5.5. form-data
body是form-data格式:
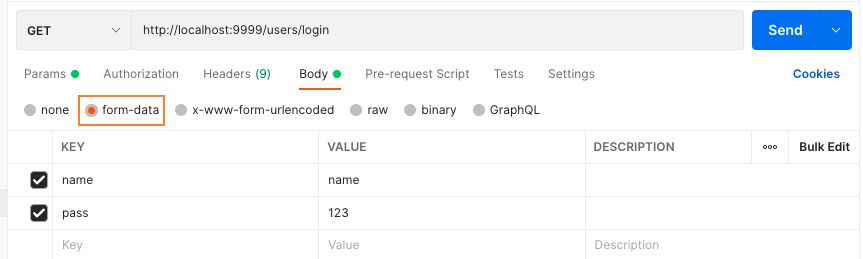
获取 form-data 数据:
安装依赖
1
npm i @koa/multer
使用 multer 的中间件;
1
2
3
4
5
6
7
8
9
10
11
12
13const Router = require("koa-router");
const multer = require("@koa/multer");
const userRouter = new Router({prefix: '/users'});
const upload = multer({});
userRouter.get("/login",upload.any(),(ctx,next)=>{
console.log(ctx.request.body);
ctx.response.body = "欢迎";
});
module.exports = userRouter;
3.6. 上传文件 multer
router/file.js
1 | const path = require("path"); |
index.js
1 | const koa = require("koa"); |
得到file信息
1 | { |
3.7. 数据的响应
输出结果:body将响应主体设置为以下之一
- string:字符串数据
- Buffer:Buffer数据
- Stream:流数据
- Object|| Array:对象或者数组
- null:不输出任何内容
- 如果response.status尚未设置,Koa会自动将状态设置为200或204。
请求状态:status
1 | const Router = require("koa-router"); |
ctx.body = ctx.response.body 两者是同一个对象
https://github.com/koajs/koa/blob/master/lib/context.js
delegate 代理 proto对象,实际指向 response对象,故 content.body 实际是调用 content.response.body
1 | /** |
3.8. 静态资源服务器
1 | npm install koa-static |
部署的过程类似于express
1 | const koa = require("koa"); |
访问 http://localhost:9999/1658562598539.jpeg
3.9. 错误处理
1 | // ================ 【router/user.js】 ======================= |
3.10. 源码
https://github.com/koajs/koa/blob/master/lib/application.js
require(“koa”) 实际是导入了Application,koa()实际是Application()
1 | module.exports = class Application extends Emitter { |
compose (middleware)
1 | function compose (middleware) { |
3.11. koa vs express
从架构设计上来说
express是完整和强大的,其中帮助我们内置了非常多好用的功能;
koa是简洁和自由的,它只包含最核心的功能,并不会对我们使用其他中间件进行任何的限制。
- 甚至是在app中连最基本的get、post都没有提供;
- 需要通过自己或者路由来判断请求方式或者其他功能;
因为express和koa框架的核心其实都是中间件
- 但是中间件的执行机制是不同的,特别是针对某个中间件中包含异步操作时;
3.11.1. 案例实现
通过一个需求来演示所有的过程:
- 假如有三个中间件会在一次请求中匹配到,并且按照顺序执行;
- 最终实现的方案是:
- 在middleware1中,在req.message中添加一个字符串 aaa;
- 在middleware2中,在req.message中添加一个 字符串bbb;
- 在middleware3中,在req.message中添加一个 字符串ccc;
- 当所有内容添加结束后,在middleware1中,通过res返回最终的结果;
实现方案:
Express同步数据的实现;
Express异步数据的实现;
Koa同步数据的实现;
Koa异步数据的实现;
3.11.2. Express同步数据实现
1 | const express = require("express"); |
原理:res.end(res.message); 是最后执行的
3.11.3. Express异步数据实现
1 | const express = require("express"); |
3.11.4. Koa同步数据实现
1 | const koa = require("koa"); |
原理:ctx.response.body = ctx.request.message; 是最后执行的
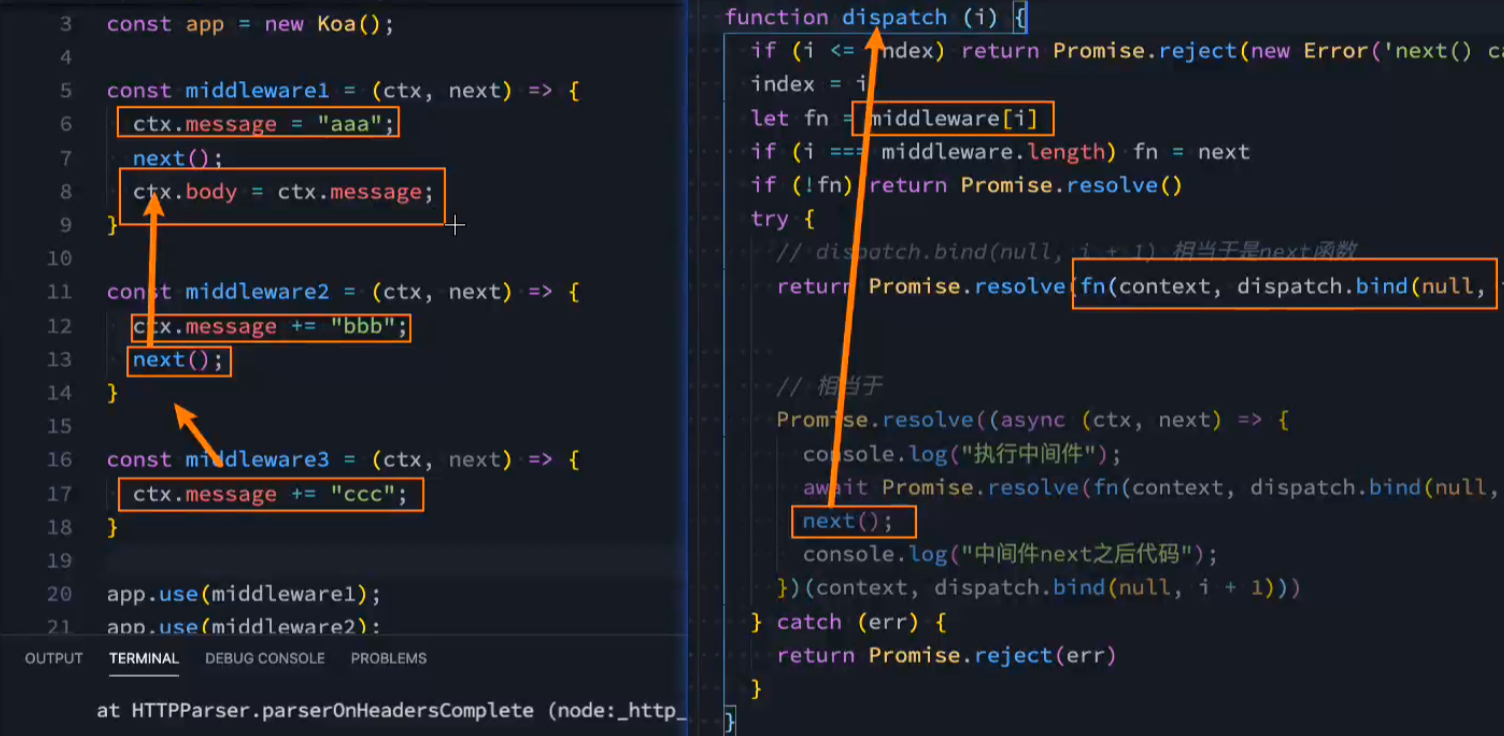
3.11.5. Koa异步数据实现
1 | const koa = require("koa"); |
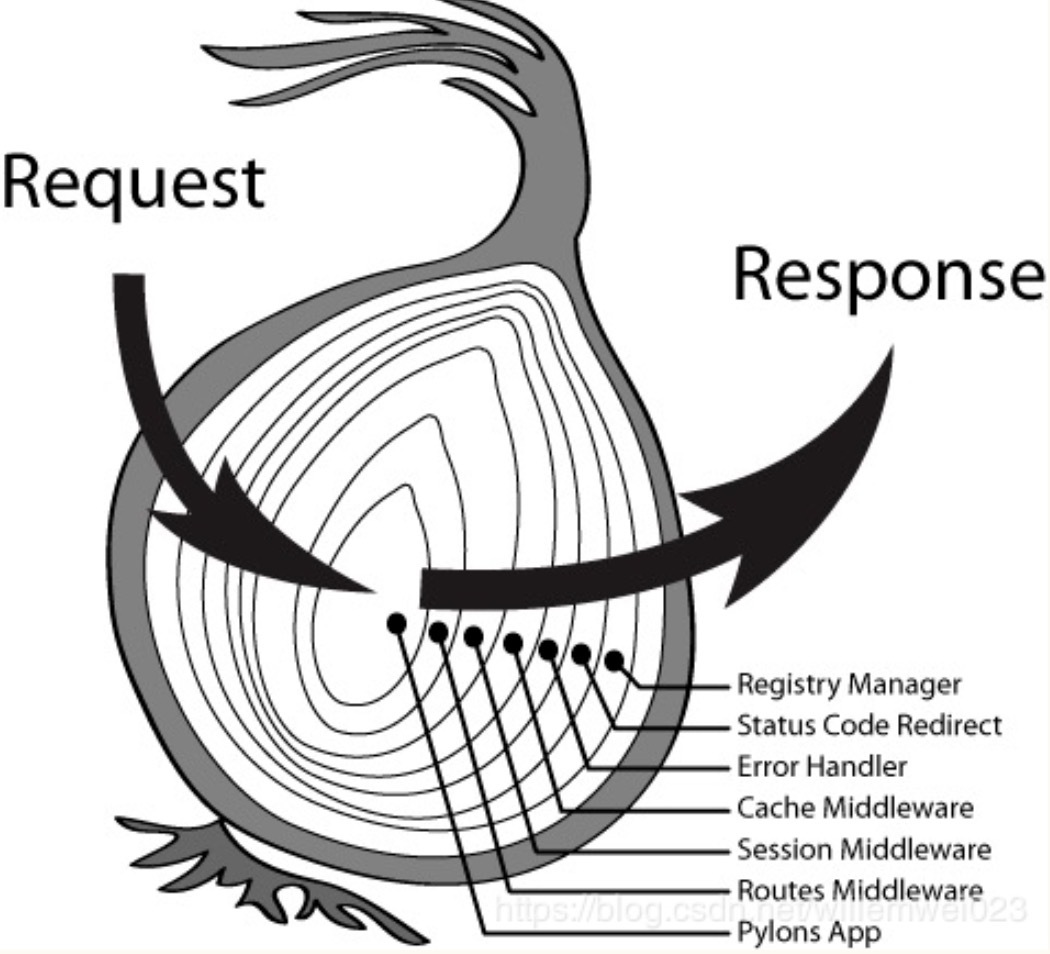
3.12. Koa洋葱模型
- 两层理解含义:
- 中间件处理代码的过程;
- response返回body执行;
1 | const koa = require("koa"); |
控制台输出
1 | 开启 9900 |
就像剥洋葱一样,由外往里,再由内往外