缓存,消息,检索,任务,安全,分布式,监控管理,部署
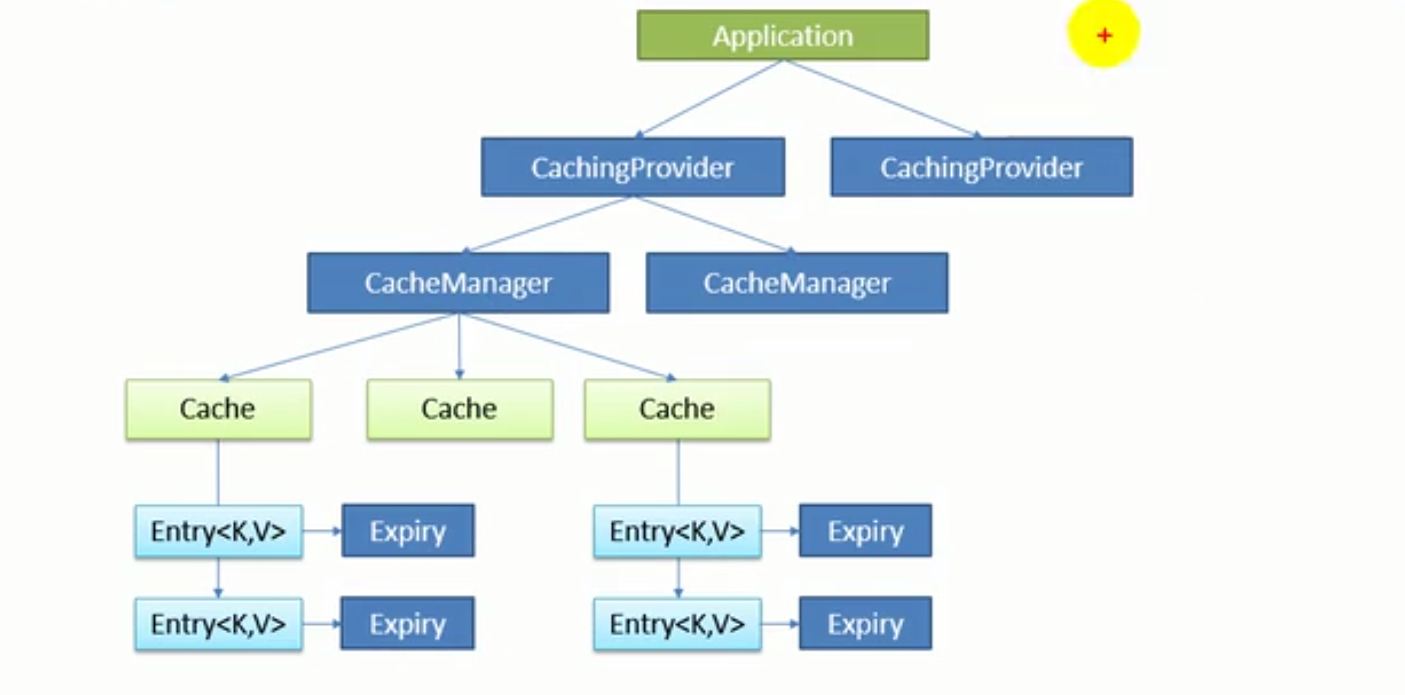
1. 缓存 Java Caching定义了5个接口:
CachingProvider
创建,配置,获取,管理和控制多个CacheManager。一个应用可以在运行期间访问多个CachingProvider
CacheManager
定义了创建,配置,获取和控制多个唯一命名的cache,这些cache存在于CacheManager的上下文中。一个CacheManager仅为一个CacheProvider拥有
Cache
一个类似map的数据结构并临时存储以key为索引的值。一个cache仅被一个CacheManager所拥有
Entry
一个存储在cache中的key-value中
Expiry
每一存储在cache中的条目有一个定义的有效期。一旦超过这个时间,条目为过期的状态。一旦过期,条目将不可访问,更新和删除。缓存有效期可以通过ExpiryPollicy设置
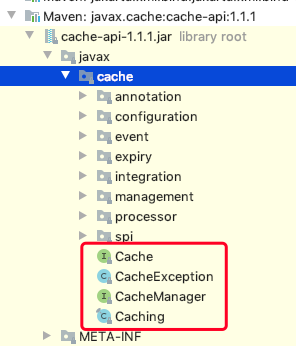
1.1. Maven依赖 https://www.javadoc.io/doc/javax.cache/cache-api/1.1.1/index.html
1 2 3 4 5 6 7 8 9 <dependency > <groupId > org.springframework.boot</groupId > <artifactId > spring-boot-starter-cache</artifactId > </dependency > <dependency > <groupId > javax.cache</groupId > <artifactId > cache-api</artifactId > </dependency >
1.2. JSR107 在线:JSR107.pdf
下载:JSR107.pdf
1.3. 缓存注解
注解
解释
Cache
缓存接口
CacheManager
缓存管理器
@Cacheable
针对方法,根据方法参数对结果进行缓存
@CacheEvict
清空缓存
@CachePut
更新缓存
@EnableCaching
开启基于注解的缓存
keyGenerator
缓存数据时key生成策略
serialize
缓存数据时value序列化策略
1.3.1. @Cacheable 需要主类注解@EnableCaching 将方法的运行结果进行缓存,以后要相同结果时,直接从缓存中获取
cacheManager 管理多个Cache组件,对缓存的真正CRUD操作在Cache中,每一个缓存都有自己的名称
1
2
3
4
5
6
7
8
9
10
11
12
13
14
15
16
17
18
19
20
21
22
23
24
25
26
27
28
29
public @interface Cacheable { @AliasFor("cacheNames") String[] value() default {}; @AliasFor("value") String[] cacheNames() default {}; String key () default "" ; String keyGenerator () default "" ; String cacheManager () default "" ; String cacheResolver () default "" ; String condition () default "" ; String unless () default "" ; boolean sync () default false ; }
@EnableCaching注解在有main方法的类,启动注解
1
2
3
4
5
6
7
8
9
10
11
12
13
14
15
16
17
package com.runaccpeted;import org.mybatis.spring.annotation.MapperScan;import org.springframework.boot.SpringApplication;import org.springframework.boot.autoconfigure.SpringBootApplication;import org.springframework.cache.annotation.EnableCaching;@SpringBootApplication @MapperScan(basePackages = "com.runaccpeted.mapper") @EnableCaching public class CachewebApplication { public static void main (String[] args) { SpringApplication.run(CachewebApplication.class, args); } }
编辑控制类方法,实现缓存
1
2
3
4
5
6
7
8
9
10
11
12
13
14
15
16
17
18
19
20
21
22
23
package com.runaccpeted.service.impl;import com.runaccpeted.mapper.UserMapper;import com.runaccpeted.pojo.User;import com.runaccpeted.service.UserService;import org.springframework.cache.annotation.Cacheable;import org.springframework.stereotype.Service;import javax.annotation.Resource;@Service public class UserServiceImpl implements UserService { @Resource UserMapper userMapper; @Cacheable(cacheNames = "user") @Override public User find (int id) { return userMapper.find(id); } }
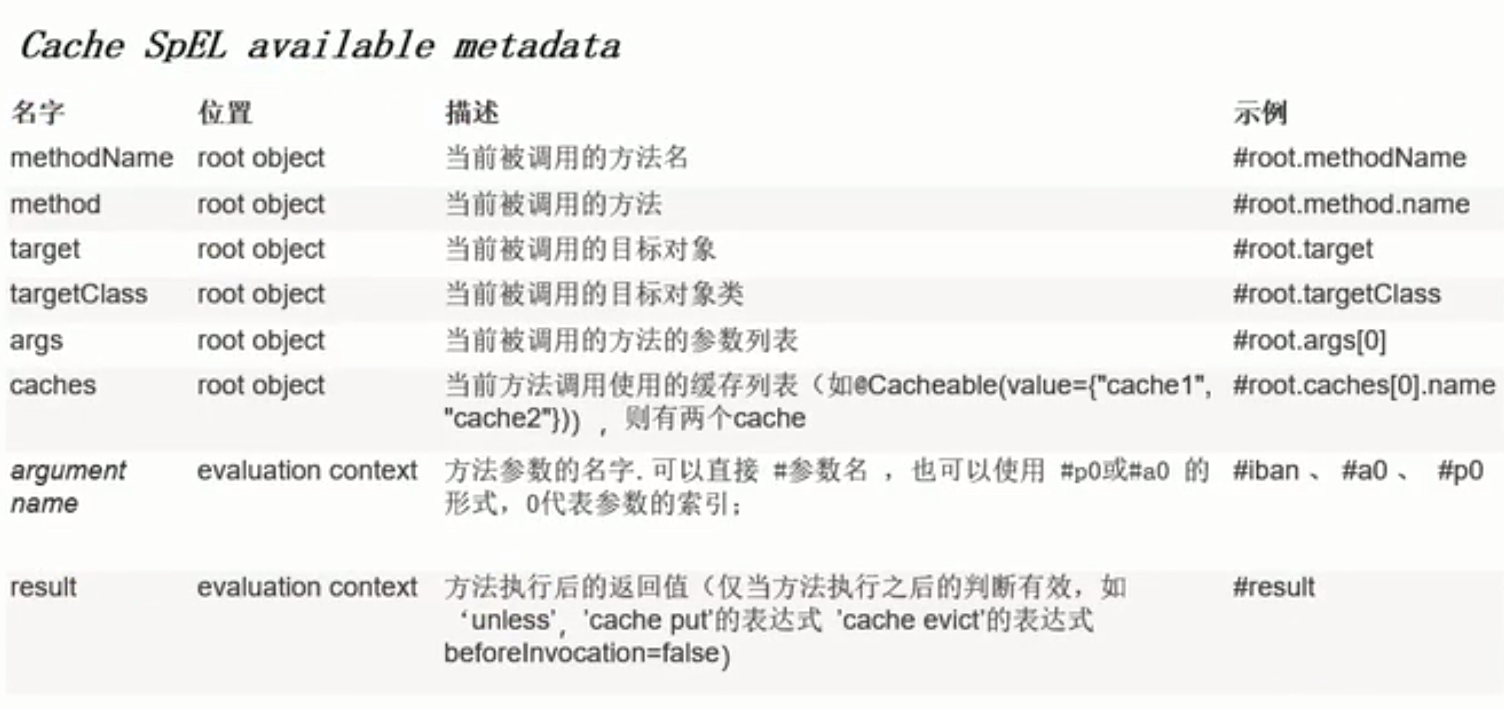
1.3.1.1. key
1.3.1.2. KeyGenerator 创建自己的键生成器
generate方法定义
1
2
3
4
5
6
7
8
9
10
11
12
13
14
15
16
17
18
19
20
21
22
23
24
25
26
27
package com.runaccpeted.config;import org.springframework.cache.interceptor.KeyGenerator;import org.springframework.context.annotation.Bean;import org.springframework.context.annotation.Configuration;import java.lang.reflect.Method;import java.util.Arrays;@Configuration public class CacheConfig { @Bean(name = "myKeyGenerator") public KeyGenerator keyGenerator () { return new KeyGenerator (){ @Override public Object generate (Object target, Method method, Object... params) { return method.getName()+"[" + Arrays.asList(params).toString()+"]" ; } }; } }
装配到缓存组件中
1
2
3
@Cacheable(cacheNames = "user",keyGenerator = "myKeyGenerator") @Cacheable(cacheNames = "user",key = "#root.methodName+'['+#id+']'")
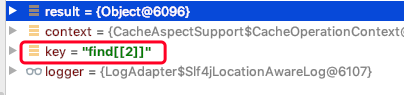
实现
1.3.1.3. condition 符合条件才进行缓存
condition=”#id>1 and #id<10” 1<id<10时缓存
1
2
3
4
5
6
7
8
9
10
11
12
13
14
15
16
17
18
19
20
21
22
23
package com.runaccpeted.service.impl;import com.runaccpeted.mapper.UserMapper;import com.runaccpeted.pojo.User;import com.runaccpeted.service.UserService;import org.springframework.cache.annotation.Cacheable;import org.springframework.stereotype.Service;import javax.annotation.Resource;@Service public class UserServiceImpl implements UserService { @Resource UserMapper userMapper; @Cacheable(cacheNames = "user",keyGenerator = "myKeyGenerator",condition="#id>1") @Override public User find (int id) { return userMapper.find(id); } }
1.3.1.4. unless 为true时不缓存
unless=”#id=2” id=2时不缓存
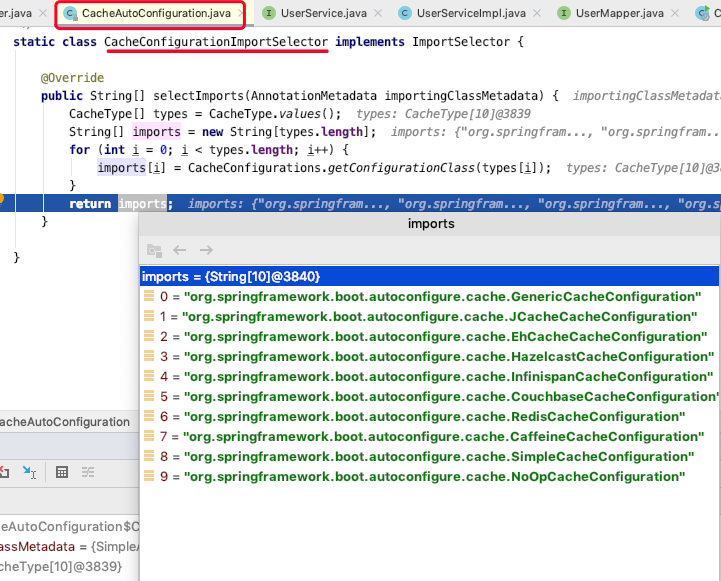
1.3.2. 原理 1.3.2.1. CacheAutoConfiguration
1.3.2.2. SimpleCacheConfiguration 1.3.2.3. ConcurrentMapCacheManager 默认加载SimpleCacheConfiguration,注册了一个CacheManager
1
2
3
4
5
6
7
8
9
10
11
12
13
14
15
16
17
18
19
20
21
22
23
24
25
26
class SimpleCacheConfiguration { @Bean ConcurrentMapCacheManager cacheManager (CacheProperties cacheProperties, CacheManagerCustomizers cacheManagerCustomizers) { ConcurrentMapCacheManager cacheManager = new ConcurrentMapCacheManager (); List<String> cacheNames = cacheProperties.getCacheNames(); if (!cacheNames.isEmpty()) { cacheManager.setCacheNames(cacheNames); } return cacheManagerCustomizers.customize(cacheManager); } } public void setCacheNames (@Nullable Collection<String> cacheNames) { if (cacheNames != null ) { for (String name : cacheNames) { this .cacheMap.put(name, createConcurrentMapCache(name)); } this .dynamic = false ; } else { this .dynamic = true ; } }
1.3.3. 流程
查询Cache组件,按照cacheNames指定的名字获取 getCache(name)
第一次获取缓存会自动创建Cache组件 createConcurrentMapCache(name)
1
2
3
4
5
6
7
8
9
10
11
12
13
14
15
16
17
18
public class ConcurrentMapCacheManager implements CacheManager , BeanClassLoaderAware { ConcurrentMap<String, Cache> cacheMap = new ConcurrentMap <>(); public Cache getCache (String name) { Cache cache = this .cacheMap.get(name); if (cache == null && this .dynamic) { synchronized (this .cacheMap) { cache = this .cacheMap.get(name); if (cache == null ) { cache = createConcurrentMapCache(name); this .cacheMap.put(name, cache); } } } return cache; } }
查找缓存中的内容,使用一个key,默认方法为参数,key按照某种策略生成,默认使用keyGenerator,使用SimpleKeyGenerator 没有key,new SimpleKey(),有一个参数,key=参数值,多个参数,new SimpleKey(params)
1
2
3
4
5
6
7
8
9
10
11
12
13
public static Object generateKey (Object... params) { if (params.length == 0 ) { return SimpleKey.EMPTY; } if (params.length == 1 ) { Object param = params[0 ]; if (param != null && !param.getClass().isArray()) { return param; } } return new SimpleKey (params); }
没有产生缓存就执行方法
将目标方法返回结果放入缓存中
1.3.4. @CachePut 更新 先执行方法,再将结果放入缓存,故每次都会访问数据库
以User对象为主键,返回结果为值
1
2
3
4
5
6
@CachePut(value = "user") @Override public User update (User user) { userMapper.update(user); return user; }
以user的id为主键 #result.id or #user.id
这样才能和find的id主键对应,更新的内容放入同一cache组件中,find查到的内容才是更新过的内容
1
2
3
4
5
6
@CachePut(value = "user",key = "#user.id") @Override public User update (User user) { userMapper.update(user); return user; }
1.3.5. @CacheEvict 清除缓存 1 2 3 4 5 @Override @CacheEvict(value = "user") public int delete (Integer id) { return userMapper.delete(id); }
CacheEvict中的属性
1 2 3 4 5 6 7 8 9 10 11 String[] value() default {}; String[] cacheNames() default {}; String key () default "" ; String keyGenerator () default "" ; String cacheManager () default "" ; String cacheResolver () default "" ; String condition () default "" ; boolean allEntries () default false ;boolean beforeInvocation () default false ;
1.3.5.1. allEntries 清除缓存中所有数据 allEntries=true
1.3.5.2. beforeInvocation 在方法之前执行缓存,当方法中存在错误时有用
1.3.6. @Caching 组合操作
1 2 3 4 5 6 7 8 9 public @interface Caching { Cacheable[] cacheable() default {}; CachePut[] put() default {}; CacheEvict[] evict() default {}; }
缓存主键分别用id,username,password
1 2 3 4 5 6 7 8 9 10 11 12 13 14 @Caching( cacheable = { @Cacheable(cacheNames = "user") }, put={ @CachePut(value = "user",key = "#user.username"), @CachePut(value = "user",key = "#user.password") }, evict={} ) public User updateEach (User user) { userMapper.update(user); return user; }
1.3.7. @CacheConfig 1 2 3 4 5 6 public @interface CacheConfig { String[] cacheNames() default {}; String keyGenerator () default "" ; String cacheManager () default "" ; String cacheResolver () default "" ; }
整个类配置缓存名
1 2 3 @Service @CacheConfig(cacheNames = "user") public class UserServiceImpl implements UserService {}
1.4. redis 1.4.1. 树莓派 docker安装redis https://hub.docker.com/r/arm32v7/redis/tags
1 2 3 4 5 6 7 8 9 10 11 12 root@pi:/# docker pull arm32v7/redis:5 root@pi:/# docker images REPOSITORY TAG IMAGE ID CREATED SIZE arm32v7/redis 5 9db682290662 10 hours ago 72.1MB portainer/portainer latest 6cb2cfd64c93 4 months ago 63.7MB hypriot/rpi-mysql latest 4f3cbdbc3bdb 20 months ago 209MB root@pi:/# docker run --name redis -p 6380:6379 -d 9db682290662 root@pi:/# docker ps CONTAINER ID IMAGE COMMAND CREATED STATUS PORTS NAMES 936bddacc6c4 9db682290662 "docker-entrypoint.s…" 8 seconds ago Up 5 seconds 0.0.0.0:6380->6379/tcp redis root@pi:/# iptables -I INPUT -i eth0 -p tcp --dport 6380 -j ACCEPT root@pi:/# iptables -I OUTPUT -o eth0 -p tcp --sport 6380 -j ACCEPT
1.4.2. linux docker安装redis 下载镜像 https://hub.docker.com/_/redis
开放6379 端口
1 2 3 4 5 6 7 8 9 10 11 12 13 [root@localhost linux]# docker pull redis [root@localhost linux]# docker run --name redis -p 6379:6379 -d redis [root@localhost linux]# docker ps CONTAINER ID IMAGE COMMAND CREATED STATUS PORTS NAMES b85b53b3fe8f redis "docker-entrypoint..." 4 seconds ago Up 3 seconds 0.0.0.0:6379->6379/tcp redis 939ddacac964 portainer/portainer "/portainer" 3 days ago Up 5 minutes 0.0.0.0:9000->9000/tcp portainer [root@localhost linux]# [root@localhost linux]# firewall-cmd --zone=public --add-port=6379/tcp --permanent success [root@localhost linux]# [root@localhost linux]# firewall-cmd --reload success [root@localhost linux]#
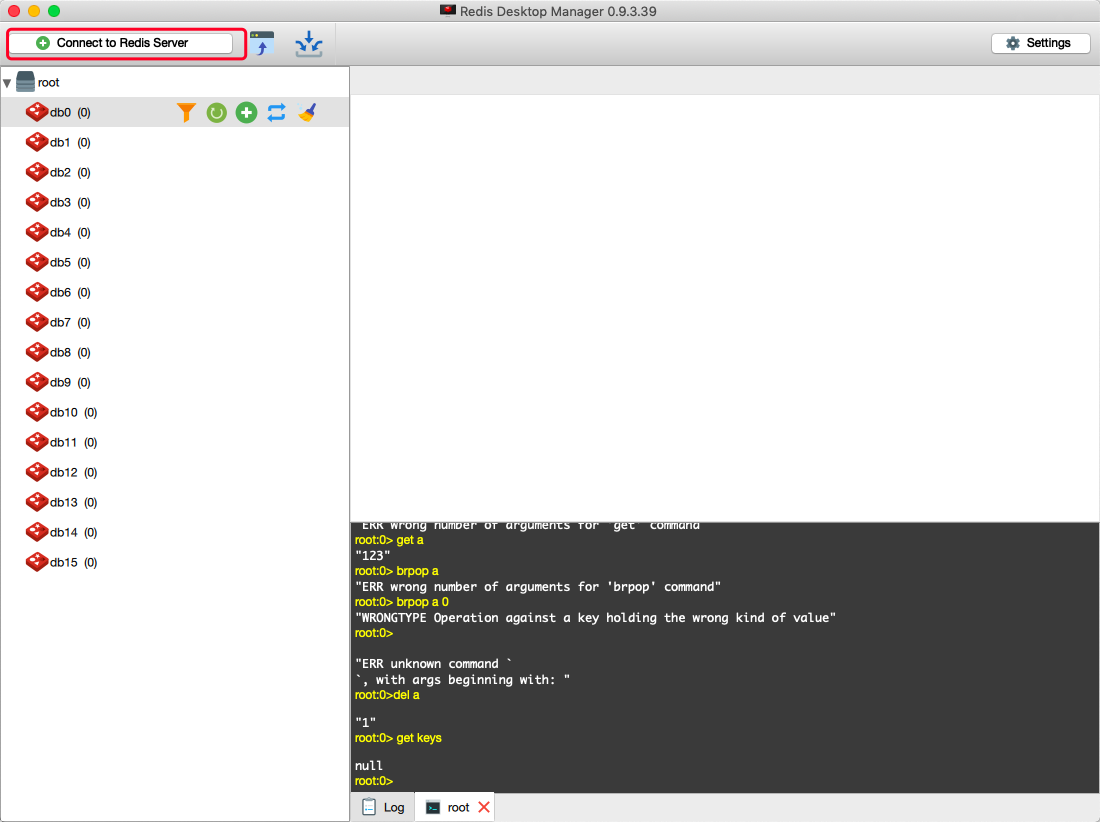
1.4.3. 开启连接 1 2 LearningtekiMacBook-Air:~ Learning$ redis-cli -h 192.168.0.104 -p 6379 192.168.0.104:6379>
客户端下载
https://www.7down.com/mac/233286.html
1.4.4. 常用命令 http://www.redis.cn/commands.html
添加key-value:set key value
附加key的value:append key value
获取value值:keys *
获取所有keys:get keys
删除key:del key
1.4.5. Maven依赖 1 2 3 4 <dependency > <groupId > org.springframework.boot</groupId > <artifactId > spring-boot-starter-data-redis</artifactId > </dependency >
application.properties
1 spring.redis.host =192.168.0.104
1.4.6. StringRedisTemplate 使用RedisTemplate,StringRedisTemplate封装方法
字符串opsForValue
列表 opsForList
集合 opsForSet
散列 opsForHash
有序列表 opsForZSet
1 2 3 4 5 6 7 8 9 10 11 12 13 14 15 16 17 18 19 20 21 22 23 package com.runaccpeted;import org.junit.jupiter.api.Test;import org.junit.runner.RunWith;import org.springframework.beans.factory.annotation.Autowired;import org.springframework.boot.test.context.SpringBootTest;import org.springframework.data.redis.core.RedisTemplate;import org.springframework.data.redis.core.StringRedisTemplate;import org.springframework.test.context.junit4.SpringJUnit4ClassRunner;import org.springframework.test.context.junit4.SpringRunner;@RunWith(SpringRunner.class) @SpringBootTest class CachewebApplicationTests { @Autowired StringRedisTemplate redisTemplate; @Test void contextLoads () { redisTemplate.opsForValue().set("a" , "123" ); } }
测试数据
1 2 3 4 5 6 192.168.0.104:6379> keys * 1) "a" 192.168.0.104:6379> 192.168.0.104:6379> get a "123" 192.168.0.104:6379>
1.4.7. RedisTemplate<Object, Object> 存入对象 org.springframework.data.redis.serializer.SerializationException: Cannot serialize; 对象必须序列化
1 public class User implements Serializable {}
存入redis的是 string 默认使用
存入对象时,默认使用Jdk序列化器
1 this .defaultSerializer = new JdkSerializationRedisSerializer (this .classLoader != null ? this .classLoader : this .getClass().getClassLoader());
1 2 3 4 5 6 7 192.168.0.104:6379> keys * 1) "a" 2) "\xac\xed\x00\x05sr\x00\x11java.lang.Integer\x12\xe2\xa0\xa4\xf7\x81\x878\x02\x00\x01I\x00\x05valuexr\x00\x10java.lang.Number\x86\xac\x95\x1d\x0b\x94\xe0\x8b\x02\x00\x00xp\x00\x00\x00\x01" 192.168.0.104:6379> 192.168.0.104:6379> get "\xac\xed\x00\x05sr\x00\x11java.lang.Integer\x12\xe2\xa0\xa4\xf7\x81\x878\x02\x00\x01I\x00\x05valuexr\x00\x10java.lang.Number\x86\xac\x95\x1d\x0b\x94\xe0\x8b\x02\x00\x00xp\x00\x00\x00\x01" "\xac\xed\x00\x05sr\x00\x19com.runaccpeted.pojo.User\xf0V\xab\xca\x8a\xe3\x12\xe7\x02\x00\x03L\x00\x02idt\x00\x13Ljava/lang/Integer;L\x00\bpasswordt\x00\x12Ljava/lang/String;L\x00\busernameq\x00~\x00\x02xpsr\x00\x11java.lang.Integer\x12\xe2\xa0\xa4\xf7\x81\x878\x02\x00\x01I\x00\x05valuexr\x00\x10java.lang.Number\x86\xac\x95\x1d\x0b\x94\xe0\x8b\x02\x00\x00xp\x00\x00\x00\x01t\x00\x03123t\x00\x01a" 192.168.0.104:6379>
1.4.7.1. jackson 1 2 3 4 5 <dependency > <groupId > com.fasterxml.jackson.jaxrs</groupId > <artifactId > jackson-jaxrs-json-provider</artifactId > <version > 2.10.0</version > </dependency >
实例化ObjectMapper,调用writeValueAsString方法转换
1 2 3 4 5 6 7 8 9 10 11 12 13 14 15 16 @Autowired StringRedisTemplate redisTemplate; User user = new User ();user.setId(1 ); user.setUsername("a" ); user.setPassword("123" ); ObjectMapper mapper = new ObjectMapper ();String str = null ;try { str=mapper.writeValueAsString(user); } catch (JsonProcessingException e) { e.printStackTrace(); } System.out.println(str); redisTemplate.opsForValue().set(user.getId()+"" , str);
获取value
1 User user = mapper.readValue(str,User.class);
1.4.8. RedisCacheManager 底层对于对象采用jdk序列化,存入redis的是乱码
重写缓存管理方法
1 2 3 4 5 6 7 8 9 10 11 12 13 14 15 16 17 18 @Bean public CacheManager cacheManager (RedisConnectionFactory factory) { RedisSerializer<String> redisSerializer = new StringRedisSerializer (); GenericJackson2JsonRedisSerializer jsonRedisSerializer = new GenericJackson2JsonRedisSerializer (); RedisCacheConfiguration config = RedisCacheConfiguration.defaultCacheConfig() .serializeKeysWith(RedisSerializationContext.SerializationPair.fromSerializer(redisSerializer)) .serializeValuesWith(RedisSerializationContext.SerializationPair.fromSerializer(jsonRedisSerializer)) .disableCachingNullValues(); RedisCacheManager cacheManager = RedisCacheManager.builder(factory) .cacheDefaults(config) .build(); return cacheManager; }
查询
1 2 3 4 5 6 @Cacheable(cacheNames = "user") @Override public User find (Integer id) { return userMapper.find(id); }
redis中的key-value
1 2 3 192.168.0.104:6379> get "user::1" "{\"@class\":\"com.runaccpeted.pojo.User\",\"id\":1,\"username\":\"abc\",\"password\":\"123\"}" 192.168.0.104:6379>
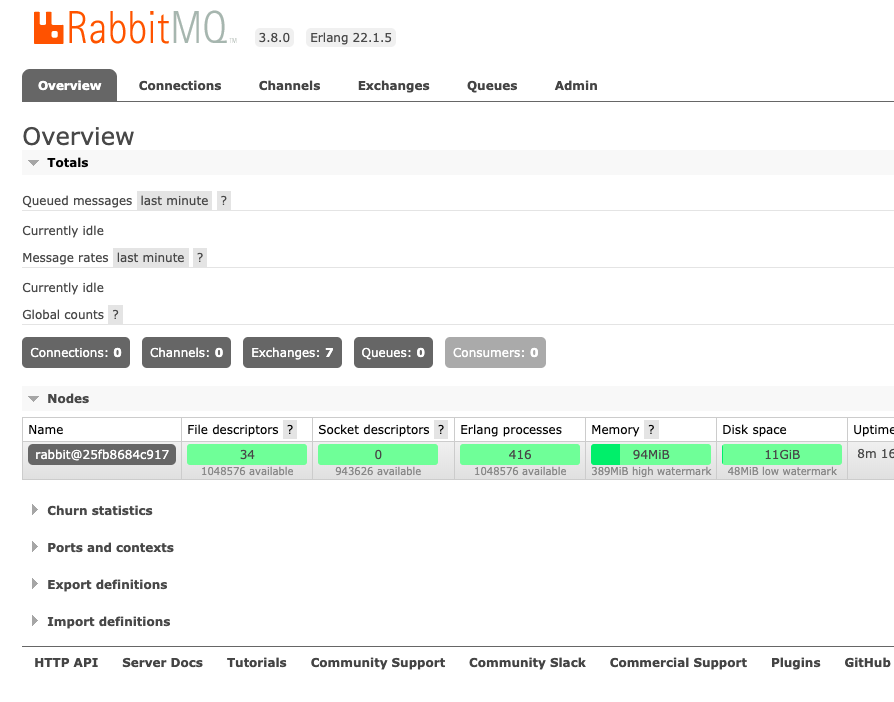
2. RabbitMQ 2.1. docker安装rabbitmq–linux 1 [root@localhost linux]# docker pull rabbitmq:management
management带管理界面
运行
docker run -d -p 5672:5672 -p 15672:15672 –name rabbit_Name image_ID
1 2 3 4 5 6 7 8 9 10 11 12 13 14 15 16 17 18 [root@localhost linux]# docker images REPOSITORY TAG IMAGE ID CREATED SIZE docker.io/rabbitmq management 5788d93cd8ad 4 hours ago 180 MB docker.io/tomcat latest 882487b8be1d 9 days ago 507 MB docker.io/mongo latest 5255aa8c3698 10 days ago 361 MB docker.io/mysql latest c8ee894bd2bd 11 days ago 456 MB docker.io/redis latest de25a81a5a0b 11 days ago 98.2 MB docker.io/portainer/portainer latest 4cda95efb0e4 2 weeks ago 80.6 MB [root@localhost linux]# [root@localhost linux]# docker run -d -p 5672:5672 -p 15672:15672 --name rabbit 5788d93cd8ad 25fb8684c917cc62e9b6d0f01a53af6a53688c06e005f81e2c876aee068cb52c [root@localhost linux]# [root@localhost linux]# [root@localhost linux]# docker ps CONTAINER ID IMAGE COMMAND CREATED STATUS PORTS NAMES 25fb8684c917 5788d93cd8ad "docker-entrypoint..." 4 seconds ago Up 3 seconds 4369/tcp, 5671/tcp, 0.0.0.0:5672->5672/tcp, 15671/tcp, 25672/tcp, 0.0.0.0:15672->15672/tcp rabbit 939ddacac964 portainer/portainer "/portainer" 7 days ago Up 23 minutes 0.0.0.0:9000->9000/tcp portainer [root@localhost linux]#
暴露端口
1 2 3 4 5 6 7 8 9 10 11 12 13 [root@localhost linux]# firewall-cmd --zone=public --add-port=15672/tcp --permanent success [root@localhost linux]# [root@localhost linux]# firewall-cmd --reload success [root@localhost linux]# [root@localhost linux]# [root@localhost linux]# firewall-cmd --zone=public --add-port=5672/tcp --permanent success [root@localhost linux]# [root@localhost linux]# firewall-cmd --reload success [root@localhost linux]#
访问 http://192.168.0.105:15672/
账号密码默认 quest
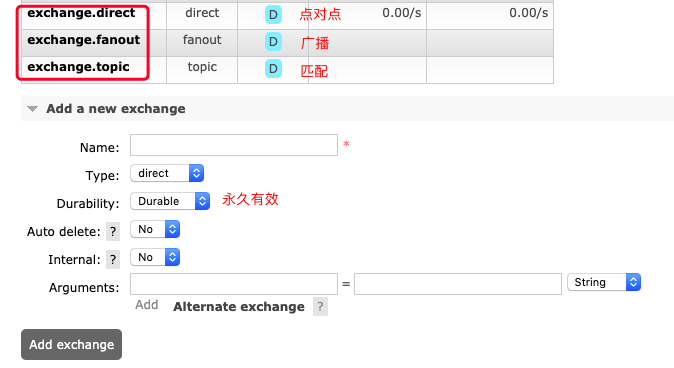
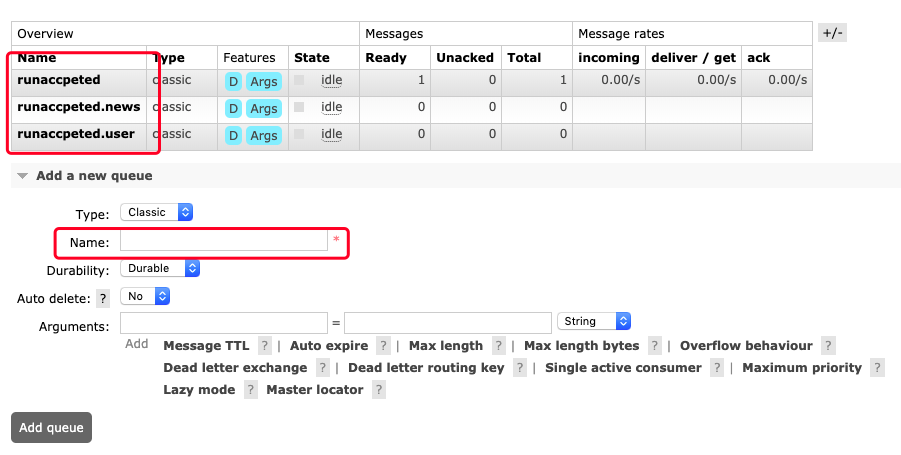
2.2. 建立交换机和队列 交换机
direct 点对点发送
fanout 广播式发送
topic #匹配任意字符,*任意一个字符
队列
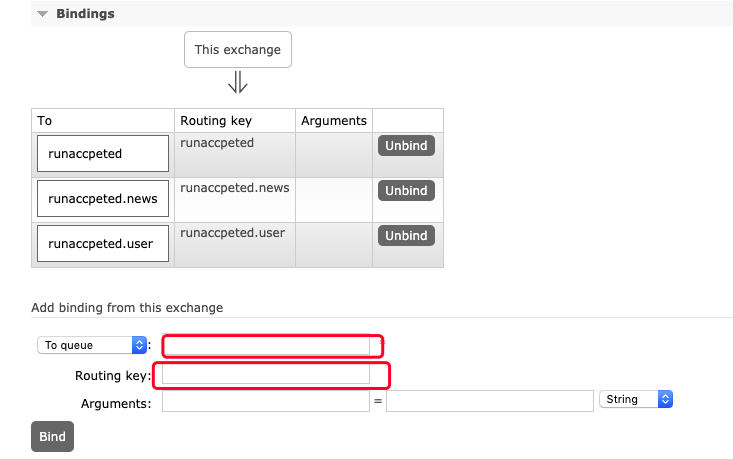
交换机中添加队列
点击交换机的名字,进入配置
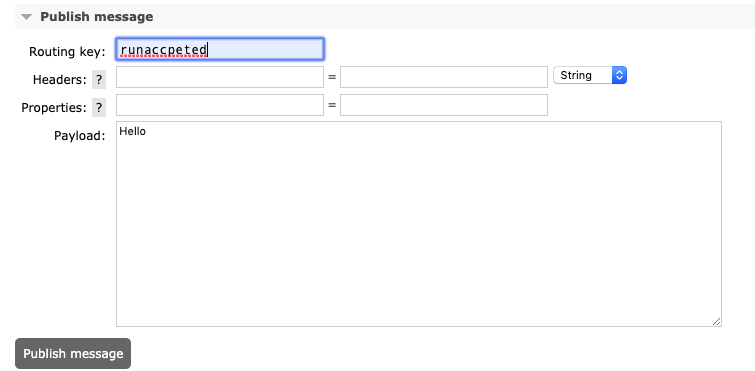
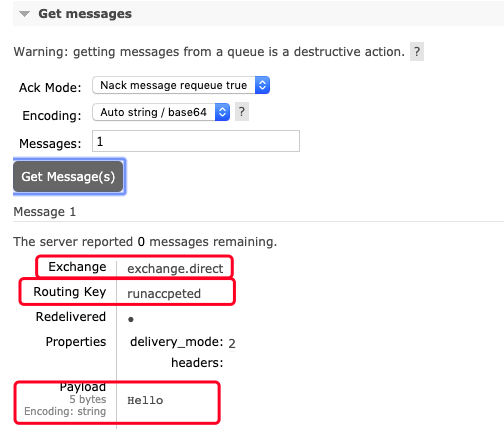
发送消息
点对点
2.3. 树莓派docker 安装rabbitmq docker pull arm32v7/rabbitmq:management
1 2 3 4 5 6 7 8 9 10 11 12 13 14 15 16 17 18 19 20 21 22 23 24 pi@pi:~ $ docker pull arm32v7/rabbitmq:management pi@pi:~ $ docker images REPOSITORY TAG IMAGE ID CREATED SIZE arm32v7/rabbitmq management d2183c759a2e 6 hours ago 146MB redis latest de25a81a5a0b 12 days ago 98.2MB portainer/portainer latest 6cb2cfd64c93 2 weeks ago 63.7MB hypriot/rpi-mysql latest 4f3cbdbc3bdb 16 months ago 209MB pi@pi:~ $ pi@pi:~ $ pi@pi:~ $ docker run -d -p 5672:5672 -p 15672:15672 --name rabbit d2183c759a2e ecd741f6bb067dd113ad795187f8b6bd5423a025cdd4ba8ca23cc5a9fb2ae8ce pi@pi:~ $ docker ps CONTAINER ID IMAGE COMMAND CREATED STATUS PORTS NAMES ecd741f6bb06 d2183c759a2e "docker-entrypoint.s…" 7 seconds ago Up 4 seconds 4369/tcp, 5671/tcp, 0.0.0.0:5672->5672/tcp, 15671/tcp, 25672/tcp, 0.0.0.0:15672->15672/tcp rabbit pi@pi:~ $ pi@pi:~ $ su 密码: root@pi:/home/pi# iptables -I INPUT -i eth0 -p tcp --dport 15672 -j ACCEPT root@pi:/home/pi# root@pi:/home/pi# iptables -I OUTPUT -o eth0 -p tcp --sport 15672 -j ACCEPT root@pi:/home/pi# root@pi:/home/pi# exit exit pi@pi:~ $
2.4. Mac 安装rabbitmq brew install rabbitmq
brew services start rabbitmq
brew services stop rabbitmq
1 2 3 4 5 6 7 8 9 10 11 12 13 14 15 16 17 18 19 20 $ brew install rabbitmq ==> erlang Man pages can be found in: /usr/local/opt/erlang/lib/erlang/man Access them with `erl -man`, or add this directory to MANPATH. ==> rabbitmq Management Plugin enabled by default at http://localhost:15672 Bash completion has been installed to: /usr/local/etc/bash_completion.d To have launchd start rabbitmq now and restart at login: brew services start rabbitmq Or, if you don't want/need a background service you can just run: rabbitmq-server $ brew services start rabbitmq ==> Successfully started `rabbitmq` (label: homebrew.mxcl.rabbitmq)
2.5. SpringBoot整合rabbitMQ 2.6. Maven依赖 1 2 3 4 5 6 7 8 9 10 <dependency > <groupId > org.springframework.boot</groupId > <artifactId > spring-boot-starter-amqp</artifactId > </dependency > <dependency > <groupId > com.rabbitmq</groupId > <artifactId > amqp-client</artifactId > <version > 5.7.2</version > </dependency >
2.7. RabbitAutoConfiguration 配置类RabbitAutoConfiguration
1 2 @ConditionalOnClass({ RabbitTemplate.class, Channel.class }) public class RabbitAutoConfiguration {}
RabbitProperties中定义了rabbitmq的连接配置
1 2 3 4 5 6 7 8 9 10 @ConfigurationProperties(prefix = "spring.rabbitmq") public class RabbitProperties { private String host = "localhost" ; private int port = 5672 ; private String username = "guest" ; private String password = "guest" ; private final Ssl ssl = new Ssl (); private String virtualHost; private String addresses; }
RabbitTemplate:交互rabbit
AmqpAdmin:建立交换机,队列等rabbit控制类
2.8. 实验一 – String 配置主机,默认端口5672,用户密码 guest
1 spring.rabbitmq.host =192.168.0.103
注入RabbitTemplate
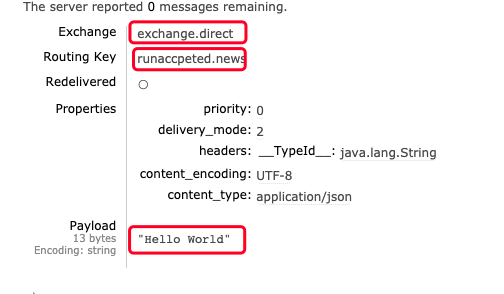
发送消息 convertAndSend(exchange,routeKey,message)
接收消息 receiveAndConvert(queueName)
1 2 3 4 5 6 7 8 9 10 11 12 @RunWith(SpringRunner.class) @SpringBootTest class DemoApplicationTests { @Autowired RabbitTemplate rabbitTemplate; @Test void contextLoads () { rabbitTemplate.convertAndSend("exchange.direct" ,"runaccpeted.news" ,"Hello World" ); } }
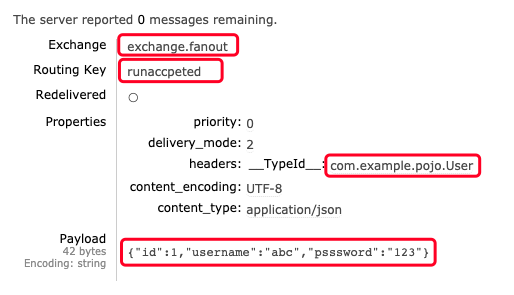
2.9. 实验二 – json rabbitTemple默认传的是java序列化的结果,重写MessageConverter
1 2 3 4 5 6 7 8 9 10 11 12 13 14 15 16 package com.example.config;import org.springframework.amqp.support.converter.Jackson2JsonMessageConverter;import org.springframework.amqp.support.converter.MessageConverter;import org.springframework.context.annotation.Bean;import org.springframework.context.annotation.Configuration;@Configuration public class rabbitConfig { @Bean public MessageConverter messageConverter () { return new Jackson2JsonMessageConverter (); } }
测试
1 2 3 4 5 6 7 8 9 10 11 @Test void contextLoads () { User user = new User (); user.setId(1 ); user.setUsername("abc" ); user.setPsssword("123" ); rabbitTemplate.convertAndSend("exchange.fanout" ,"runaccpeted" ,user); }
2.10. @RabbitListener 接收一个或多个队列中的消息
1 2 3 4 5 6 7 8 9 10 11 12 13 14 15 16 17 18 import org.springframework.amqp.core.Messages;@Service public class rabbitListener { @RabbitListener(queues = "runaccpeted") public void getMsg (User user) { System.out.println(user); } @RabbitListener(queues = "runaccpeted") public void getMsg (Message message) { System.out.println(message.getBody()); System.out.println(message.getMessageProperties()); } }
2.10.1. 应答 1 2 3 4 spring.rabbitmq.listener.direct.acknowledge-mode =manual
Channel
1 2 3 4 5 6 7 8 9 10 11 12 13 14 15 16 17 18 import com.rabbitmq.client.Channel;@RabbitListener(queues = "") public void getMessage (Message message, Channel channel) throws IOException { channel.basicAck(message.getMessageProperties().getDeliveryTag(),false ); channel.basicNack(message.getMessageProperties().getDeliveryTag(),false ,false ); channel.basicReject(message.getMessageProperties().getDeliveryTag(),false ); }
2.11. 异常关闭channel– unknown delivery tag 1 1 2 3 [ 127.0.0.1:5672] o.s.a.r.c.CachingConnectionFactory : Channel shutdown: channel error; protocol method: #method<channel.close>(reply-code=406, reply-text=PRECONDITION_FAILED - unknown delivery tag 1, class-id=60, method-id=80) [ntContainer# 0-1] o.s.a.r.l.SimpleMessageListenerContainer : Restarting Consumer@92d1782: tags=[[amq.ctag--E7Yvof-WCqFzzbFZn6_kQ]], channel=Cached Rabbit Channel: AMQChannel(amqp://guest@127.0.0.1:5672/,1), conn: Proxy@1665fa54 Shared Rabbit Connection: SimpleConnection@17b37e9a [delegate=amqp://guest@127.0.0.1:5672/, localPort= 58113], acknowledgeMode=AUTO local queue size=0
rabbitmq依旧是自动确认acknowledgeMode=AUTO
使用的是 spring.rabbitmq.listener.simple.acknowledge-mode=manual
主类中添加注解
@EnableRabbit
1 2 3 4 5 6 7 8 9 @SpringBootApplication @EnableRabbit public class DemoApplication { public static void main (String[] args) { SpringApplication.run(DemoApplication.class, args); } }
2.12. AmqpAdmin 1 2 3 4 5 6 7 8 9 10 @Autowired AmqpAdmin amqpAdmin; public void config () { amqpAdmin.declareExchange(new DirectExchange ("exchange.java" )); amqpAdmin.declareQueue(new Queue ("runaccpeted.java" )); amqpAdmin.declareBinding(new Binding ("runaccpeted.java" , Binding.DestinationType.QUEUE,"exchange.java" ,"runaccpeted.java" ,null )); }
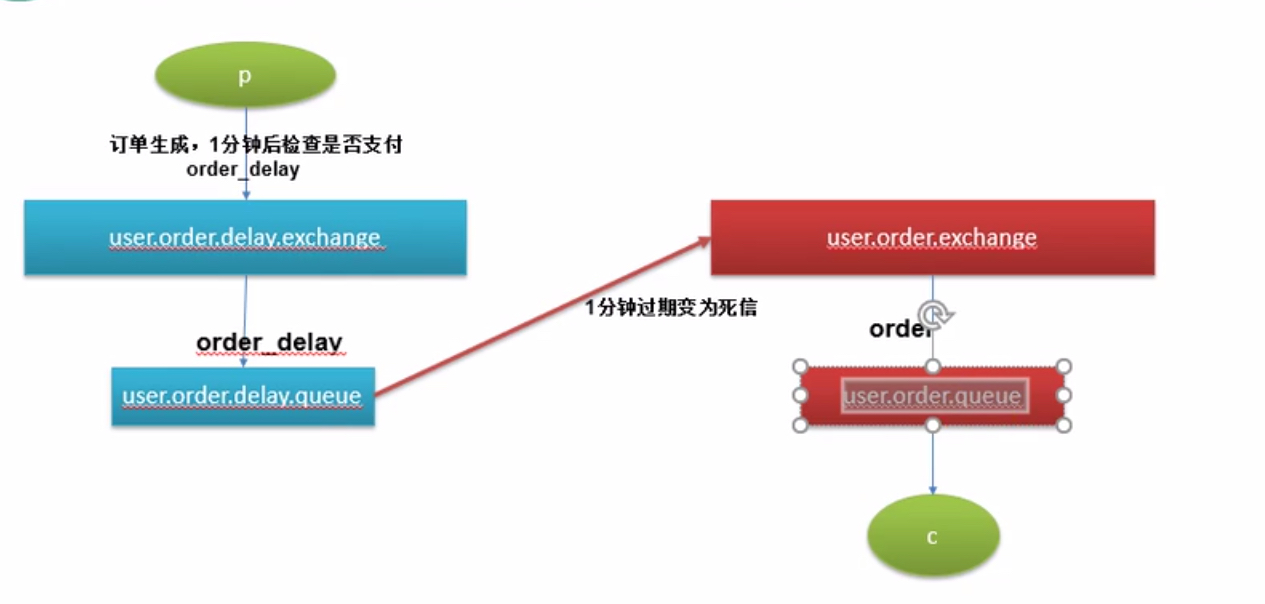
2.13. 死信
1 2 3 4 5 6 7 8 9 10 11 12 13 14 15 16 17 18 19 20 @Autowired AmqpAdmin amqpAdmin; public void config () { Exchange exchange = new DirectExchange ("user.order.exchage" ); amqpAdmin.declareExchange(exchange); Queue deadQueue = new Queue ("user.order.queue" ,true ,false ,false ,null ); amqpAdmin.declareQueue(deadQueue); Binding binding = new Binding ("user.order.queue" , Binding.DestinationType.QUEUE,"user.order.exchange" ,"order" ,null ); amqpAdmin.declareBinding(binding); Map<String, Object> map = new HashMap <>(); map.put("x-message-ttl" ,10 *1000 ); map.put("x-dead-letter-routing-key" ,exchange); map.put("x-dead-letter-exchage" ,binding); Queue queue = new Queue ("user.order.delay.queue" ,true ,false ,false ,map); amqpAdmin.declareQueue(queue); }
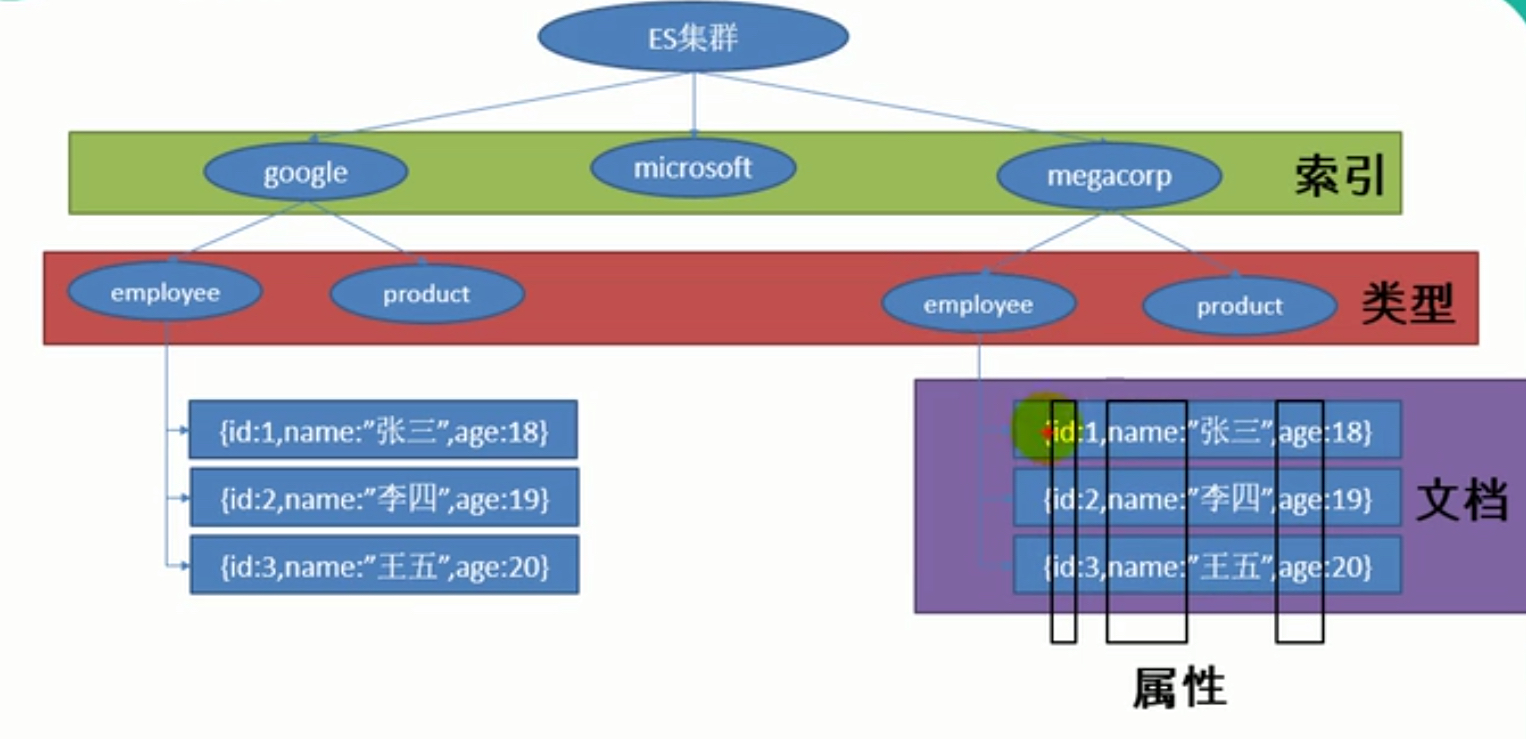
3. ElasticSearch检索 分布式搜索服务
3.1. linux安装 1 2 docker pull elasticsearch docker run -e ES_JAVA_OPTS="-Xms256m -Xmx256m" -d -p 9200:9200 -p 9300:9300 --name es id
3.2. 树莓派安装 https://www.elastic.co/guide/en/elasticsearch/reference/5.6/zip-targz.html#install-zip
Elasticsearch的学习与使用
树莓派上找不到docker elasticsearch的镜像
利用zip安装
1 2 3 wget https://artifacts.elastic.co/downloads/elasticsearch/elasticsearch-5.6.16.zip unzip elasticsearch-5.6.16.zip cp -r elasticsearch-5.6.16 /usr/local/elasticsearch-5.6.16
修改jvm内存
将-Xms2g
-Xmx2g
改为
-Xms512m
-Xmx512m
修改配置文件
1 nano config/elasticsearch.yml
主要配置
1 2 3 4 5 6 7 8 bootstrap.memory_lock : false bootstrap.system_call_filter : false network.host : 0.0.0.0 http.port : 9200 discovery.zen.ping.unicast.hosts : ["192.168.0.103"]
运行
1 2 3 cd .. cd bin ./elasticsearch
ERROR: [1] bootstrap checks failed
[1]: max virtual memory areas vm.max_map_count [65530] is too low, increase to at least [262144]
ElasticSearch 5.0.0 安装部署常见错误或问题
1 2 3 4 5 nano /etc/sysctl.conf vm.max_map_count=655360 sysctl -p
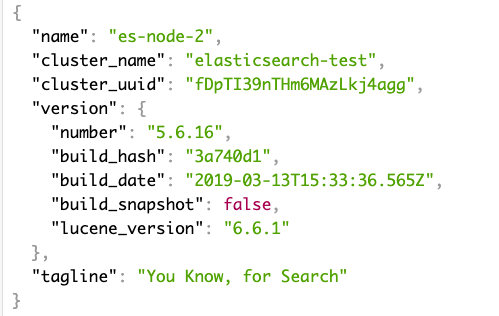
重新启动elasticsearch 访问http://192.168.0.103:9200/
3.3. 介绍
3.3.1. PUT /索引/类型/id 增加/更新 添加/更新
请求方式Content-Type=application/json
http://192.168.0.103:9200/runaccpeted/user/3
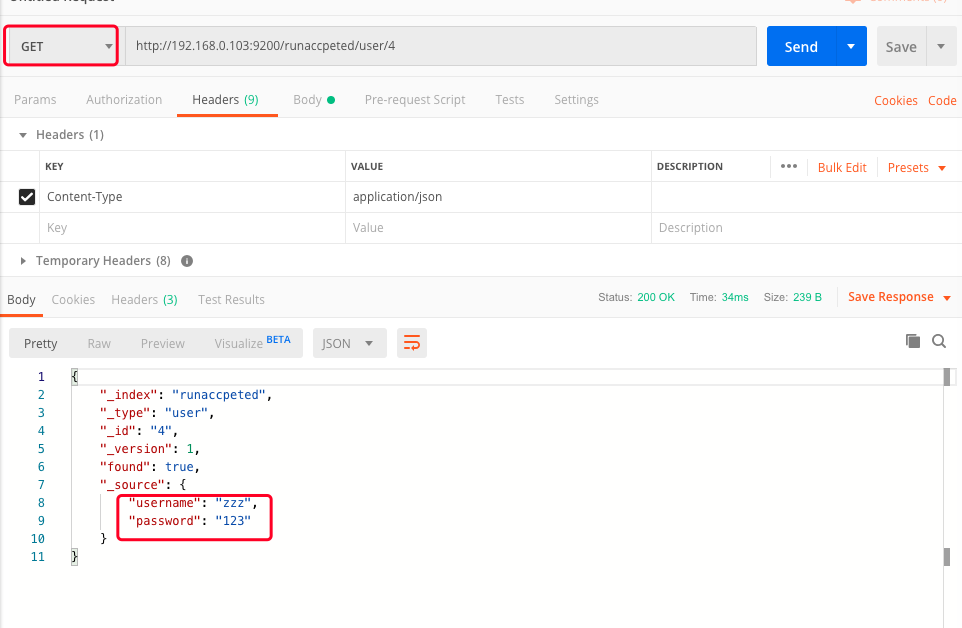
3.3.2. GET /索引/类型/id 查询 http://192.168.0.103:9200/runaccpeted/user/4
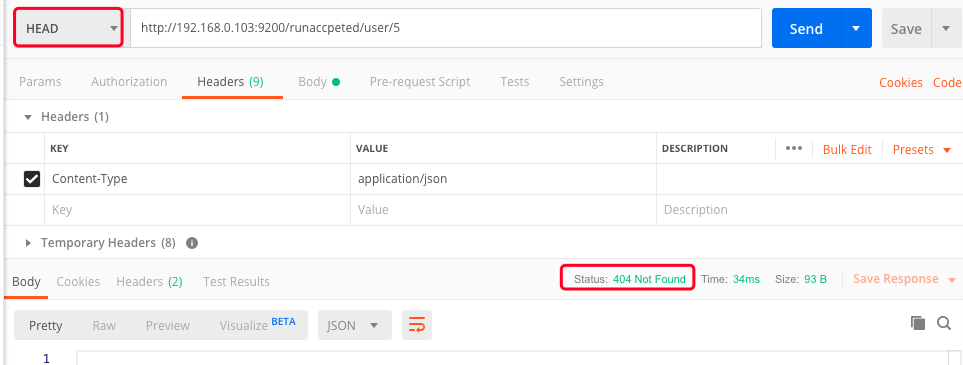
3.3.3. HEAD /索引/类型/id 查询 没有记录则报404 NOT FOUND
有记录则为200 OK
http://192.168.0.103:9200/runaccpeted/user/5
3.3.4. DELETE /索引/类型/id 删除 查询后删除
3.3.5. GET _search 查询所有信息 查询所有记录
http://192.168.0.103:9200/runaccpeted/user/_search
请求内容 {} 请求方式 application/json
按照条件查询
GET http://192.168.0.103:9200/runaccpeted/user/_search?q=username:zzz
or
GET http://192.168.0.103:9200/runaccpeted/user/_search
1 2 3 4 5 6 7 { "query" : { "match" : { "password" : 1234 } } }
3.3.6. Maven依赖 1 2 3 4 <dependency > <groupId > org.springframework.boot</groupId > <artifactId > spring-boot-starter-data-elasticsearch</artifactId > </dependency >
3.3.7. SpringBoot整合Elasticsearch两种方式 1 spring.elasticsearch.jest.uris =http://192.168.0.103:9200
3.3.7.1.1. JestClient 1 2 3 4 5 <dependency > <groupId > io.searchbox</groupId > <artifactId > jest</artifactId > <version > 6.3.1</version > </dependency >
加入数据
3.3.7.1.2. Index 1 2 3 4 5 6 7 8 9 10 11 12 13 14 15 16 17 import io.searchbox.core.Index;@Autowired JestClient jestClient; @Test public void insert () { User user = new User (); user.setId(1 ); user.setUsername("abc" ); user.setPsssword("123" ); Index index = new Index .Builder(user).index("runaccpeted" ).type("user" ).id("1" ).build(); try { jestClient.execute(index); } catch (IOException e) { e.printStackTrace(); } }
读取数据
3.3.7.1.3. Search 1 2 3 4 5 6 7 8 9 10 11 12 13 14 @Test public void search () { String json = "{\"query\":{\"match\":{\"username\":\"abc\"}}}" ; Search search = new Search .Builder(json).addIndex("runaccpeted" ).addType("user" ).build(); try { SearchResult result = jestClient.execute(search); System.out.println(execute.getSourceAsObjectList(User.class,true )); } catch (IOException e) { e.printStackTrace(); } }
1 2 spring.data.elasticsearch.cluster-name =elasticsearch-test spring.data.elasticsearch.cluster-nodes =192.168.0.103:9300
ElasticsearchRepository中指定了索引,查询方法
1 2 3 4 5 6 7 8 9 10 11 12 13 14 15 16 17 18 19 20 21 22 23 24 25 26 package org.springframework.data.elasticsearch.repository;import org.elasticsearch.index.query.QueryBuilder;import org.springframework.data.domain.Page;import org.springframework.data.domain.Pageable;import org.springframework.data.elasticsearch.core.query.SearchQuery;import org.springframework.data.repository.NoRepositoryBean;@NoRepositoryBean public interface ElasticsearchRepository <T, ID> extends ElasticsearchCrudRepository <T, ID> { <S extends T > S index (S var1) ; <S extends T > S indexWithoutRefresh (S var1) ; Iterable<T> search (QueryBuilder var1) ; Page<T> search (QueryBuilder var1, Pageable var2) ; Page<T> search (SearchQuery var1) ; Page<T> searchSimilar (T var1, String[] var2, Pageable var3) ; void refresh () ; Class<T> getEntityClass () ; }
3.3.7.2.1. extends ElasticsearchRepository 继承ElasticsearchRepository接口定义方法
1 2 3 4 5 6 7 8 9 10 package com.example.config;import com.example.pojo.User;import org.springframework.data.elasticsearch.repository.ElasticsearchRepository;import org.springframework.stereotype.Component;@Component public interface UserRepository extends ElasticsearchRepository <User,Integer> {}
实现
1 2 3 @Document(indexName = "runaccpeted",type = "user") public class User {}
测试
1 2 3 4 5 6 7 8 9 10 @Autowired UserRepository userRepository; @Test public void esInsert () { User user = new User (); user.setId(2 ); user.setUsername("bcd" ); user.setPsssword("234" ); userRepository.index(user); }
http://192.168.0.103:9200/runaccpeted/user/_search
1 2 3 4 5 6 7 8 9 10 11 12 "hits" : [ { "_index" : "runaccpeted" , "_type" : "user" , "_id" : "2" , "_score" : 1.0 , "_source" : { "id" : 2 , "username" : "bcd" , "psssword" : "234" } } ,
3.3.7.2.2. 自定义方法 1 2 3 4 5 6 7 8 9 10 11 12 13 14 15 16 @Component public interface UserRepository extends ElasticsearchRepository <User, Integer> { List<User> findByUsernameLike (String name) ; } @Test public void elastic2 () { List<User> user =userRepository.findByUsernameLike("b" ); for (User u:user) { System.out.println(u); } }
4. 任务 4.1. 异步 @Async 注解在方法中,表示方法是异步的
@EnableAsync 注解在主配置类上
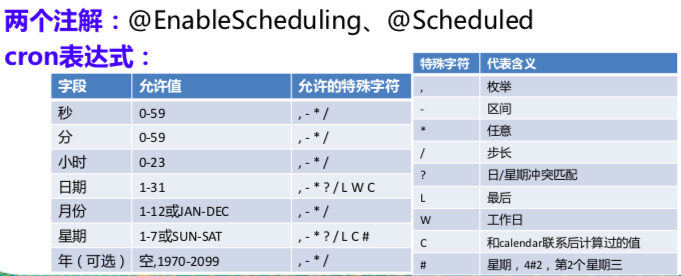
4.2. 定时 @Scheduled
1 2 3 4 5 6 7 8 9 10 11 String cron () default "" ;
@EnableScheduling 配置在主配置类上
5. 邮件 5.1. Maven依赖 1 2 3 4 <dependency > <groupId > org.springframework.boot</groupId > <artifactId > spring-boot-starter-mail</artifactId > </dependency >
5.2. application.properties 1 2 3 4 spring.mail.host =smtp.qq.com spring.mail.username =QQ spring.mail.password =源自于qq邮箱-设置-SMTP服务-生成授权码 spring.mail.properties.mail.smtp.ssl.enable =true
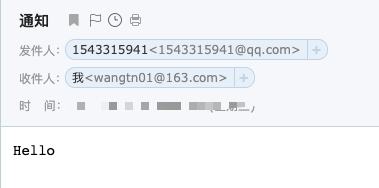
5.3. Test 1 2 3 4 5 6 7 8 9 10 11 12 13 14 15 16 17 @Autowired JavaMailSenderImpl mailSender; @Test void contextLoads () { SimpleMailMessage message = new SimpleMailMessage (); message.setSubject("通知" ); message.setText("Hello" ); message.setFrom("1543315941@qq.com" ); message.setTo("wangtn01@163.com" ); mailSender.send(message); }
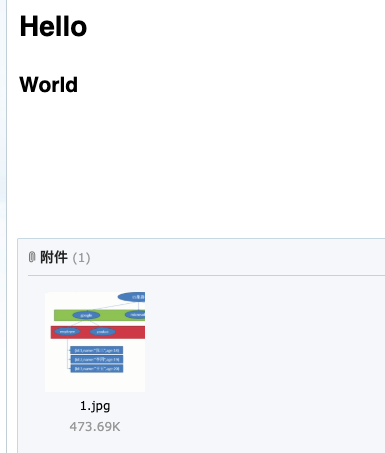
5.4. 复杂邮件 1 2 3 4 5 6 7 8 9 10 11 12 13 14 15 16 17 18 19 @Test void test () throws Exception { MimeMessage mimeMessage = mailSender.createMimeMessage(); MimeMessageHelper helper = new MimeMessageHelper (mimeMessage,true ); helper.setSubject("通知" ); helper.setText("<h1>Hello</h1><h2>World</h2>" ,true ); helper.addAttachment("1.jpg" ,new File ("/Users/Learning/Downloads/1.jpg" )); helper.setFrom("1543315941@qq.com" ); helper.setTo("wangtn01@163.com" ); mailSender.send(mimeMessage); }
6. 安全 6.1. shiro 6.2. spring security 6.2.1. Maven 1 2 3 4 <dependency > <groupId > org.springframework.boot</groupId > <artifactId > spring-boot-starter-security</artifactId > </dependency >
6.2.2. 配置类 SecurityConfig @EnableWebSecurity 内部注解@Configuration
配置类继承WebSecurityConfigurerAdapter,重写 configure方法
版本需要提供一个PasswordEncorder的实例,否则后台汇报错误:java.lang.IllegalArgumentException: There is no PasswordEncoder mapped for the id “null”
PasswordEncoder实现类
1 2 3 4 5 6 7 8 9 10 11 12 13 14 15 package com.example.config;import org.springframework.security.crypto.password.PasswordEncoder;public class myPasswordEncoder implements PasswordEncoder { @Override public String encode (CharSequence charSequence) { return charSequence.toString(); } @Override public boolean matches (CharSequence charSequence, String s) { return charSequence.toString().equals(s); } }
配置类
1 2 3 4 5 6 7 8 9 10 11 12 13 14 15 16 17 18 19 20 21 22 23 24 25 26 27 28 29 30 31 32 33 34 35 36 37 38 39 40 41 42 43 44 45 46 47 package com.example.config;import org.springframework.security.config.annotation.authentication.builders.AuthenticationManagerBuilder;import org.springframework.security.config.annotation.web.builders.HttpSecurity;import org.springframework.security.config.annotation.web.configuration.EnableWebSecurity;import org.springframework.security.config.annotation.web.configuration.WebSecurityConfigurerAdapter;import org.springframework.security.config.annotation.web.configurers.FormLoginConfigurer;@EnableWebSecurity public class SecurityConfig extends WebSecurityConfigurerAdapter { @Override protected void configure (HttpSecurity http) throws Exception { http.authorizeRequests().antMatchers("/" ).permitAll() .antMatchers("/user/**" ).hasRole("user" ) .antMatchers("/vip/**" ).hasRole("vip" ); http.formLogin(); http.logout().logoutSuccessUrl("/" ); } @Override protected void configure (AuthenticationManagerBuilder auth) throws Exception { myPasswordEncoder passwordEncoder = new myPasswordEncoder (); auth.inMemoryAuthentication().passwordEncoder(new myPasswordEncoder ()) .withUser("a" ).password("123" ).roles("user" ) .and() .withUser("b" ).password("123" ).roles("vip" ); } }
6.2.3. TestController 1 2 3 4 5 6 7 8 9 10 11 12 13 14 15 16 17 18 19 20 21 22 23 24 package com.example.controller;import org.springframework.stereotype.Controller;import org.springframework.web.bind.annotation.RequestMapping;import org.springframework.web.bind.annotation.RestController;@RestController public class TestController { @RequestMapping("/") public String index () { return "index" ; } @RequestMapping("/user") public String user () { return "user/index" ; } @RequestMapping("/vip") public String vip () { return "vip/index" ; } }
6.2.4. 前端页面 Index.html
1 2 3 4 5 6 7 8 9 10 11 12 <!DOCTYPE html > <html lang ="en" xmlns:th ="http://www.thymeleaf.org" > <head > <meta charset ="UTF-8" > <title > Title</title > </head > <body > index<br > <a th:href ="@{/user}" > user</a > <br > <a th:href ="@{/vip}" > vip</a > </body > </html >
/user/index.html
1 2 3 4 5 6 7 8 9 10 <!DOCTYPE html > <html lang ="en" > <head > <meta charset ="UTF-8" > <title > Title</title > </head > <body > User </body > </html >
/user/vip.html
1 2 3 4 5 6 7 8 9 10 <!DOCTYPE html > <html lang ="en" > <head > <meta charset ="UTF-8" > <title > Title</title > </head > <body > vip </body > </html >
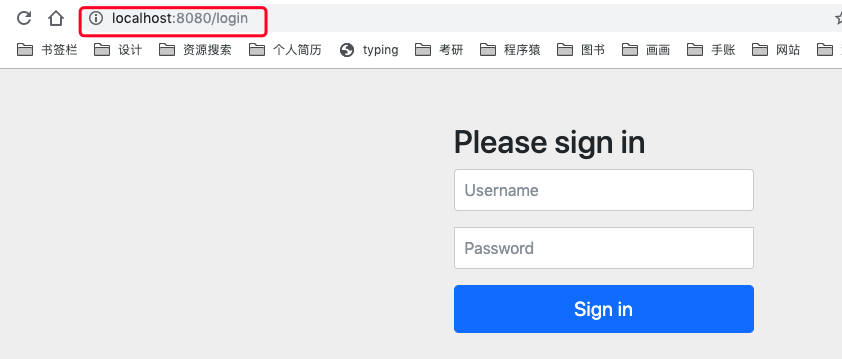
6.2.5. 访问 http://localhost:8080/
http://localhost:8080/user/ –> http://localhost:8080/login
输入a/123 跳转至http://localhost:8080/user/ –> user
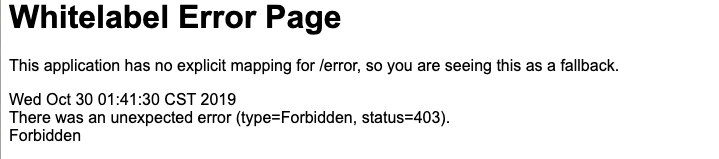
清空缓存 访问http://localhost:8080/user/ –> http://localhost:8080/login 输入b/123 访问 http://localhost:8080/user/ forbidden
访问 http://localhost:8080/vip/ –> vip
6.2.6. thymeleaf-security❌ 根据登录用户显示不同页面
1 2 3 4 5 <dependency > <groupId > org.thymeleaf.extras</groupId > <artifactId > thymeleaf-extras-springsecurity4</artifactId > <version > 3.0.4.RELEASE</version > </dependency >
security.html
sec:authorize=”!isAuthenticated()” 开启认证
sec:authentication=”name” 获取登录名
sec:authentication=”principal.authorities” 获取登录角色
1 2 3 4 5 6 7 8 9 10 11 12 13 14 15 16 17 18 19 20 21 22 <!DOCTYPE html > <html lang ="en" xmlns:th ="http://www.thymeleaf.org" xmlns:sec ="http://www.thymeleaf.org/thymeleaf-extras-springsecurity4" > <head > <meta charset ="UTF-8" > <title > Security</title > </head > <body > <a th:href ="@{/user}" > <h1 > user</h1 > </a > <a th:href ="@{/vip}" > <h1 > vip</h1 > </a > <div sec:authorize ="!isAuthenticated()" > 欢迎访问 </div > <div sec:authorize ="isAuthenticated()" > 登录名:<span sec:authentication ="name" > </span > <br > 角色为:<span sec:authentication ="principal.authorities" > </span > <br > <form th:action ="@{/logout}" method ="post" sec:authentication ="isAuthenticated()" > <input type ="submit" value ="注销" > </form > </div > </body > </html >
并没有效果
改变版本
1 2 3 4 5 <dependency > <groupId > org.thymeleaf.extras</groupId > <artifactId > thymeleaf-extras-springsecurity5</artifactId > <version > 3.0.4.RELEASE</version > </dependency >
报500错误,Error retrieving value for property “isAuthenticated()” of authentication object of class org.springframework.security.authentication.UsernamePasswordAuthenticationToken
6.2.7. 记住我 浏览器记录cookie数据
添加参数
1 http.rememberMe().rememberMeParameter("remember");
1 <input type ="checkbox" name ="remember" >
6.2.8. 自定义登录页 1 http.formLogin().usernameParameter("usr" ).passwordParameter("pwd" ).loginPage("/userlogin" ).loginProcessingUrl("/login" );
默认为POST的/login,参数为username,password
修改为 /userlogin,则处理请求的也是 /userlogin,故配置loginProcessingUrl
7. 分布式 7.1. zookeeper 7.1.1. 树莓派 https://archive.apache.org/dist/zookeeper/zookeeper-3.5.4-beta/
启动 zkServer.sh start
1 2 3 4 5 6 7 8 9 10 11 12 13 14 15 16 17 18 19 20 21 22 23 24 25 root@pi:/home/pi/Downloads# tar zxvf zookeeper-3.5.4-beta.tar.gz root@pi:/home/pi/Downloads# cp -r zookeeper-3.5.4-beta /usr/local/zookeeper root@pi:/usr/local/zookeeper# nano /etc/profile export ZOOKEEPER_HOME=/usr/local/zookeeper export PATH=$PATH:$ZOOKEEPER_HOME/bin root@pi:/usr/local/zookeeper# source /etc/profile root@pi:/usr/local/zookeeper/conf# nano zoo_sample.cfg tickTime=2000 通信心跳数,服务器和客户端心跳时间 initLimit=10 LF初始通信时限,Leader,follower之间初始连接最多容忍心跳数 syncLimit=5 LF之间最大响应时间单位,超过syncLimit*tickTime,leader认为follower死亡,删除follower dataDir=/usr/local/zookeeper/data clientPort=2181 root@pi:/usr/local/zookeeper/conf# mv zoo_sample.cfg zoo.cfg root@pi:/usr/local/zookeeper/conf# iptables -I INPUT -i eth0 -p tcp --dport 2181 -j ACCEPT root@pi:/usr/local/zookeeper/conf# root@pi:/usr/local/zookeeper/conf# iptables -I OUTPUT -o eth0 -p tcp --sport 2181 -j ACCEPT root@pi:/usr/local/zookeeper/conf# zkServer.sh start root@pi:/usr/local/zookeeper/conf# zkServer.sh stop root@pi:/usr/local/zookeeper/conf# zkServer.sh status root@pi:/usr/local/zookeeper/conf# zkCli.sh
7.2. springboot整合dubbo+zookeeper 新建 springboot-web项目 provider-ticket,consumer.user
https://github.com/apache/dubbo-spring-boot-project/tree/0.2.x
7.2.1. provider-ticket 7.2.1.1. Maven依赖 1 2 3 4 5 6 7 8 9 10 11 12 13 14 15 16 17 18 19 20 21 22 23 24 25 26 27 28 29 30 <properties > <java.version > 1.8</java.version > <dubbo.version > 2.6.5</dubbo.version > </properties > <dependency > <groupId > com.alibaba.boot</groupId > <artifactId > dubbo-spring-boot-starter</artifactId > <version > 0.2.1.RELEASE</version > </dependency > <dependency > <groupId > com.alibaba</groupId > <artifactId > dubbo</artifactId > <version > ${dubbo.version}</version > </dependency > <dependency > <groupId > org.apache.curator</groupId > <artifactId > curator-framework</artifactId > <version > 2.12.0</version > </dependency > <dependency > <groupId > com.101tec</groupId > <artifactId > zkclient</artifactId > <version > 0.11</version > </dependency >
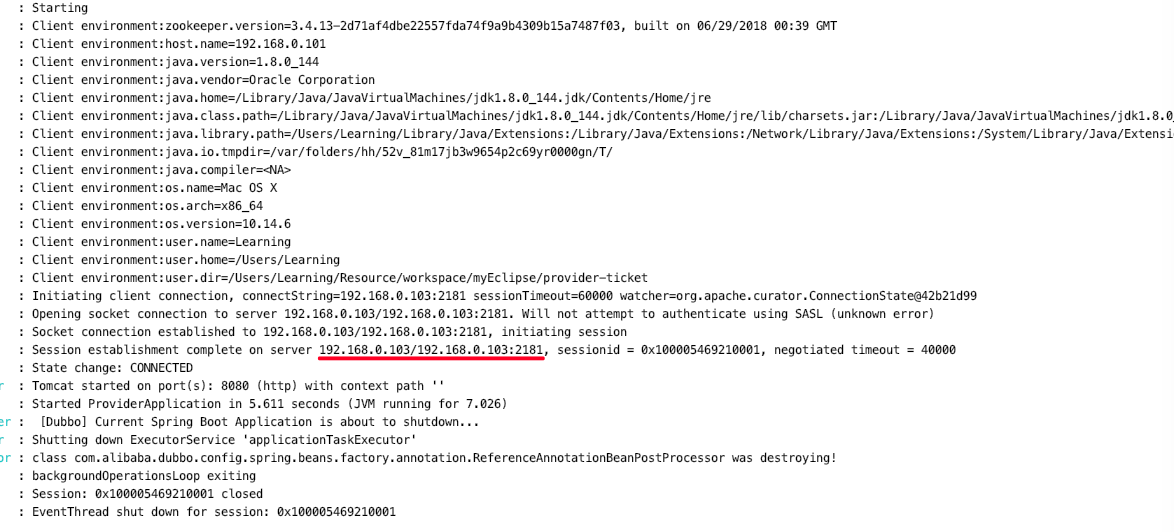
7.2.1.2. 配置application.properties 1 2 3 dubbo.application.name =provider-ticket dubbo.registry.address =zookeeper://192.168.0.103:2181 dubbo.scan.base-packages =com.runaccpeted.service
7.2.1.3. service类 @Service dubbo注解
1 2 3 4 5 6 7 8 9 10 11 12 13 14 15 16 17 18 19 20 21 22 23 24 package com.runaccpeted.service;public interface TicketService { public String getTicket () ; } package com.runaccpeted.service.impl;import com.alibaba.dubbo.config.annotation.Service;import com.runaccpeted.service.TicketService;import org.springframework.stereotype.Component;@Service @Component public class TicketServiceImpl implements TicketService { @Override public String getTicket () { return "Ticket" ; } }
7.2.1.4. 运行provider-ticket
7.2.2. consumer-user 7.2.2.1. Maven依赖 1 2 3 4 5 6 7 8 9 10 11 12 13 14 15 16 17 18 19 20 21 22 23 24 25 26 27 28 29 30 <properties > <java.version > 1.8</java.version > <dubbo.version > 2.6.5</dubbo.version > </properties > <dependency > <groupId > com.alibaba.boot</groupId > <artifactId > dubbo-spring-boot-starter</artifactId > <version > 0.2.1.RELEASE</version > </dependency > <dependency > <groupId > com.alibaba</groupId > <artifactId > dubbo</artifactId > <version > ${dubbo.version}</version > </dependency > <dependency > <groupId > org.apache.curator</groupId > <artifactId > curator-framework</artifactId > <version > 2.12.0</version > </dependency > <dependency > <groupId > com.101tec</groupId > <artifactId > zkclient</artifactId > <version > 0.11</version > </dependency >
7.2.2.2. 写一样的TicketService 1 2 3 4 5 6 package com.runaccpeted.service;public interface TicketService { public String getTicket () ; }
7.2.2.3. Userservice @Reference 根据名字注入
1 2 3 4 5 6 7 8 9 10 11 12 13 14 15 16 17 18 package com.runaccpeted.service;import com.alibaba.dubbo.config.annotation.Reference;import org.springframework.stereotype.Service;@Service public class UserService { @Reference TicketService ticketService; public void test () { String str = ticketService.getTicket(); System.out.println("买到了 " +str); } }
7.2.2.4. 检验 1 2 3 4 5 6 7 8 9 10 11 12 13 14 15 16 17 18 19 package com.runaccpeted;import com.runaccpeted.service.UserService;import org.junit.jupiter.api.Test;import org.springframework.beans.factory.annotation.Autowired;import org.springframework.boot.test.context.SpringBootTest;@SpringBootTest class ConsumerApplicationTests { @Autowired UserService service; @Test void contextLoads () { service.test(); } }
输出
7.3. SpringCloud 7.3.1. 五大组件 服务发现 Netflix Eureka
客户端负载均衡 Netflix Ribbon
断路器 Netflix Hystrix
服务网关 Netflix Zuul
分布式配置 Spring Cloud Config
7.3.2. eureka-server 注册中心 7.3.2.1. 导入eureka-server 1 2 3 4 5 6 7 8 9 10 11 12 13 14 15 16 17 18 19 20 21 22 23 24 25 26 27 28 29 30 31 32 33 34 35 36 37 38 39 40 41 42 43 44 45 46 47 48 49 50 51 52 53 54 55 56 57 58 59 60 61 62 63 64 65 66 67 68 69 70 <?xml version="1.0" encoding="UTF-8" ?> <project xmlns ="http://maven.apache.org/POM/4.0.0" xmlns:xsi ="http://www.w3.org/2001/XMLSchema-instance" xsi:schemaLocation ="http://maven.apache.org/POM/4.0.0 https://maven.apache.org/xsd/maven-4.0.0.xsd" > <modelVersion > 4.0.0</modelVersion > <parent > <groupId > org.springframework.boot</groupId > <artifactId > spring-boot-starter-parent</artifactId > <version > 2.2.0.RELEASE</version > <relativePath /> </parent > <groupId > com.runaccpeted</groupId > <artifactId > eureka-server</artifactId > <version > 0.0.1-SNAPSHOT</version > <name > eureka-server</name > <description > Demo project for Spring Boot</description > <properties > <java.version > 1.8</java.version > <spring-cloud.version > Hoxton.RC1</spring-cloud.version > </properties > <dependencies > <dependency > <groupId > org.springframework.cloud</groupId > <artifactId > spring-cloud-starter-netflix-eureka-server</artifactId > </dependency > <dependency > <groupId > org.springframework.boot</groupId > <artifactId > spring-boot-starter-test</artifactId > <scope > test</scope > <exclusions > <exclusion > <groupId > org.junit.vintage</groupId > <artifactId > junit-vintage-engine</artifactId > </exclusion > </exclusions > </dependency > </dependencies > <dependencyManagement > <dependencies > <dependency > <groupId > org.springframework.cloud</groupId > <artifactId > spring-cloud-dependencies</artifactId > <version > ${spring-cloud.version}</version > <type > pom</type > <scope > import</scope > </dependency > </dependencies > </dependencyManagement > <build > <plugins > <plugin > <groupId > org.springframework.boot</groupId > <artifactId > spring-boot-maven-plugin</artifactId > </plugin > </plugins > </build > <repositories > <repository > <id > spring-milestones</id > <name > Spring Milestones</name > <url > https://repo.spring.io/milestone</url > </repository > </repositories > </project >
7.3.2.2. 配置application.yml 1 2 3 4 5 6 7 8 9 10 11 12 server: port: 8761 eureka: instance: hostname: eureka-server client: register-with-eureka: false fetch-registry: false
7.3.2.3. 启动 @EnableEurekaServer 1 2 3 4 5 6 7 8 9 10 11 12 13 14 15 package com.runaccpeted;import org.springframework.boot.SpringApplication;import org.springframework.boot.autoconfigure.SpringBootApplication;import org.springframework.cloud.netflix.eureka.server.EnableEurekaServer;@EnableEurekaServer @SpringBootApplication public class EurekaServerApplication { public static void main (String[] args) { SpringApplication.run(EurekaServerApplication.class, args); } }
http://localhost:8761/
7.3.3. provider-ticket 服务中心 7.3.3.1. Maven 添加web – Spring Web,Spring Cloud Discovery – Eureka Discovery Client
1 2 3 4 5 6 7 8 9 10 11 12 13 14 15 16 17 18 19 20 21 22 23 24 25 26 27 28 29 30 31 32 33 34 35 36 37 38 39 40 41 42 43 44 45 46 47 48 49 50 51 52 53 54 55 56 57 58 59 60 61 62 63 64 65 66 67 68 69 70 71 72 73 74 75 <?xml version="1.0" encoding="UTF-8" ?> <project xmlns ="http://maven.apache.org/POM/4.0.0" xmlns:xsi ="http://www.w3.org/2001/XMLSchema-instance" xsi:schemaLocation ="http://maven.apache.org/POM/4.0.0 https://maven.apache.org/xsd/maven-4.0.0.xsd" > <modelVersion > 4.0.0</modelVersion > <parent > <groupId > org.springframework.boot</groupId > <artifactId > spring-boot-starter-parent</artifactId > <version > 2.2.0.RELEASE</version > <relativePath /> </parent > <groupId > com.runaccpeted</groupId > <artifactId > provider-ticket</artifactId > <version > 0.0.1-SNAPSHOT</version > <name > provider-ticket</name > <description > Demo project for Spring Boot</description > <properties > <java.version > 1.8</java.version > <spring-cloud.version > Hoxton.RC1</spring-cloud.version > </properties > <dependencies > <dependency > <groupId > org.springframework.cloud</groupId > <artifactId > spring-cloud-starter-netflix-eureka-client</artifactId > </dependency > <dependency > <groupId > org.springframework.boot</groupId > <artifactId > spring-boot-starter-web</artifactId > </dependency > <dependency > <groupId > org.springframework.boot</groupId > <artifactId > spring-boot-starter-test</artifactId > <scope > test</scope > <exclusions > <exclusion > <groupId > org.junit.vintage</groupId > <artifactId > junit-vintage-engine</artifactId > </exclusion > </exclusions > </dependency > </dependencies > <dependencyManagement > <dependencies > <dependency > <groupId > org.springframework.cloud</groupId > <artifactId > spring-cloud-dependencies</artifactId > <version > ${spring-cloud.version}</version > <type > pom</type > <scope > import</scope > </dependency > </dependencies > </dependencyManagement > <build > <plugins > <plugin > <groupId > org.springframework.boot</groupId > <artifactId > spring-boot-maven-plugin</artifactId > </plugin > </plugins > </build > <repositories > <repository > <id > spring-milestones</id > <name > Spring Milestones</name > <url > https://repo.spring.io/milestone</url > </repository > </repositories > </project >
7.3.3.2. application.yml 1 2 3 4 5 6 7 8 9 10 11 12 server : port : 8001 eureka : instance : prefer-ip-address : true client : service-url : defaultZone : http://localhost:8761/eureka/ spring : application : name : provider-ticket
7.3.3.3. TickerService 1 2 3 4 5 6 7 8 9 10 11 12 package com.runaccpeted.service;import org.springframework.stereotype.Service;@Service public class TickerService { public String getTicket () { return "Ticket" ; } }
7.3.3.4. TicketController 1 2 3 4 5 6 7 8 9 10 11 12 13 14 15 16 17 18 package com.runaccpeted.controller;import com.runaccpeted.service.TickerService;import org.springframework.beans.factory.annotation.Autowired;import org.springframework.web.bind.annotation.RequestMapping;import org.springframework.web.bind.annotation.RestController;@RestController public class TicketController { @Autowired TickerService service; @RequestMapping("/ticket") public String getTicket () { return service.getTicket(); } }
暴露 8001端口http://localhost:8001/ticket
server中有所改变
7.3.3.5. 打包项目,更改端口号 分别运行jar包
1 2 java -jar provider-ticket-0.0.1-SNAPSHOT-8002.jar java -jar provider-ticket-0.0.1-SNAPSHOT-8001.jar
7.3.4. consumer-user 消费者 7.3.4.1. Maven 添加web – Spring Web,Spring Cloud Discovery – Eureka Discovery Client
同provider-ticket
7.3.4.2. application.yml 1 2 3 4 5 6 7 8 9 10 11 spring: application: name: consumer-user eureka: instance: prefer-ip-address: true client: service-url: defaultZone: http://localhost:8761/eureka/ server: port: 8800
7.3.4.3. Main类 @EnableDiscoveryClient 开启服务
@LoadBalanced 负载均衡
1 2 3 4 5 6 7 8 9 10 11 12 13 14 15 16 17 18 19 20 21 22 23 24 25 26 27 package com.runaccpeted;import org.springframework.boot.SpringApplication;import org.springframework.boot.autoconfigure.SpringBootApplication;import org.springframework.cloud.client.discovery.EnableDiscoveryClient;import org.springframework.cloud.client.loadbalancer.LoadBalanced;import org.springframework.cloud.netflix.eureka.EnableEurekaClient;import org.springframework.context.annotation.Bean;import org.springframework.web.client.RestTemplate;@EnableDiscoveryClient @SpringBootApplication public class ConsumerUserApplication { public static void main (String[] args) { SpringApplication.run(ConsumerUserApplication.class, args); } @LoadBalanced @Bean public RestTemplate restTemplate () { return new RestTemplate (); } }
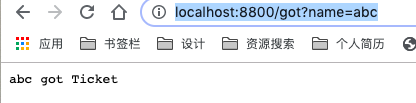
7.3.4.4. UserController 1 2 3 4 5 6 7 8 9 10 11 12 13 14 15 16 17 18 19 20 package com.runaccpeted.controller;import org.springframework.beans.factory.annotation.Autowired;import org.springframework.web.bind.annotation.RequestMapping;import org.springframework.web.bind.annotation.RestController;import org.springframework.web.client.RestTemplate;@RestController public class UserController { @Autowired RestTemplate restTemplate; @RequestMapping("/got") public String getTicket (String name) { String str=restTemplate.getForObject("http://PROVIDER-TICKET/ticket" ,String.class); return name +" got " +str; } }
http://localhost:8800/got?name=abc
Eureka 中存入ip
1 2 3 4 <dependency > <groupId > org.springframework.boot</groupId > <artifactId > spring-boot-devtools</artifactId > </dependency >
每次修改代码后,command+F9 build project,重新编译
9. 监控管理 9.1. Maven – actuator 1 2 3 4 <dependency > <groupId > org.springframework.boot</groupId > <artifactId > spring-boot-starter-actuator</artifactId > </dependency >
9.2. 默认仅暴露health,info端口 1 2 3 4 5 6 7 8 9 10 11 12 13 14 15 16 17 18 19 20 21 22 { "_links" : { "self" : { "href" : "http://localhost:8080/actuator" , "templated" : false } , "health-path" : { "href" : "http://localhost:8080/actuator/health/{*path}" , "templated" : true } , "health" : { "href" : "http://localhost:8080/actuator/health" , "templated" : false } , "info" : { "href" : "http://localhost:8080/actuator/info" , "templated" : false } } }
9.3. applicat.properties 1 2 management.endpoints.web.exposure.include =*
得到可访问的端口
1 2 3 4 5 6 7 8 9 10 11 12 13 14 15 16 17 18 19 20 21 22 23 24 25 26 27 28 29 30 31 32 33 34 35 36 37 38 39 40 41 42 43 44 45 46 47 48 49 50 51 52 53 54 55 56 57 58 59 60 61 62 63 64 65 66 67 68 69 70 71 72 73 74 75 76 77 78 79 80 81 82 { "_links" : { "self" : { "href" : "http://localhost:8080/actuator" , "templated" : false } , "beans" : { "href" : "http://localhost:8080/actuator/beans" , "templated" : false } , "caches-cache" : { "href" : "http://localhost:8080/actuator/caches/{cache}" , "templated" : true } , "caches" : { "href" : "http://localhost:8080/actuator/caches" , "templated" : false } , "health" : { "href" : "http://localhost:8080/actuator/health" , "templated" : false } , "health-path" : { "href" : "http://localhost:8080/actuator/health/{*path}" , "templated" : true } , "info" : { "href" : "http://localhost:8080/actuator/info" , "templated" : false } , "conditions" : { "href" : "http://localhost:8080/actuator/conditions" , "templated" : false } , "configprops" : { "href" : "http://localhost:8080/actuator/configprops" , "templated" : false } , "env" : { "href" : "http://localhost:8080/actuator/env" , "templated" : false } , "env-toMatch" : { "href" : "http://localhost:8080/actuator/env/{toMatch}" , "templated" : true } , "loggers-name" : { "href" : "http://localhost:8080/actuator/loggers/{name}" , "templated" : true } , "loggers" : { "href" : "http://localhost:8080/actuator/loggers" , "templated" : false } , "heapdump" : { "href" : "http://localhost:8080/actuator/heapdump" , "templated" : false } , "threaddump" : { "href" : "http://localhost:8080/actuator/threaddump" , "templated" : false } , "metrics-requiredMetricName" : { "href" : "http://localhost:8080/actuator/metrics/{requiredMetricName}" , "templated" : true } , "metrics" : { "href" : "http://localhost:8080/actuator/metrics" , "templated" : false } , "scheduledtasks" : { "href" : "http://localhost:8080/actuator/scheduledtasks" , "templated" : false } , "mappings" : { "href" : "http://localhost:8080/actuator/mappings" , "templated" : false } } }
内置端点默认曝光,启用了不代表可以直接访问,还需要将其暴露出来。
ID
描述
Web
JMX
auditevents
显示当前应用程序的审计事件信息
No
Yes
beans
显示一个应用中所有Spring Beans的完整列表
No
Yes
conditions
显示配置类和自动配置类(configuration and auto-configuration classes)的状态及它们被应用或未被应用的原因
No
Yes
configprops
显示一个所有@ConfigurationProperties的集合列表
No
Yes
env
显示来自Spring的 ConfigurableEnvironment的属性
No
Yes
flyway
显示数据库迁移路径,如果有的话
No
Yes
health
显示应用的健康信息(当使用一个未认证连接访问时显示一个简单的’status’,使用认证连接访问则显示全部信息详情)
YesYes
heapdump
返回一个GZip压缩的hprof堆dump文件
No
N/A
httptrace
请求追踪
No
Yes
info
显示任意的应用信息,在application.yml 中有info.*
YesYes
jolokia
通过HTTP暴露JMX beans(当Jolokia在类路径上时,WebFlux不可用)
No
Yes
logfile
返回日志文件内容(如果设置了logging.file或logging.path属性的话),支持使用HTTP Range 头接收日志文件内容的部分信息
No
Yes
loggers
日志信息
No
Yes
liquibase
展示任何Liquibase数据库迁移路径,如果有的话
No
Yes
metrics
展示当前应用的metrics信息
No
Yes
mappings
显示一个所有@RequestMapping路径的集合列表
No
Yes
prometheus
以可以被Prometheus服务器抓取的格式显示metrics信息
No
N/A
scheduledtasks
显示应用程序中的计划任务
No
Yes
sessions
允许从Spring会话支持的会话存储中检索和删除(retrieval and deletion)用户会话。使用Spring Session对反应性Web应用程序的支持时不可用。
No
Yes
shutdown
允许应用以优雅的方式关闭(默认情况下不启用)
No
Yes
threaddump
执行一个线程dump
No
Yes
使用以下技术特定的include属性列出了公开的端点的ID 和exclude属性列出了不应该公开的端点的ID
Property
Default
management.endpoints.jmx.exposure.exclude
*
management.endpoints.jmx.exposure.include
*
management.endpoints.web.exposure.exclude
*
management.endpoints.web.exposure.include
*
9.4. shutdown 必须是POST请求 http://localhost:8080/actuator/shutdown
1 management.endpoint.shutdown.enabled =true
9.5. 定制端点 1 2 3 4 5 6 7 8 9 10 11 12 endpoints.beans.id =mybean endpoints.beans.path =/bean endpoints.enabled =false endpoints.beans.enabled =true management.context-path =/manage
9.6. 自定义HealthIndicator extends AbstractHealthIndicator
重写doHealthCheck
1 2 3 4 5 6 7 8 9 10 11 12 13 14 15 16 17 package com.example.health;import org.springframework.boot.actuate.health.AbstractHealthIndicator;import org.springframework.boot.actuate.health.Health;import org.springframework.stereotype.Component;@Component public class MyAppHealthIndicator extends AbstractHealthIndicator { @Override protected void doHealthCheck (Health.Builder builder) throws Exception { builder.up().build(); } }