Cannot connect to the Docker daemon at unix:///var/run/docker.sock. Is the docker daemon running?
systemctl daemon-reload
systemctl restart docker
Got permission denied while trying to connect to the Docker daemon socket at unix:///var/run/docker.sock: Get http://%2Fvar%2Frun%2Fdocker.sock/v1.40/containers/json: dial unix /var/run/docker.sock: connect: permission denied
root@pi:/home/pi# apt-get install curl root@pi:/home/pi# curl -sSL https://get.docker.com | sh # Executing docker install script, commit: f45d7c11389849ff46a6b4d94e0dd1ffebca32c1 + sh -c apt-get update -qq >/dev/null + sh -c DEBIAN_FRONTEND=noninteractive apt-get install -y -qq apt-transport-https ca-certificates curl >/dev/null + sh -c curl -fsSL "https://download.docker.com/linux/raspbian/gpg" | apt-key add -qq - >/dev/null Warning: apt-key output should not be parsed (stdout is not a terminal) + sh -c echo "deb [arch=armhf] https://download.docker.com/linux/raspbian buster stable" > /etc/apt/sources.list.d/docker.list + sh -c apt-get update -qq >/dev/null + [ -n ] + sh -c apt-get install -y -qq --no-install-recommends docker-ce >/dev/null + sh -c docker version Client: Docker Engine - Community Version: 19.03.4 API version: 1.40 Go version: go1.12.10 Git commit: 9013bf5 Built: Fri Oct 18 16:03:00 2019 OS/Arch: linux/arm Experimental: false
Server: Docker Engine - Community Engine: Version: 19.03.4 API version: 1.40 (minimum version 1.12) Go version: go1.12.10 Git commit: 9013bf5 Built: Fri Oct 18 15:56:55 2019 OS/Arch: linux/arm Experimental: false containerd: Version: 1.2.10 GitCommit: b34a5c8af56e510852c35414db4c1f4fa6172339 runc: Version: 1.0.0-rc8+dev GitCommit: 3e425f80a8c931f88e6d94a8c831b9d5aa481657 docker-init: Version: 0.18.0 GitCommit: fec3683 If you would like to use Docker as a non-root user, you should now consider adding your user to the "docker" group with something like:
sudo usermod -aG docker your-user
Remember that you will have to log out and back in for this to take effect!
WARNING: Adding a user to the "docker" group will grant the ability to run containers which can be used to obtain root privileges on the docker host. Refer to https://docs.docker.com/engine/security/security/#docker-daemon-attack-surface for more information. root@pi:/home/pi# docker -v Docker version 19.03.4, build 9013bf5
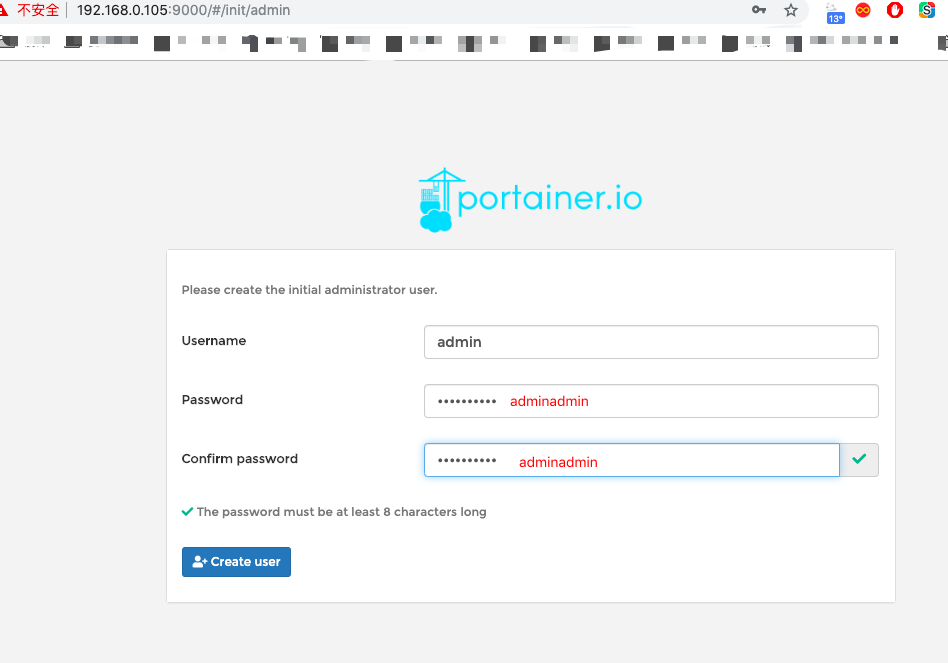
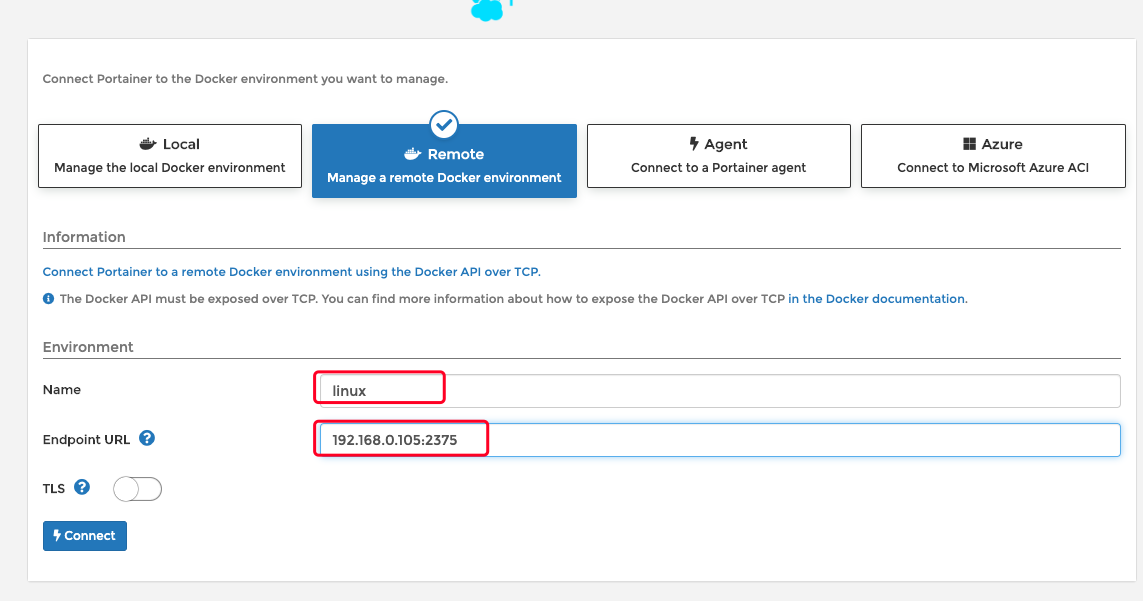
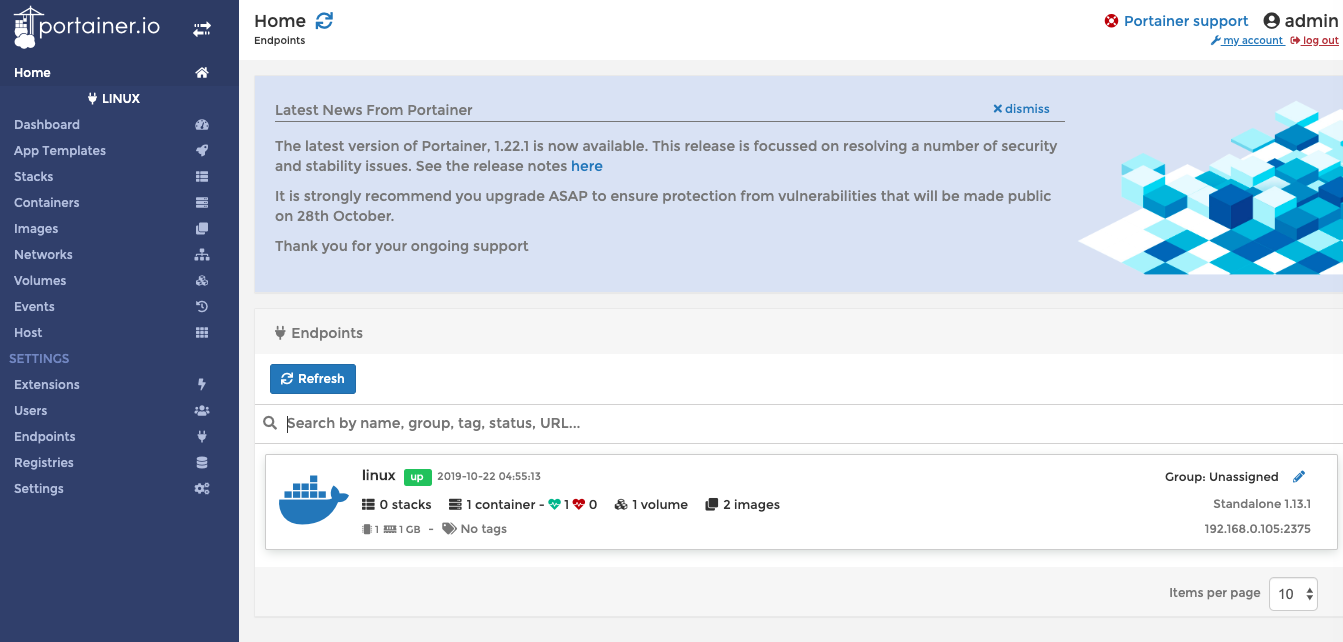
4. portainer远程管理docker
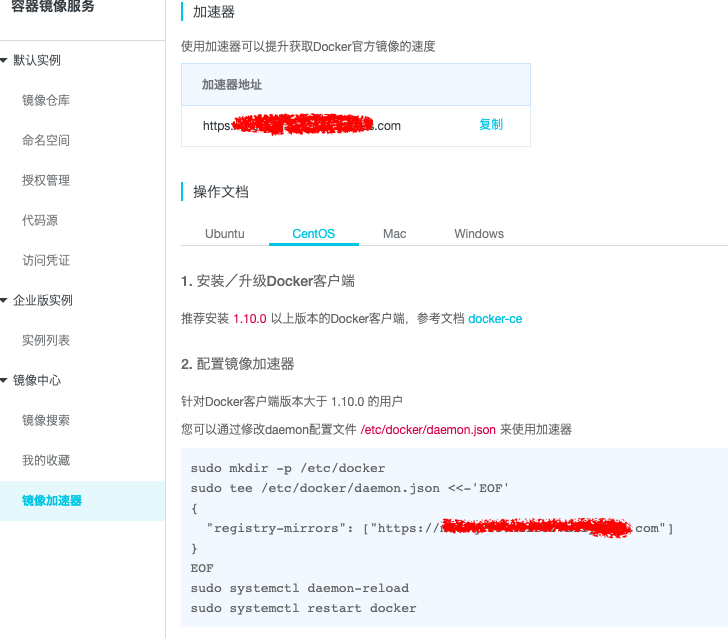
更新Centos docker 镜像加速地址
curl -sSL https://get.daocloud.io/daotools/set_mirror.sh | sh -s http://ef017c13.m.daocloud.io
[root@localhost linux]# docker exec -it mysql /bin/bash root@36fb6e3122de:/# mysql -uroot -p Enter password: Welcome to the MySQL monitor. Commands end with ; or \g. Your MySQL connection id is 10 Server version: 8.0.18 MySQL Community Server - GPL
Copyright (c) 2000, 2019, Oracle and/or its affiliates. All rights reserved.
Oracle is a registered trademark of Oracle Corporation and/or its affiliates. Other names may be trademarks of their respective owners.
Type 'help;' or '\h' for help. Type '\c' to clear the current input statement. mysql> mysql> show databases -> ; +--------------------+ | Database | +--------------------+ | information_schema | | mysql | | performance_schema | | sys | +--------------------+ 4 rows in set (0.04 sec) mysql> mysql> use mysql; Reading table information for completion of table and column names You can turn off this feature to get a quicker startup with -A
Database changed mysql> ALTER USER 'root'@'%' IDENTIFIED WITH mysql_native_password BY '123456'; Query OK, 0 rows affected (0.02 sec) mysql> select user,host,plugin from mysql.user; +------------------+-----------+-----------------------+ | user | host | plugin | +------------------+-----------+-----------------------+ | root | % | mysql_native_password | | mysql.infoschema | localhost | caching_sha2_password | | mysql.session | localhost | caching_sha2_password | | mysql.sys | localhost | caching_sha2_password | | root | localhost | caching_sha2_password | +------------------+-----------+-----------------------+ 5 rows in set (0.00 sec) mysql> exit;
退出后docker重启mysql
1 2 3 4 5 6
[root@localhost linux]# docker stop mysql mysql [root@localhost linux]# [root@localhost linux]# docker start mysql mysql [root@localhost linux]#
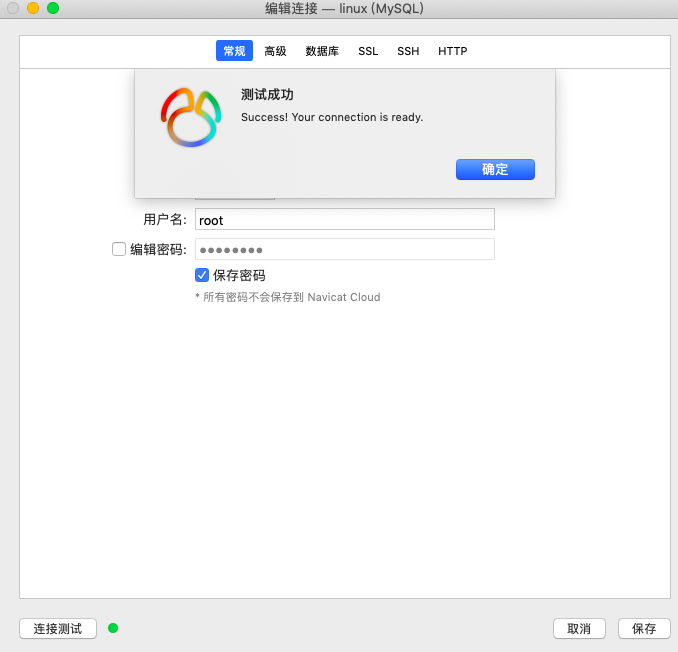
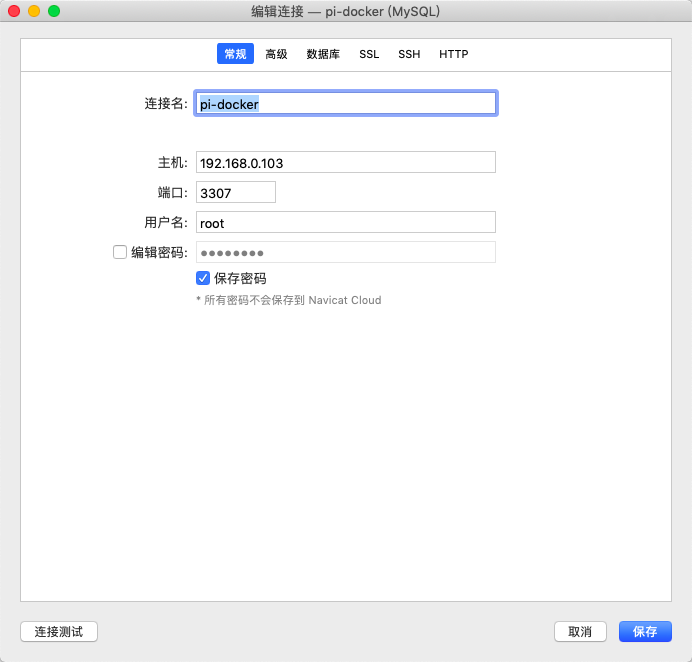
5.5. 测试链接
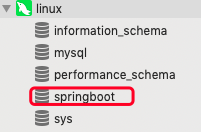
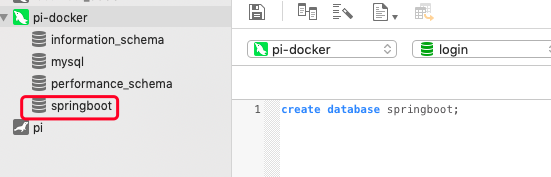
5.6. 测试语句
1
create database springboot;
linux终端
1 2 3 4 5 6 7 8 9 10 11 12 13
mysql> show databases; +--------------------+ | Database | +--------------------+ | information_schema | | mysql | | performance_schema | | springboot | | sys | +--------------------+ 5 rows in set (0.01 sec) mysql> exit;
pi@pi:~ $ docker pull hypriot/rpi-mysql Using default tag: latest latest: Pulling from hypriot/rpi-mysql docker.io/hypriot/rpi-mysql:latest pi@pi:~ $ pi@pi:~ $ pi@pi:~ $ docker run --name mysql -e MYSQL_ROOT_PASSWORD=123456 -d -p 3307:3306 hypriot/rpi-mysql c3a05071cbb680b969fa48f49b806ee30c5a40c7776796e8e75d03bee419108d pi@pi:~ $ pi@pi:~ $ docker exec -it mysql /bin/bash root@c3a05071cbb6:/# mysql -uroot -p Enter password: Welcome to the MySQL monitor. Commands end with ; or \g. Your MySQL connection id is 2 Server version: 5.5.60-0+deb7u1 (Debian)
Copyright (c) 2000, 2018, Oracle and/or its affiliates. All rights reserved.
Oracle is a registered trademark of Oracle Corporation and/or its affiliates. Other names may be trademarks of their respective owners.
Type 'help;' or '\h' for help. Type '\c' to clear the current input statement. mysql> mysql> mysql> use mysql; Reading table information for completion of table and column names You can turn off this feature to get a quicker startup with -A
Database changed mysql> mysql> mysql> select user,host,plugin from mysql.user; +------+------+--------+ | user | host | plugin | +------+------+--------+ | root | % | | +------+------+--------+ 1 row in set (0.01 sec) mysql> mysql> grant all privileges on *.* to 'root'@'%' identified by '123456' with grant option; Query OK, 0 rows affected (0.00 sec) mysql> mysql> flush privileges; Query OK, 0 rows affected (0.00 sec) mysql> mysql> exit Bye root@c3a05071cbb6:/# exit exit pi@pi:~ $ su 密码: root@pi:/home/pi# root@pi:/home/pi# iptables --version iptables v1.8.2 (nf_tables) root@pi:/home/pi# root@pi:/home/pi# iptables -I INPUT -i eth0 -p tcp --dport 3307 -j ACCEPT root@pi:/home/pi# root@pi:/home/pi# iptables -I OUTPUT -o eth0 -p tcp --sport 3307 -j ACCEPT root@pi:/home/pi# root@pi:/home/pi# exit exit pi@pi:~ $
测试
树莓派docker中mysql
1 2 3 4 5 6 7 8 9 10 11 12 13
mysql>
mysql> show databases;
+--------------------+
| Database           |
+--------------------+
| information_schema |
| mysql              |
| performance_schema |
| springboot         |
+--------------------+
4 rows in set (0.00 sec)

mysql> exit;
pi@pi:~ $ docker exec -it mysql-master /bin/bash
mysql@7ce91168422b:/$ mysql -uroot -p
Enter password:
Welcome to the MySQL monitor.  Commands end with ; or \g.
Your MySQL connection id is 5
Server version: 5.5.60-0+deb7u1 (Debian)

Copyright (c) 2000, 2018, Oracle and/or its affiliates. All rights reserved.

Oracle is a registered trademark of Oracle Corporation and/or its
affiliates. Other names may be trademarks of their respective
owners.

Type 'help;' or '\h' for help. Type '\c' to clear the current input statement.

mysql> grant all privileges on *.* to 'mysql'@'%' identified by '123456' with grant option;
Query OK, 0 rows affected (0.01 sec)

mysql> select user,host,plugin from mysql.user;
+-------+--------------+--------+
| user  | host         | plugin |
+-------+--------------+--------+
| root  | localhost    |        |
| root  | b32ea1f1ae91 |        |
| root  | 127.0.0.1    |        |
| root  | ::1          |        |
| root  | %            |        |
| mysql | %            |        |
+-------+--------------+--------+
6 rows in set (0.00 sec)

mysql>
mysql> flush privileges;
Query OK, 0 rows affected (0.00 sec)

mysql>
root@pi:/mydata/mysql# docker exec -it mysql-master /bin/bash
mysql@098fea9cade2:/$
mysql@098fea9cade2:/$ mysql -uroot -p
# 添加用来同步的用户
mysql> GRANT REPLICATION SLAVE ON *.* to 'backup'@'%' identified by '123456';
# 查看master状态
mysql> show master status\G;
*************************** 1. row ***************************
            File: mysql-bin.000003
        Position: 107
    Binlog_Do_DB: gmall_ums,gmall_pms,gmall_oms,gmall_sms,gmall_cms
Binlog_Ignore_DB:
1 row in set (0.00 sec)

ERROR:
No query specified

mysql> show variables like 'server_id';
+---------------+-------+
| Variable_name | Value |
+---------------+-------+
| server_id     | 1     |
+---------------+-------+
1 row in set (0.00 sec)
6.1.2.2. 从
主库连接
change master to master_host=’192.168.0.112’,master_user=’backup’,master_password=’123456’,master_log_file=’mysql-bin.000002’,master_log_pos=0,master_port=3308;