RPC思想 zookeeper mysql主从数据库配置 dubbo配置
1. 分布式基础概念
《分布式系统原理与范型》定义:
“分布式系统是若干独立计算机的集合,这些计算机对于用户来说就像单个相关系统”
分布式系统(distributed system)是建立在网络之上的软件系统。
集群指的是将几台服务器集中在一起,实现同一业务。
分布式中的每一个节点,都可以做集群。而集群并不一定就是分布式的。
2. RPC
RPC【Remote Procedure Call】是指远程过程调用,是一种进程间通信方式,他是一种技术的思想,而不是规范。它允许程序调用另一个地址空间(通常是共享网络的另一台机器上)的过程或函数,而不用程序员显式编码这个远程调用的细节。即程序员无论是调用本地的还是远程的函数,本质上编写的调用代码基本相同。
他来解决分布式系统的各个服务之间互相交互问题;
3. CAP定理
Consistency(一致性):
在分布式系统中的所有数据备份,在同一时刻是否同样的值。(写操作之后的读操作,必须返回该值。更新操作执行成功后所有的用户都应该读到最新的值,要求所有的备份数据保持一致)
Availability(可用性):
在集群中一部分节点故障后,集群整体是否还能响应客户端的读写请求。(要求数据需要备份)
Partition tolerance(分区容错):
大多数分布式系统都分布在多个子网络。每个子网络就叫做一个区(partition)。分区容错的意思是,区间通信可能失败。
CAP理论就是说在分布式存储系统中,最多只能实现上面的两点。而由于当前的网络硬件肯定会出现延迟丢包等问题,所以分区容忍性是我们必须需要实现的。所以我们只能在一致性和可用性之间进行权衡,没有NoSQL系统能同时保证这三点
一致性和可用性,为什么不可能同时成立?答案很简单,因为可能通信失败(即出现分区容错)。
redis - AP
Zookeeper - CP 如何在分布式系统中实现一致性的raft算法;
http://thesecretlivesofdata.com/raft/
4. BASE
BASE:
Basically Available(基本可用)、
Soft state(软状态)
Eventually consistent(最终一致性)
三个短语的简写,BASE是对CAP中一致性和可用性权衡的结果,其来源于对大规模互联网系统分布式实践的结论,是基于CAP定理逐步演化而来的,其核心思想是即使无法做到强一致性(Strong consistency),但每个应用都可以根据自身的业务特点,采用适当的方式来使系统达到最终一致性(Eventual consistency)。
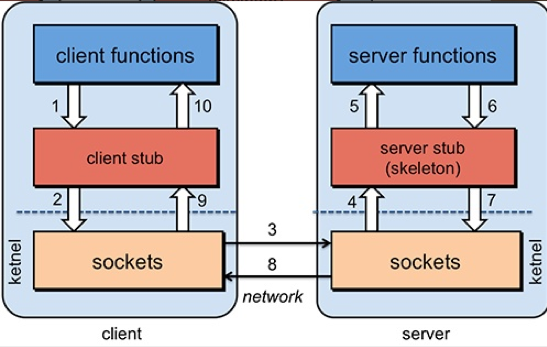
5. Dubbo
Apache Dubbo (incubating) |ˈdʌbəʊ| 是一款高性能、轻量级的开源Java RPC框架,它提供了三大核心能力:面向接口的远程方法调用,智能容错和负载均衡,以及服务自动注册和发现。
官网:
5.1. http://dubbo.apache.org/
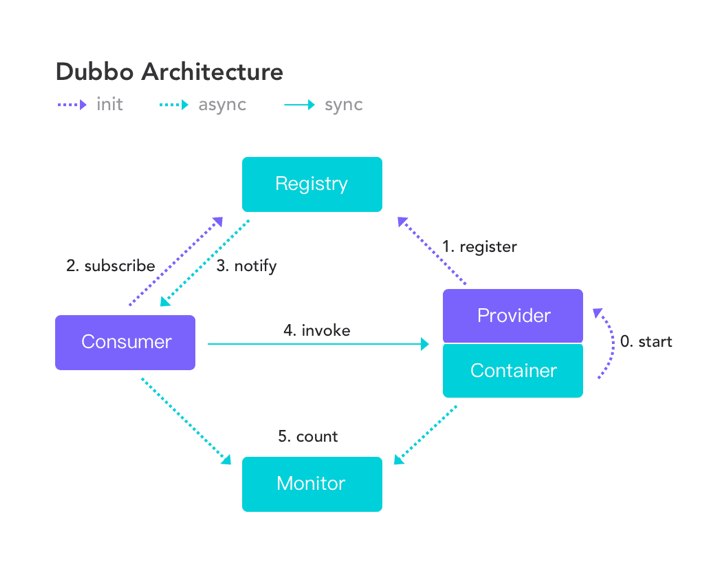
5.2. 调用关系
服务提供者(Provider):暴露服务的服务提供方,服务提供者在启动时,向注册中心注册自己提供的服务。
服务消费者(Consumer): 调用远程服务的服务消费方,服务消费者在启动时,向注册中心订阅自己所需的服务,服务消费者,从提供者地址列表中,基于软负载均衡算法,选一台提供者进行调用,如果调用失败,再选另一台调用。
注册中心(Registry):注册中心返回服务提供者地址列表给消费者,如果有变更,注册中心将基于长连接推送变更数据给消费者
监控中心(Monitor):服务消费者和提供者,在内存中累计调用次数和调用时间,定时每分钟发送一次统计数据到监控中心
5.3. 调用关系说明
服务容器负责启动,加载,运行服务提供者。
服务提供者在启动时,向注册中心注册自己提供的服务。
服务消费者在启动时,向注册中心订阅自己所需的服务。
注册中心返回服务提供者地址列表给消费者,如果有变更,注册中心将基于长连接推送变更数据给消费者。
服务消费者,从提供者地址列表中,基于软负载均衡算法,选一台提供者进行调用,如果调用失败,再选另一台调用。
服务消费者和提供者,在内存中累计调用次数和调用时间,定时每分钟发送一次统计数据到监控中心。
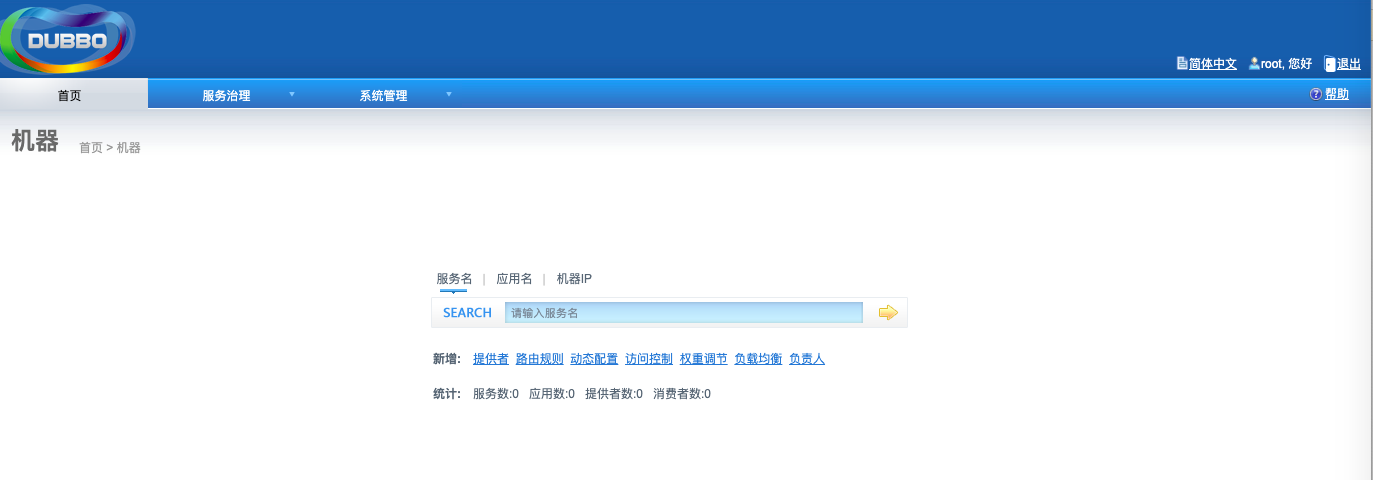
5.4. 安装Dubbo的监控管理后台
https://github.com/apache/incubator-dubbo-admin
1
2
3
4
5
6
7
8
9
10
| - Clone source code on develop branch git clone https://github.com/apache/incubator-dubbo-admin.git
- Specify registry address in
dubbo-admin-server/src/main/resources/application-production.properties
- Build
mvn clean package
- Start
cd dubbo-admin-distribution/target; java -jar dubbo-admin-0.1.jar
- Visit http://localhost:8080
|
页面
5.5. 配置项目
5.5.1. 分包
建议将服务接口、服务模型、服务异常等均放在 API 包中,因为服务模型和异常也是 API 的一部分,这样做也符合分包原则:重用发布等价原则(REP),共同重用原则(CRP)
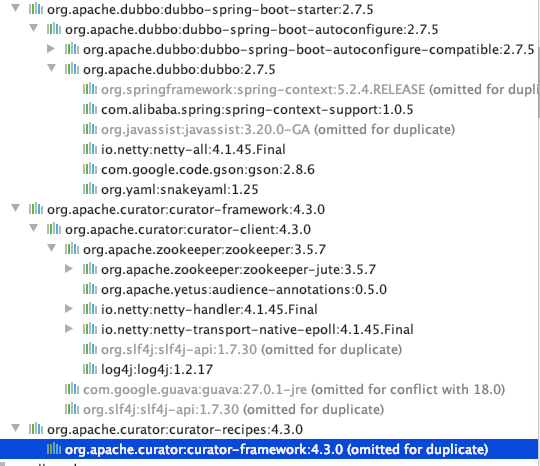
5.5.2. Maven依赖
1
2
3
4
5
6
7
8
9
10
11
12
13
14
15
16
17
18
19
20
|
<dependency>
<groupId>org.apache.dubbo</groupId>
<artifactId>dubbo-spring-boot-starter</artifactId>
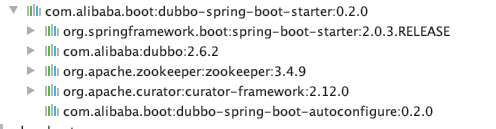
<version>2.7.5</version>
</dependency>
<dependency>
<groupId>org.apache.curator</groupId>
<artifactId>curator-framework</artifactId>
<version>4.3.0</version>
</dependency>
<dependency>
<groupId>org.apache.curator</groupId>
<artifactId>curator-recipes</artifactId>
<version>4.3.0</version>
</dependency>
|
或者直接
1
2
3
4
5
6
|
<dependency>
<groupId>com.alibaba.boot</groupId>
<artifactId>dubbo-spring-boot-starter</artifactId>
<version>0.2.0</version>
</dependency>
|
5.5.3. application.properties
1
2
3
4
5
6
| dubbo.application.name=gmall-pms
dubbo.registry.address=zookeeper://192.168.0.112:2181
dubbo.protocol.port=20880
dubbo.protocol.name=dubbo
dubbo.consumer.check=false
|
5.5.4. 提供者注解@Service
1
2
3
4
5
| import org.apache.dubbo.config.annotation.Service;
@Component
@Service
public class ProductServiceImpl extends ServiceImpl<ProductMapper, Product> implements ProductService {}
|
5.5.5. 调用者注解@Reference
1
2
3
4
| import org.apache.dubbo.config.annotation.Reference;
@Reference
ProductService productService;
|
5.5.6. 开启注解
1
2
3
4
5
6
7
8
9
10
| import org.apache.dubbo.config.spring.context.annotation.EnableDubbo;
@EnableDubbo
public class GmallPmsApplication {
public static void main(String[] args) {
SpringApplication.run(GmallPmsApplication.class, args);
}
}
|
6. shardingSphere 读写分离mysql
https://shardingsphere.apache.org/document/current/cn/manual/sharding-jdbc/configuration/config-yaml/
6.1. maven依赖
1
2
3
4
5
6
|
<dependency>
<groupId>org.apache.shardingsphere</groupId>
<artifactId>sharding-jdbc-core</artifactId>
<version>4.0.1</version>
</dependency>
|
6.2. yml文件
1
2
3
4
5
6
7
8
9
10
11
12
13
14
15
| dataSources:
db_master: !!com.zaxxer.hikari.HikariDataSource
driverClassName: com.mysql.jdbc.Driver
jdbcUrl: jdbc:mysql://192.168.0.112:3308/gmall_pms?useUnicode=true&characterEncoding=utf-8&useSSL=false
username: root
password: 123456
db_slave: !!com.zaxxer.hikari.HikariDataSource
driverClassName: com.mysql.jdbc.Driver
jdbcUrl: jdbc:mysql://192.168.0.112:3309/gmall_pms?useUnicode=true&characterEncoding=utf-8&useSSL=false
username: root
password: 123456
masterSlaveRule:
name: db_ms
masterDataSourceName: db_master
slaveDataSourceNames: [db_slave]
|
6.3. 注入DataSource-YamlMasterSlaveDataSourceFactory
1
2
3
4
5
6
7
8
9
10
11
12
13
14
15
16
17
18
19
20
21
22
23
24
25
26
| package com.runaccpeted.gmall.pms.config;
import org.apache.shardingsphere.shardingjdbc.api.yaml.YamlMasterSlaveDataSourceFactory;
import org.springframework.context.annotation.Bean;
import org.springframework.context.annotation.Configuration;
import org.springframework.util.ResourceUtils;
import javax.sql.DataSource;
import java.io.File;
@Configuration
public class DataConfiguration {
@Bean
public DataSource dataSource(){
DataSource dataSource = null;
try {
File file = ResourceUtils.getFile("classpath:sharding-jdbc.yml");
dataSource = YamlMasterSlaveDataSourceFactory.createDataSource(file);
}catch (Exception e){
}
return dataSource;
}
}
|
7. 开启校验
7.1. Hibernate-vaild
7.1.1. Maven依赖
1
2
3
4
5
| <dependency>
<groupId>org.hibernate</groupId>
<artifactId>hibernate-validator</artifactId>
<version>6.1.2.Final</version>
</dependency>
|
7.1.2. 添加注解
1
2
3
4
5
6
7
8
9
10
11
12
13
14
15
16
17
18
19
20
21
22
23
24
25
26
27
28
29
30
31
32
33
34
35
36
| package com.runaccpeted.gmall.vo.ums;
import io.swagger.annotations.ApiModelProperty;
import lombok.Data;
import org.hibernate.validator.constraints.Length;
import javax.validation.constraints.Email;
import javax.validation.constraints.NotNull;
import javax.validation.constraints.Pattern;
import java.io.Serializable;
@Data
public class UmsAdminParam implements Serializable {
@NotNull(message = "必须输入用户名")
private String username;
@NotNull
@Length(min = 6, max = 10, message = "密码长度在6-10位,不宜太简单")
private String password;
@NotNull(message = "请上传头像")
@ApiModelProperty(value = "头像")
private String icon;
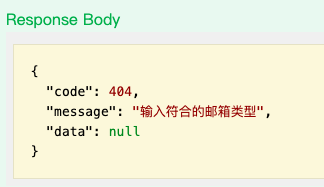
@Email(message = "输入符合的邮箱类型")
@ApiModelProperty(value = "邮箱")
private String email;
@ApiModelProperty(value = "昵称")
private String nickName;
@ApiModelProperty(value = "备注信息")
private String note;
}
|
7.2. aop环绕通知,验证信息
7.2.1. Maven依赖
1
2
3
4
| <dependency>
<groupId>org.springframework.boot</groupId>
<artifactId>spring-boot-starter-aop</artifactId>
</dependency>
|
7.2.2. 注入切面
BindingResult 用于手动阻止程序的运行,得到验证的错误信息
1
2
3
4
5
6
7
8
9
10
11
12
13
14
15
16
17
18
19
20
21
22
23
24
25
26
27
28
29
30
31
32
33
34
35
36
37
38
39
40
41
42
43
44
45
46
47
48
49
50
51
52
53
54
| package com.runaccpeted.gmall.aop;
import com.runaccpeted.gmall.to.CommonResult;
import lombok.extern.slf4j.Slf4j;
import org.aspectj.lang.ProceedingJoinPoint;
import org.aspectj.lang.annotation.Around;
import org.aspectj.lang.annotation.Aspect;
import org.springframework.stereotype.Component;
import org.springframework.validation.BindingResult;
import org.springframework.validation.FieldError;
import java.util.List;
@Slf4j
@Component
@Aspect
public class DataVaildAspect {
@Around("execution(* com.runaccpeted.gmall..*Controller.*(..))")
public Object round(ProceedingJoinPoint point){
Object[] args = point.getArgs();
for(Object obj:args){
if(obj instanceof BindingResult){
BindingResult result = (BindingResult) obj;
int resultNum = result.getErrorCount();
if(resultNum>0){
List<FieldError> fieldErrors = result.getFieldErrors();
fieldErrors.forEach((fieldError)->{
String errorField = fieldError.getField();
log.debug("属性:{},传来的值是:{},校验出错。出错的提示消息:{}",
errorField,fieldError.getRejectedValue(),fieldError.getDefaultMessage());
});
return new CommonResult().validateFailed(result);
}
}
}
Object proceed = null;
try {
proceed = point.proceed(args);
log.debug("环绕通知已放行 {}",proceed);
} catch (Throwable throwable) {
throw new RuntimeException(throwable);
} finally{
}
return proceed;
}
}
|
7.2.3. 统一异常
1
2
3
4
5
6
7
8
9
10
11
12
13
14
15
16
17
18
19
20
21
22
23
24
25
26
27
28
29
30
31
32
33
34
35
36
37
38
39
| package com.runaccpeted.gmall.aop;
import com.runaccpeted.gmall.to.CommonResult;
import lombok.extern.slf4j.Slf4j;
import org.springframework.web.bind.annotation.ControllerAdvice;
import org.springframework.web.bind.annotation.ExceptionHandler;
import org.springframework.web.bind.annotation.ResponseBody;
import org.springframework.web.bind.annotation.RestControllerAdvice;
@Slf4j
@RestControllerAdvice
public class GlobalExceptionHandler {
@ExceptionHandler(value = {Exception.class})
public Object handlerException(Exception exception){
log.error("系统全局异常感知,信息:{}",exception.getStackTrace());
return new CommonResult().validateFailed("服务器正忙,请稍后再试");
}
@ExceptionHandler(value = {NullPointerException.class})
public Object handlerNullPointerException(Exception exception){
log.error("系统出现异常感知,信息:{}",exception.getMessage());
return new CommonResult().validateFailed("空指针");
}
@ExceptionHandler(value = {GmallException.class})
public Object handlerGmallException(GmallException exception){
log.error("系统出现异常,信息:{}",exception.getMessage());
return new CommonResult().validateFailed(exception.getMessage()).setCode(exception.getCode());
}
}
|
1
2
3
4
5
6
7
8
9
10
11
12
13
14
15
16
17
| package com.runaccpeted.gmall.aop;
import lombok.AllArgsConstructor;
import lombok.Data;
import lombok.NoArgsConstructor;
@Data
@NoArgsConstructor
@AllArgsConstructor
public class GmallException extends RuntimeException{
private Integer code;
private String message;
}
|
7.3. 示例-用户注册
1
2
3
4
5
6
7
8
9
10
11
12
13
14
15
| @ApiOperation(value = "用户注册")
@PostMapping(value = "/register")
public Object register(@Valid @RequestBody UmsAdminParam umsAdminParam, BindingResult result) {
Admin admin = null;
log.debug("需要注册的用户详情:{}",umsAdminParam);
admin=adminService.register(umsAdminParam);
if(admin!=null){
return new CommonResult().success(admin);
}
return new CommonResult().validateFailed("用户注册失败,请稍后再试");
}
|
1
2
3
4
5
6
7
8
| @Override
public Admin register(UmsAdminParam umsAdminParam) {
Admin admin = new Admin();
BeanUtils.copyProperties(umsAdminParam,admin);
baseMapper.insert(admin);
return admin;
}
|
8. 商品数据模型
8.1. sku
Stock keeping unit 库存量单位 记件单位 iphoneX64G黑
8.2. spu
standard product unit 标准化产品单元。商品信息聚合最小单位。描述一个产品特性 iphonex
9. 缓存问题
9.1. 缓存穿透
缓存穿透是指查询一个一定不存在的数据,由于缓存是不命中,将去查询数据库,但是数据库也无此记录,并且处于容错考虑,我们没有将这次查询的null写入缓存,这将导致这个不存在的数据每次请求都要到存储层去查询,失去了缓存的意义。在流量大时,可能DB就挂掉了,要是有人利用不存在的key频繁攻击我们的应用,这就是漏洞。
解决:
空结果进行缓存,但它的过期时间会很短,最长不超过五分钟。
9.2. 缓存雪崩
缓存雪崩是指在我们设置缓存时采用了相同的过期时间,导致缓存在某一时刻同时失效,请求全部转发到DB,DB瞬时压力过重雪崩。
解决:
原有的失效时间基础上增加一个随机值,比如1-5分钟随机,这样每一个缓存的过期时间的重复率就会降低,就很难引发集体失效的事件。
9.3. 缓存击穿
对于一些设置了过期时间的key,如果这些key可能会在某些时间点被超高并发地访问,是一种非常“热点”的数据。这个时候,需要考虑一个问题:如果这个key在大量请求同时进来前正好失效,那么所有对这个key的数据查询都落到db,我们称为缓存击穿。和缓存雪崩的区别:
击穿是一个热点key失效
雪崩是很多key集体失效
缓存在某个时间点过期的时候,恰好在这个时间点对这个Key有大量的并发请求过来,这些请求发现缓存过期一般都会从后端DB加载数据并回设到缓存,这个时候大并发的请求可能会瞬间把后端DB压垮。
解决:
分布式锁
10. 缓存使用模式
缓存使用模式分为两大类:Cache-Aside和Cache As SoR
专业名词:
SoR(system-of-record):记录系统,或者可以叫数据源,实际存储原始数据的系统
Cache:缓存,是SoR的快照数据,Cache的访问速度比SoR要快,放入Cache的目的是提升系统速度,减少回源到SoR的次数
回源:回到数据源头检索数据,Cache没有命中需要回到SoR读取数据,这叫做回源
10.1. Cache-Aside
即业务代码围绕Cache编写,由业务代码维护缓存;
10.1.1. 读场景
1
2
3
4
5
6
| data = cache.getIfPresent(key);
if(data == null){
data = loadFromSoR(key);
cache.put(key,data)
}
|
10.1.2. 写场景
1
2
3
4
5
6
7
8
9
10
11
12
|
writeToSoR(k,v);
cache.put(k,v)
writeToSoR(k,v);
cache.invalidate(k);
|
10.1.3. 并发更新问题与解决
1、考虑使用中间件如Canal订阅binlog,进行增量更新分布式缓存,不会存在缓存数据不一致问题。但是会有延迟,我们可以调整合理的过期时间来容忍这个延迟
2、读服务,可以考虑一致性哈希,相同的操作负载均衡到同一个实例,从而减少并发几率。
10.2. Cache-As-SoR
即把Cache当做SoR,所有操作都是对Cache进行,然后Cache委托SoR进行数据的真实读写。即业务代码只看到Cache的操作,看不到关于SoR的代码;三种实现模式:read-through、write-through、write-behind
10.2.1. read-through
业务代码首先调用Cache,Cache不命中,由Cache回源到SoR(类似回调的方式或者Cache配置的方式),而不是业务代码。【Guava、Ehcache均支持这种模式】
优点:业务代码整洁
10.2.2. write-through
称为穿透写模式/直写模式。业务代码调用Cache写数据,然后由Cache负责写缓存和写SoR,而不是业务代码。
10.2.3. write-behind
也叫write-back;回写模式。不同于write-through的是,write-through是同步写,而write-back是异步写,异步成功后可以实现批量写、合并写、延时写等
10.3. 缓存污染
在从缓存中读出内容后,修改了缓存内容,导致另一个线程读到的数据不一致
缓存使用两种复制模式,注意。Copy-On-Read(读时复制)、Copy-On-Write(写时复制)。
有些进程内缓存很多是基于引用的,所以拿到缓存中的数据如果进行修改,可能发生不可预测的问题。
读时复制:读取到的缓存的值,复制内容封装一个新的对象。
写时复制:给缓存中写的值,复制一个新的对象写入
11. 分布式锁
11.1. 配置nginx负载均衡
1
2
3
4
5
6
7
8
9
10
11
12
| http{
upstream tomcat{
server 192.168.0.112:8080 weight=20;
server 192.168.0.112:8081 weight=20;
server 192.168.0.112:8082 weight=20;
}
}
server{
location /{
proxy_pass http://tomcat;
}
}
|
11.2. synchronized
非公平(抢占式),悲观,独享(只有一个线程),互斥,可重入的重量级锁(性能高)
synchronized是在JVM层面上实现的, 不但可以通过一些监控工具监控synchronized的锁定, 而且在代码执行时出现异常,JVM会自动释放锁定, 但是使用Lock则不行,lock是通过代码实现的, 要保证锁定一定会被释放,就必须将unLock()放到finally{}中
在资源竞争不是很激烈的情况下,Synchronized的性能要优于ReetrantLock, 但是在资源竞争很激烈的情况下,Synchronized的性能会下降几十倍,但是ReetrantLock的性能能维持常态; 实际上,以压力测试为准
11.3. ReentrantLock
非公平(抢占式),悲观,独享(只有一个线程),互斥,可重入的重量级锁(性能高)
可以实现公平锁 AbstractQueuedSynchronizer 抽象队列同步器,对于ReentrantLock而言, 通过构造函数指定该锁是否是公平锁, 默认是非公平锁。非公平锁的优点在于吞吐量比公平锁大。
lock();
如果获取了锁立即返回,如果别的线程持有锁, 当前线程则一直处于休眠状态,直到获取锁
tryLock();
如果获取了锁立即返回true, 如果别的线程正持有锁,立即返回false,中断等待
tryLock(long timeout,TimeUnit unit)
如果获取了锁定立即返回true, 如果别的线程正持有锁, 会等待参数给定的时间, 在等待的过程中,如果获取了锁定,就返回true, 如果等待超时,返回false;
lockInterruptibly
如果获取了锁定立即返回, 如果没有获取锁定,当前线程处于休眠状态, 直到获取锁定,或者当前线程被别的线程中断
锁绑定多个条件是指一个ReentrantLock对象可以同时绑定多个Condition对象,而在synchronized中,锁对象的wait()和notify()或notifyAll()方法可以实现一个隐含的条件,如果要和多于一个的条件关联的时候,就不得不额外地添加一个锁,而ReentrantLock则无须这样做,只需要多次调用newCondition()方法即可。
1
2
3
4
5
| ReentrantLock lock = new ReentrantLock();
lock.lock();
public void operation(){}
lock.unlock();
|
11.4. 进程间锁
11.4.1. jedis
11.4.1.1. Maven
1
2
3
4
5
| <dependency>
<groupId>redis.clients</groupId>
<artifactId>jedis</artifactId>
<version>3.0.1</version>
</dependency>
|
11.4.1.2. JedisPool
1
2
3
4
5
6
7
8
9
10
11
12
13
14
15
16
17
18
19
20
21
22
23
24
25
26
27
28
29
| package com.atguigu.locks.config;
import org.springframework.boot.autoconfigure.data.redis.RedisProperties;
import org.springframework.context.annotation.Bean;
import org.springframework.context.annotation.Configuration;
import redis.clients.jedis.JedisPool;
import redis.clients.jedis.JedisPoolConfig;
@Configuration
public class AppJedisConfig {
@Bean
public JedisPool jedisPoolConfig(RedisProperties properties) throws Exception {
JedisPoolConfig config = new JedisPoolConfig();
RedisProperties.Pool pool = properties.getJedis().getPool();
config.setMaxIdle(pool.getMaxIdle());
config.setMaxTotal(pool.getMaxActive());
JedisPool jedisPool = null;
jedisPool = new JedisPool(config, properties.getHost(), properties.getPort());
return jedisPool;
}
|
11.4.1.3. 实现
1
2
3
4
5
6
7
8
9
10
11
12
13
14
15
16
17
18
19
20
21
22
23
24
25
26
27
28
29
30
31
32
33
34
35
36
37
38
39
40
41
42
43
44
45
46
47
48
49
50
51
52
53
54
55
56
57
58
59
60
61
62
63
64
65
66
67
68
69
70
71
72
73
74
75
76
77
78
79
80
81
82
83
84
85
86
87
88
89
90
91
92
93
94
95
96
97
98
99
100
101
102
103
104
105
106
107
108
109
110
111
112
113
114
115
116
117
118
119
120
121
122
123
124
125
126
127
128
129
130
131
132
133
134
135
136
137
138
139
140
141
142
143
144
145
146
147
148
149
150
151
152
153
154
155
156
157
158
159
160
161
162
163
164
165
166
167
168
169
170
171
172
173
174
175
176
177
178
179
180
181
182
183
184
185
186
187
188
189
190
191
192
193
194
195
196
197
198
199
200
201
202
203
204
205
206
207
208
209
210
211
212
213
214
215
216
217
218
219
220
221
222
223
|
public void incrDistribute(){
@Autowired
JedisPool jedisPool;
Jedis jedis = jedisPool.getResource();
try {
String token = UUID.randomUUID().toString();
String lock = jedis.set("lock", token, SetParams.setParams().ex(3).nx());
if(lock!=null&&lock.equalsIgnoreCase("OK")){
String num = jedis.get("num");
Integer i = Integer.parseInt(num);
i = i+1;
jedis.set("num",i.toString())
String script = "if redis.call('get', KEYS[1]) == ARGV[1] then return redis.call('del', KEYS[1]) else return 0 end";
jedis.eval(script, Collections.singletonList("lock"),Collections.singletonList(token));
System.out.println("删除锁ok....");
}else {
try {
Thread.sleep(1000);
incrDistribute();
} catch (InterruptedException e) {
e.printStackTrace();
}
}
}
finally {
jedis.close();
}
}
|
11.4.2. Redisson
https://github.com/redisson/redisson/wiki/1.-Overview
11.4.2.1. Maven
1
2
3
4
5
| <dependency>
<groupId>org.redisson</groupId>
<artifactId>redisson</artifactId>
<version>3.10.0</version>
</dependency>
|
11.4.2.2. RedissonClient
1
2
3
4
5
6
7
8
9
10
11
12
13
14
15
16
17
18
19
20
| package com.atguigu.locks.config;
import org.redisson.Redisson;
import org.redisson.api.RedissonClient;
import org.redisson.config.Config;
import org.springframework.context.annotation.Bean;
import org.springframework.context.annotation.Configuration;
import java.io.IOException;
@Configuration
public class RedissonConfig {
@Bean
RedissonClient redisson() throws IOException {
Config config = new Config();
config.useSingleServer().setAddress("redis://192.168.159.128:6379");
return Redisson.create(config);
}
}
|
11.4.2.3. getLock(key) 可重入锁
基于Redis的Redisson分布式可重入锁RLock Java对象实现了java.util.concurrent.locks.Lock接口。同时还提供了异步(Async)、反射式(Reactive)和RxJava2标准的接口
另外Redisson还通过加锁的方法提供了leaseTime的参数来指定加锁的时间。超过这个时间后锁便自动解开了。
1
2
3
4
5
6
7
8
9
10
11
12
13
14
15
16
17
18
19
20
21
22
23
24
25
26
27
28
29
30
31
32
33
34
35
36
37
| @Autowired
RedissonClient redisson;
RLock lock = redisson.getLock("lock");
try {
lock.lock(3,TimeUnit.SECONDS);
Jedis jedis = jedisPool.getResource();
String num = jedis.get("num");
Integer i = Integer.parseInt(num);
i = i+1;
jedis.set("num",i.toString());
jedis.close();
}finally {
lock.unlock();
}
RLock lock = redisson.getLock("lock");
lock.lock();
System.out.println("第一次锁");
lock.lock();
System.out.println("第二次锁");
lock.lock();
System.out.println("第三次锁");
|
尝试加锁,最多等待100秒,上锁以后10秒自动解锁,如果没有等待时间,锁不住直接返回false
1
| boolean res = lock.tryLock(100,10,TimeUnit.SECONDS);
|
11.4.2.4. getFairLock(key) 公平锁
它保证了当多个Redisson客户端线程同时请求加锁时,优先分配给先发出请求的线程。所有请求线程会在一个队列中排队,当某个线程出现宕机时,Redisson会等待5秒后继续下一个线程,也就是说如果前面有5个线程都处于等待状态,那么后面的线程会等待至少25秒。
1
2
3
| RLock fairLock = redisson.getFairLock("lock");
fairLock.lock();
|
11.4.2.5. RedissonMultiLock(key1,key2,key3) 联锁
基于Redis的Redisson分布式联锁RedissonMultiLock对象可以将多个RLock对象关联为一个联锁,每个RLock对象实例可以来自于不同的Redisson实例。
1
2
3
4
5
6
7
| RLock lock1 = redisson.getLock("lock1");
RLock lock2 = redisson.getLock("lock2");
RLock lock3 = redisson.getLock("lock3");
RedissonMultiLock lock = new RedissonMultiLock(lock1,lock2,lock3);
lock.lock();
|
11.4.2.6. RedissonRedLock(key1,key2,key3) 红锁
基于Redis的Redisson红锁RedissonRedLock对象实现了Redlock介绍的加锁算法。该对象也可以用来将多个RLock对象关联为一个红锁,每个RLock对象实例可以来自于不同的Redisson实例。
1
2
3
4
5
6
7
| RLock lock1 = redisson.getLock("lock1");
RLock lock2 = redisson.getLock("lock2");
RLock lock3 = redisson.getLock("lock3");
RedissonRedLock lock = new RedissonRedLock(lock1,lock2,lock3);
lock.lock();
|
11.4.2.7. ReadWriteLock(key) 读写锁
基于Redis的Redisson分布式可重入读写锁RReadWriteLock Java对象实现了java.util.concurrent.locks.ReadWriteLock接口。其中读锁和写锁都继承了RLock接口。
分布式可重入读写锁允许同时有多个读锁和一个写锁处于加锁状态。
1
2
3
4
5
6
7
8
9
10
11
12
13
14
15
16
17
18
19
20
21
22
23
24
25
26
27
28
29
30
31
32
33
34
35
36
37
38
39
40
41
42
43
44
45
46
47
48
49
50
| RReadWriteLock rwLock = redisson.getReadWriteLock("lock");
rwLock.readLock().lock();
rwLock.readLock().lock(10,TimeUnit.SECONDS);
rwLock.readLock().tryLock(100,10,TimeUnit.SECONDS);
rwLock.writeLock().lock();
public String read() {
RReadWriteLock helloValue = redisson.getReadWriteLock("helloValue");
RLock readLock = helloValue.readLock();
readLock.lock();
try {
Thread.sleep(2000);
} catch (InterruptedException e) {
e.printStackTrace();
}
String a = hello;
readLock.unlock();
return a;
}
public String write(){
RReadWriteLock helloValue = redisson.getReadWriteLock("helloValue");
RLock writeLock = helloValue.writeLock();
writeLock.lock();
try {
Thread.sleep(5000);
} catch (InterruptedException e) {
}
hello = UUID.randomUUID().toString();
writeLock.unlock();
return hello;
}
|
11.4.2.8. getCountDownLatch(key) 闭锁
基于Redisson的Redisson分布式闭锁(CountDownLatch)Java对象RCountDownLatch采用了与java.util.concurrent.CountDownLatch相似的接口和用法
1
2
3
4
5
6
7
8
9
10
11
12
| RCountDownLatch latch = redisson.getCountDownLatch("anyCountDownLatch");
latch.trySetCount(10);
latch.await();
System.out.println("我要锁门....");
RCountDownLatch latch = redisson.getCountDownLatch("anyCountDownLatch");
latch.countDown();
System.out.println("溜了....");
|
11.4.2.9. Semaphore 信号量
1
2
3
4
5
6
7
8
9
10
11
12
13
14
15
16
17
| public Boolean tc() throws InterruptedException {
RSemaphore semaphore = redisson.getSemaphore("tcc");
semaphore.acquire();
return true;
}
public Boolean rc() {
RSemaphore semaphore = redisson.getSemaphore("tcc");
semaphore.release();
return true;
}
|
11.4.2.10. PermitExpirableSemaphore 可过期信号量
基于Redis的Redisson可过期性信号量(PermitExpirableSemaphore)是在RSemaphore对象的基础上,为每个信号增加了一个过期时间。每个信号可以通过独立的ID来辨识,释放时只能通过提交这个ID才能释放。它提供了异步(Async)、反射式(Reactive)和RxJava2标准的接口。
1
2
3
4
5
6
| RPermitExpirableSemaphore semaphore = redisson.getPermitExpirableSemaphore("mySemaphore");
String permitId = semaphore.acquire();
String permitId = semaphore.acquire(2, TimeUnit.SECONDS);
semaphore.release(permitId);
|
12. 线程池
12.1. ExecutorService
线程放在BlockingQueue 队列中排队执行
newCachedThreadPool创建一个可缓存线程池,如果线程池长度超过处理需要,可灵活回收空闲线程,若无可回收,则新建线程。
newFixedThreadPool 创建一个定长线程池,可控制线程最大并发数,超出的线程会在队列中等待。
newScheduledThreadPool 创建一个定长线程池,支持定时及周期性任务执行。
newSingleThreadExecutor 创建一个单线程化的线程池,它只会用唯一的工作线程来执行任务,保证所有任务按照指定顺序(FIFO, LIFO, 优先级)执行。
1
2
3
4
5
6
7
8
9
10
11
| ExecutorService pool= Executors.newFixedThreadPool(2);
pool.submit(new Thread());
|
12.2. CompletableFuture 异步编排
Future接口可以构建异步应用,但依然有其局限性。它很难直接表述多个Future 结果之间的依赖性。实际开发中,我们经常需要达成以下目的:
1
2
3
4
5
6
7
8
9
10
11
12
13
14
15
16
17
18
19
20
21
22
23
|
ExecutorService pool = Executors.newFixedThreadPool(2);
CompletableFuture<String> future = CompletableFuture.supplyAsync(()->{
return "";
},pool);
public static <U> CompletableFuture<U> supplyAsync(Supplier<U> supplier) {
return asyncSupplyStage(asyncPool, supplier);
}
public static <U> CompletableFuture<U> supplyAsync(Supplier<U> supplier,Executor executor) {
return asyncSupplyStage(screenExecutor(executor), supplier);
}
public static CompletableFuture<Void> runAsync(Runnable runnable) {
return asyncRunStage(asyncPool, runnable);
}
public static CompletableFuture<Void> runAsync(Runnable runnable,
Executor executor) {
return asyncRunStage(screenExecutor(executor), runnable);
}
|
12.2.1. whenComplete 感知异常和结果
1
2
3
4
| future.whenComplete((r,e)->{
System.out.println("结果"+r);
System.out.println("异常"+e);
});
|
12.2.2. thenApply 修改返回值
当前阶段正常完成以后执行,而且当前阶段的执行的结果会作为下一阶段的输入参数。thenApplyAsync默认是异步执行的。这里所谓的异步指的是不在当前线程内执行。
thenApply相当于回调函数(callback)(如ajax的success,error等回调)
1
2
3
4
5
6
7
8
| future.thenApply((r)->{
return r.replace("..","_");
});
public <U> CompletableFuture<U> thenApply(
Function<? super T,? extends U> fn) {
return uniApplyStage(null, fn);
}
|
12.3. allof()
1
2
3
4
5
6
7
8
9
10
11
12
13
14
15
16
17
18
19
20
21
22
23
24
25
26
27
28
29
30
31
32
33
34
35
36
37
38
39
40
| private void method() throws ExecutionException, InterruptedException {
CompletableFuture<String> f1 = CompletableFuture.supplyAsync(() -> {
try {
TimeUnit.SECONDS.sleep(3);
} catch (InterruptedException e) {
e.printStackTrace();
}
return "f1";
});
f1.whenCompleteAsync(new BiConsumer<String, Throwable>() {
@Override
public void accept(String s, Throwable throwable) {
System.out.println(System.currentTimeMillis() + ":" + s);
}
});
CompletableFuture<String> f2 = CompletableFuture.supplyAsync(() -> {
try {
TimeUnit.SECONDS.sleep(2);
} catch (InterruptedException e) {
e.printStackTrace();
}
return "f2";
});
f2.whenCompleteAsync(new BiConsumer<String, Throwable>() {
@Override
public void accept(String s, Throwable throwable) {
System.out.println(System.currentTimeMillis() + ":" + s);
}
});
CompletableFuture<Void> all = CompletableFuture.allOf(f1, f2);
all.join();
System.out,println("阻塞你完成");
|
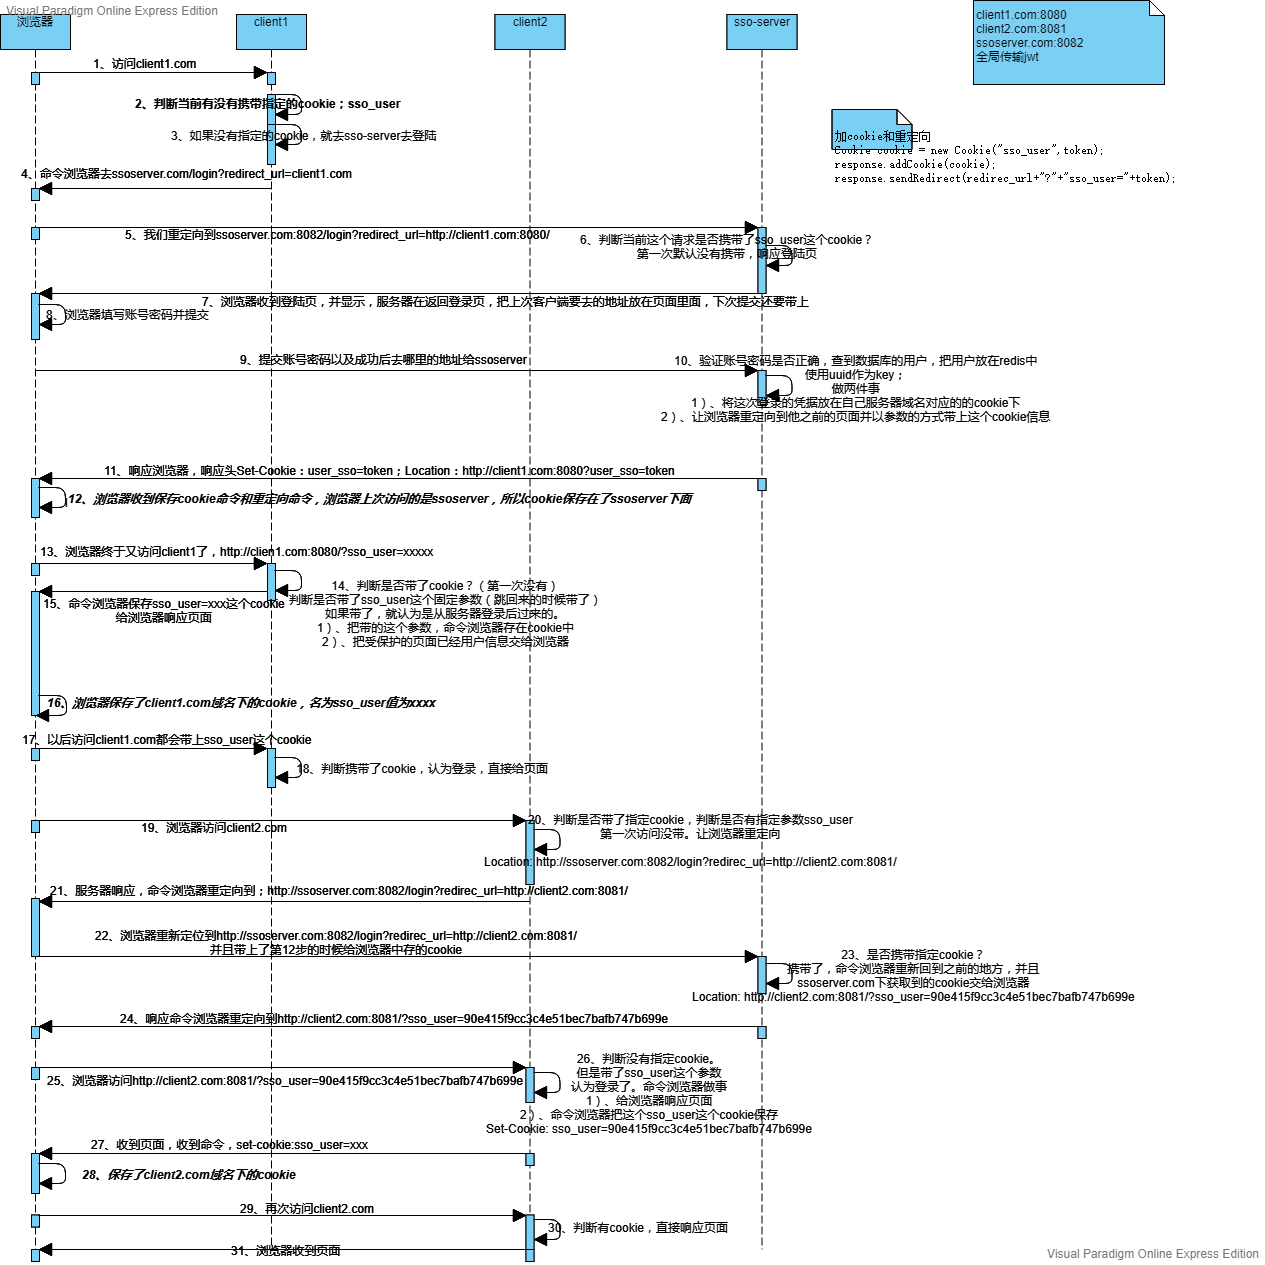
13. 单点登录 Single Sign On
SSO是在多个应用系统中,用户只需要登录一次就可以访问所有相互信任的应用系统。
1)、任何系统都必须去登陆服务器进行登录
2)、服务器就记住了登录状态
3)、其他系统访问受保护资源,需要再次登录,跳转到sso_server登录的时候,服务器告诉客户端,已经登录过,无须登录。登录过得信息
13.1. 项目实例
https://gitee.com/xuxueli0323/xxl-sso
http://www.xuxueli.com/xxl-sso/#/
XXL-SSO 是一个分布式单点登录框架。只需要登录一次就可以访问所有相互信任的应用系统。 拥有”轻量级、分布式、跨域、Cookie+Token均支持、Web+APP均支持”等特性。现已开放源代码,开箱即用
13.1.1. 默认规则
单点登录服务器的地址应该是:
http://xxlssoserver.com:8080/xxl-sso-server 服务器
/8081/xxl-sso-web-sample-springboot web系统1
/8082/xxl-sso-web-sample-springboot web系统2
修改各个项目中redis地址信息
13.1.2. 为系统添加以下域名映射
域名只要不同:cookie不能共享,跨域还需配置
127.0.0.1 xxlssoserver.com
127.0.0.1 xxlssoclient1.com
127.0.0.1 xxlssoclient2.com
13.1.3. 启动服务
java -jar xxl-sso-server-1.1.1-SNAPSHOT.jar
java -jar xxl-sso-web-sample-springboot-1.1.1-SNAPSHOT.jar
java -jar xxl-sso-web-sample-springboot-1.1.1-SNAPSHOT.jar –server.port=8082
13.1.4. 访问服务测试
访问 http://xxlssoclient1.com:8081/xxl-sso-web-sample-springboot/ 需要登录
访问http://xxlssoclient2.com:8082/xxl-sso-web-sample-springboot/ 需要登录
但是他们都重定向到了 http://xxlssoserver.com:8080/xxl-sso-server/ 统一认证中心
只要有一个人登录
13.1.5. 观察核心
每一个应用下都有一个相同的cookie。单点登录的核心就是不同系统之间同步cookie即可。
13.2. 流程图
13.3. client
13.3.1. application.properties
1
2
3
4
5
| spring.thymeleaf.prefix=classpath:/templates/
spring.thymeleaf.suffix=.html
sso.server.url=http://ssoserver.com:8082
sso.server.loginpath=/login
|
13.3.2. config
1
2
3
4
5
6
7
8
9
10
11
12
13
14
15
| package com.runaccpeted.gmall.config;
import lombok.Data;
import org.springframework.boot.context.properties.ConfigurationProperties;
import org.springframework.context.annotation.Configuration;
@Data
@Configuration
@ConfigurationProperties(prefix = "sso.server")
public class SsoConfig {
private String url;
private String loginpath;
}
|
13.3.3. Controller
1
2
3
4
5
6
7
8
9
10
11
12
13
14
15
16
17
18
19
20
21
22
23
24
25
26
27
28
29
30
31
32
33
34
35
36
37
38
39
40
41
42
43
44
45
46
47
48
49
50
51
52
53
54
55
56
57
58
59
60
61
62
63
64
65
66
| package com.runaccpeted.gmall.controller;
import com.runaccpeted.gmall.config.SsoConfig;
import org.springframework.beans.factory.annotation.Autowired;
import org.springframework.stereotype.Controller;
import org.springframework.ui.Model;
import org.springframework.util.StringUtils;
import org.springframework.web.bind.annotation.CookieValue;
import org.springframework.web.bind.annotation.GetMapping;
import org.springframework.web.bind.annotation.RequestParam;
import javax.servlet.http.Cookie;
import javax.servlet.http.HttpServletRequest;
import javax.servlet.http.HttpServletResponse;
import java.io.IOException;
@Controller
public class HelloController {
@Autowired
SsoConfig ssoConfig;
@GetMapping("/")
public String index(Model model,
@CookieValue(value = "sso_user",required = false)
String ssoUserCookie,
@RequestParam(value = "sso_user",required = false) String ssoUserParam,
HttpServletRequest request,
HttpServletResponse response) throws IOException {
if(!StringUtils.isEmpty(ssoUserParam)){
Cookie sso_user = new Cookie("sso_user", ssoUserParam);
response.addCookie(sso_user);
return "index";
}
StringBuffer requestURL = request.getRequestURL();
if(StringUtils.isEmpty(ssoUserCookie)){
System.out.println("判断进来了???");
String url = ssoConfig.getUrl()+ssoConfig.getLoginpath()+"?redirec_url="+requestURL.toString();
response.sendRedirect(url);
return null;
}else{
model.addAttribute("loginUser","张三");
return "index";
}
}
}
|
13.3.4. index.html
1
2
3
4
5
6
7
8
9
10
11
12
13
| <!DOCTYPE html>
<html lang="en">
<head>
<meta charset="UTF-8">
<title>client客户端</title>
</head>
<body>
<h1>欢迎 <label th:text="${loginUser}">啊哈哈哈</label> </h1>
<button>退出</button>
</body>
</html>
|
13.4. Sso-server
13.4.1. controller
1
2
3
4
5
6
7
8
9
10
11
12
13
14
15
16
17
18
19
20
21
22
23
24
25
26
27
28
29
30
31
32
33
34
35
36
37
38
39
40
41
42
43
44
45
46
47
48
49
50
51
52
53
54
55
56
57
58
59
60
61
62
63
64
65
66
67
68
69
70
71
72
73
74
75
76
77
78
79
80
81
82
83
84
85
86
87
| package com.runaccpeted.gmall.controller;
import com.alibaba.dubbo.config.annotation.Reference;
import com.alibaba.fastjson.JSON;
import com.runaccpeted.gmall.constant.SysCacheConstant;
import com.runaccpeted.gmall.to.CommonResult;
import com.runaccpeted.gmall.ums.entity.Member;
import com.runaccpeted.gmall.ums.service.MemberService;
import com.runaccpeted.gmall.vo.ums.LoginResponseVo;
import org.springframework.beans.BeanUtils;
import org.springframework.beans.factory.annotation.Autowired;
import org.springframework.data.redis.core.StringRedisTemplate;
import org.springframework.stereotype.Controller;
import org.springframework.ui.Model;
import org.springframework.util.StringUtils;
import org.springframework.web.bind.annotation.*;
import javax.servlet.http.Cookie;
import javax.servlet.http.HttpServletRequest;
import javax.servlet.http.HttpServletResponse;
import java.io.IOException;
import java.util.HashMap;
import java.util.Map;
import java.util.UUID;
import java.util.concurrent.TimeUnit;
@Controller
public class LoginController {
@Autowired
StringRedisTemplate redisTemplate;
@GetMapping("/login")
public String login(@RequestParam(value = "redirec_url") String redirec_url,
@CookieValue(value = "sso_user",required = false) String ssoUser,
HttpServletResponse response,
Model model) throws IOException {
System.out.println("认证中心开始认证.....");
if(!StringUtils.isEmpty(ssoUser)){
String url = redirec_url+"?"+"sso_user="+ssoUser;
response.sendRedirect(url);
return null;
}else {
model.addAttribute("redirec_url",redirec_url);
return "login";
}
}
@PostMapping("/doLogin")
public void doLogin(String username, String password,String redirec_url,
HttpServletResponse response,
HttpServletRequest request) throws IOException {
Map<String,Object> map = new HashMap<>();
map.put("username",username);
map.put("email",username+"@qq.com");
String token = UUID.randomUUID().toString().replace("-", "");
redisTemplate.opsForValue().set(token,JSON.toJSONString(map));
Cookie cookie = new Cookie("sso_user",token);
response.addCookie(cookie);
response.sendRedirect(redirec_url+"?"+"sso_user="+token);
StringBuffer requestURL = request.getRequestURL();
System.out.println("将要去的地方是:"+requestURL.toString());
}
}
|
13.4.2. login.html
1
2
3
4
5
6
7
8
9
10
11
12
13
14
15
16
| <!DOCTYPE html>
<html lang="en">
<head>
<meta charset="UTF-8">
<title>Title</title>
</head>
<body>
<form th:action="@{/doLogin}" method="post">
用户名:<input name="username" /><br/>
密码:<input name="password" type="password"><br/>
<input type="hidden" name="redirec_url" th:value="${redirec_url}"/>
<input type="submit" value="登录"/>
</form>
</body>
</html></font>
|
13.5. 项目登录-用token交换数据
13.5.1. controller
1
2
3
4
5
6
7
8
9
10
11
12
13
14
15
16
17
18
19
20
21
22
23
24
25
26
27
28
29
30
31
32
33
34
35
36
37
38
39
40
41
42
43
| package com.runaccpeted.gmall.sso.controller;
import com.alibaba.dubbo.config.annotation.Reference;
import com.runaccpeted.gmall.to.CommonResult;
import com.runaccpeted.gmall.ums.entity.Member;
import com.runaccpeted.gmall.ums.service.MemberService;
import com.runaccpeted.gmall.vo.ums.LoginResponseParam;
import org.springframework.beans.factory.annotation.Autowired;
import org.springframework.data.redis.core.StringRedisTemplate;
import org.springframework.stereotype.Controller;
import org.springframework.web.bind.annotation.*;
@Controller
@CrossOrigin
public class LoginController {
@Autowired
StringRedisTemplate redisTemplate;
@Reference
MemberService memberService;
@PostMapping("/applogin")
@ResponseBody
public Object LoginForGmall(@RequestParam("username") String username,
@RequestParam("password") String password){
LoginResponseParam param=memberService.login(username,password);
if (param==null){
return new CommonResult().validateFailed("账号或密码不正确");
}else{
return new CommonResult().success(param);
}
}
@ResponseBody
@GetMapping("/userinfo")
public Object getUserInfo(@RequestParam("accessToken") String accessToken){
Member userInfo = memberService.getUserInfo(accessToken);
return new CommonResult().success(userInfo);
}
}
|
13.5.2. 修改RedisTemplate存储json的方式
1
2
3
4
5
6
7
8
9
10
11
12
13
14
15
16
17
18
19
20
21
22
23
24
25
26
27
| package com.runaccpeted.gmall.ums.config;
import org.apache.shardingsphere.shardingjdbc.api.yaml.YamlMasterSlaveDataSourceFactory;
import org.springframework.context.annotation.Bean;
import org.springframework.context.annotation.Configuration;
import org.springframework.data.redis.connection.RedisConnectionFactory;
import org.springframework.data.redis.core.RedisTemplate;
import org.springframework.data.redis.serializer.GenericJackson2JsonRedisSerializer;
import org.springframework.util.ResourceUtils;
import javax.sql.DataSource;
import java.io.File;
import java.net.UnknownHostException;
@Configuration
public class DataConfiguration {
@Bean("redisTemplate")
public RedisTemplate<Object, Object> redisTemplate(RedisConnectionFactory redisConnectionFactory)
throws UnknownHostException {
RedisTemplate<Object, Object> template = new RedisTemplate<>();
GenericJackson2JsonRedisSerializer jackson2JsonRedisSerializer = new GenericJackson2JsonRedisSerializer();
template.setConnectionFactory(redisConnectionFactory);
template.setDefaultSerializer(jackson2JsonRedisSerializer);
return template;
}
}
|
13.5.3. service - 将数据保存在redis
1
2
3
4
5
6
7
8
9
10
11
12
13
14
15
16
17
18
19
20
21
22
23
24
25
26
27
28
29
30
31
32
33
34
35
36
37
38
39
40
41
42
43
44
45
46
47
48
49
50
51
52
53
54
55
56
57
58
| package com.runaccpeted.gmall.ums.service.impl;
import com.alibaba.dubbo.config.annotation.Service;
import com.baomidou.mybatisplus.core.conditions.query.QueryWrapper;
import com.runaccpeted.gmall.constant.RedisCacheConstant;
import com.runaccpeted.gmall.ums.entity.Member;
import com.runaccpeted.gmall.ums.mapper.MemberMapper;
import com.runaccpeted.gmall.ums.service.MemberService;
import com.baomidou.mybatisplus.extension.service.impl.ServiceImpl;
import com.runaccpeted.gmall.vo.ums.LoginResponseParam;
import org.springframework.beans.BeanUtils;
import org.springframework.beans.factory.annotation.Autowired;
import org.springframework.data.redis.core.RedisTemplate;
import org.springframework.stereotype.Component;
import org.springframework.util.DigestUtils;
import java.util.UUID;
import java.util.concurrent.TimeUnit;
@Service
@Component
public class MemberServiceImpl extends ServiceImpl<MemberMapper, Member> implements MemberService {
@Autowired
RedisTemplate<Object,Object> redisTemplate;
@Override
public LoginResponseParam login(String username, String password) {
QueryWrapper<Member> queryWrapper = new QueryWrapper<>();
queryWrapper.eq("username",username);
password = DigestUtils.md5DigestAsHex(password.getBytes());
queryWrapper.eq("password",password);
Member member = baseMapper.selectOne(queryWrapper);
if(member != null){
String token= UUID.randomUUID().toString().replace("-","");
redisTemplate.opsForValue().set(RedisCacheConstant.LOGIN_MEMBER+token,member,
RedisCacheConstant.LOGIN_MEMBER_TIMEOUT, TimeUnit.MINUTES);
LoginResponseParam param = new LoginResponseParam();
BeanUtils.copyProperties(member,param);
param.setAccessToken(token);
return param;
}
return null;
}
@Override
public Member getUserInfo(String accessToken) {
Member member = (Member)redisTemplate.opsForValue().get(RedisCacheConstant.LOGIN_MEMBER + accessToken);
member.setId(null);
member.setPassword(null);
return member;
}
}
|