SpringBoot入门 command+n-类内get/set方法 shift*2-全文搜索
https://docs.spring.io/spring-boot/docs/2.2.0.RELEASE/reference/html/documentation-overview.html#boot-documentation
1. Maven配置 下载maven3.6.2 http://archive.apache.org/dist/maven/maven-3/3.6.2/binaries/
解压进入setting.xml添加插件
1 2 3 4 5 6 7 8 9 10 11 12 13 14 15 16 17 18 19 20 21 22 23 24 25 <mirrors > <mirror > <id > alimaven</id > <mirrorOf > central</mirrorOf > <name > aliyun maven</name > <url > http://maven.aliyun.com/nexus/content/groups/public/</url > </mirror > </mirrors > <profiles > <profile > <id > jdk-1.8</id > <activation > <activeByDefault > true</activeByDefault > <jdk > 1.8</jdk > </activation > <repositories > <maven.compiler.source > 1.8</maven.compiler.source > <maven.compiler.target > 1.8</maven.compiler.target > <maven.compiler.compilerVersion > 1.8</maven.compiler.compilerVersion > </repositories > </profiles >
IntelliJ IDEA中配置
2. 第一个SpringBoot项目 新建Maven project
在pom.xml下配置springboot
1 2 3 4 5 6 7 8 9 10 11 12 13 14 15 16 17 18 19 20 21 22 23 24 25 26 <parent > <groupId > org.springframework.boot</groupId > <artifactId > spring-boot-starter-parent</artifactId > <version > 2.1.6.RELEASE</version > </parent > <dependencies > <dependency > <groupId > org.springframework.boot</groupId > <artifactId > spring-boot-starter-web</artifactId > </dependency > </dependencies > <properties > <java.version > 1.8</java.version > </properties > <build > <plugins > <plugin > <groupId > org.springframework.boot</groupId > <artifactId > spring-boot-maven-plugin</artifactId > </plugin > </plugins > </build >
新建Application.java
1
2
3
4
5
6
7
8
9
10
11
12
13
14
15
16
17
18
19
20
21
22
23
24
import org.springframework.boot.SpringApplication;import org.springframework.boot.autoconfigure.SpringBootApplication;import org.springframework.context.annotation.ComponentScan;@SpringBootApplication @ComponentScan(basePackages="com.runaccpeted") public class TestApplication { public static void main (String[] args) { SpringApplication.run(TestApplication.class,args); } @Bean public CommandLineRunner getBeans (ApplicationContext ac) { return args -> { String[] str = ac.getBeanDefinitionNames(); for (String s : str) { System.out.println(s); } }; } }
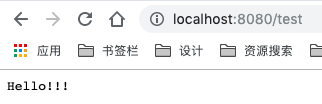
新建controller类
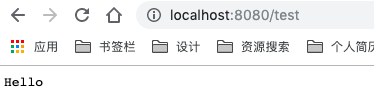
1
2
3
4
5
6
7
8
9
10
11
12
13
14
15
package com.runaccpeted.controller;import org.springframework.stereotype.Controller;import org.springframework.web.bind.annotation.RequestMapping;import org.springframework.web.bind.annotation.ResponseBody;@Controller public class TestController { @RequestMapping("/test") @ResponseBody public String test () { return "Hello!!!" ; } }
运行main方法
1
2
3
4
5
6
7
8
9
. ____ _ __ _ _ /\\ / ___'_ __ _ _(_)_ __ __ _ \ \ \ \ ( ( )\___ | '_ | '_| | '_ \/ _` | \ \ \ \ \\/ ___)| |_)| | | | | || (_| | ) ) ) ) ' |____| .__|_| |_|_| |_\__, | / / / / =========|_|==============|___/=/_/_/_/ :: Spring Boot :: (v2.1.6.RELEASE) Tomcat started on port(s): 8080 (http) with context path ''
运行
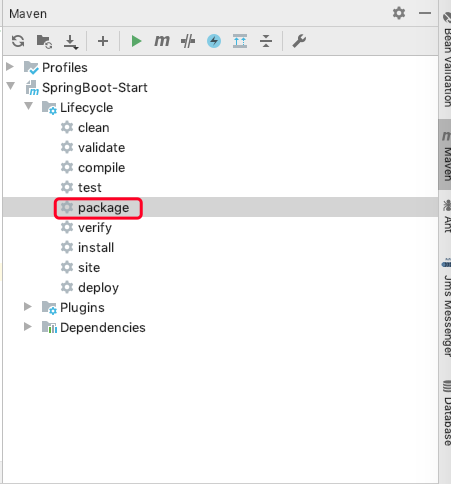
2.1. java jar xx.jar 将整个项目打包
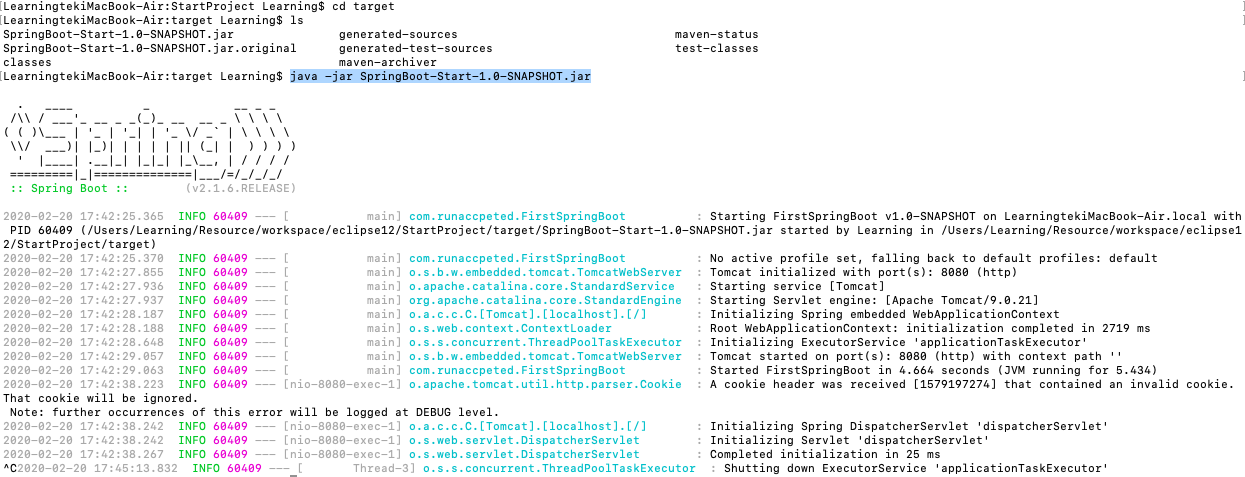
打包好的项目会放在target文件夹下
直接终端运行jar项目,可以直接访问
1 $ java -jar SpringBoot-Start-1.0-SNAPSHOT.jar
在springboot项目中自动包含了tomcat服务器
3. @SpringBootApplication自动配置 1 2 3 4 5 6 7 8 9 @Target(ElementType.TYPE) @Retention(RetentionPolicy.RUNTIME) @Documented @Inherited @SpringBootConfiguration @EnableAutoConfiguration @ComponentScan(excludeFilters = { @Filter(type = FilterType.CUSTOM, classes = TypeExcludeFilter.class), @Filter(type = FilterType.CUSTOM, classes = AutoConfigurationExcludeFilter.class) }) public @interface SpringBootApplication {
注解标注为自动配置
3.1. @SpringBootConfiguration 注明为配置类 1 2 3 @Configuration public @interface SpringBootConfiguration {}
配置类也是容器中的一个组件@Component
1 2 3 4 5 @Target({ElementType.TYPE}) @Retention(RetentionPolicy.RUNTIME) @Documented @Component public @interface Configuration {}
3.2. @EnableAutoConfiguration开启自动配置 1 2 3 4 5 6 7 8 9 10 11 12 13 14 15 16 17 18 19 20 21 22 23 package org.springframework.boot.autoconfigure;import java.lang.annotation.Documented;import java.lang.annotation.ElementType;import java.lang.annotation.Inherited;import java.lang.annotation.Retention;import java.lang.annotation.RetentionPolicy;import java.lang.annotation.Target;import org.springframework.context.annotation.Import;@Target({ElementType.TYPE}) @Retention(RetentionPolicy.RUNTIME) @Documented @Inherited @AutoConfigurationPackage @Import({AutoConfigurationImportSelector.class}) public @interface EnableAutoConfiguration { String ENABLED_OVERRIDE_PROPERTY = "spring.boot.enableautoconfiguration" ; Class<?>[] exclude() default {}; String[] excludeName() default {}; }
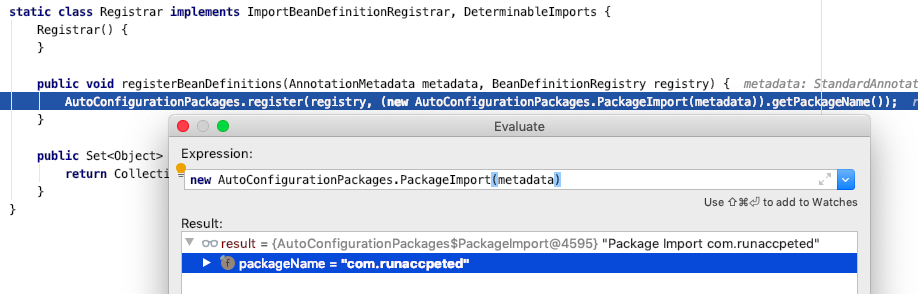
3.2.1. @AutoConfigurationPackage自动配置包 3.2.1.1. @Import({Registrar.class}) 导入配置包 1 2 3 4 5 6 7 8 9 10 11 12 13 14 15 16 17 package org.springframework.boot.autoconfigure;import java.lang.annotation.Documented;import java.lang.annotation.ElementType;import java.lang.annotation.Inherited;import java.lang.annotation.Retention;import java.lang.annotation.RetentionPolicy;import java.lang.annotation.Target;import org.springframework.boot.autoconfigure.AutoConfigurationPackages.Registrar;import org.springframework.context.annotation.Import;@Target({ElementType.TYPE}) @Retention(RetentionPolicy.RUNTIME) @Documented @Inherited @Import({Registrar.class}) public @interface AutoConfigurationPackage {}
3.2.1.2. Register.java描主配置类包 1 2 3 4 5 6 7 8 9 10 static class Registrar implements ImportBeanDefinitionRegistrar , DeterminableImports { Registrar() { } public void registerBeanDefinitions (AnnotationMetadata metadata, BeanDefinitionRegistry registry) { AutoConfigurationPackages.register(registry, (new AutoConfigurationPackages .PackageImport(metadata)).getPackageName()); } public Set<Object> determineImports (AnnotationMetadata metadata) { return Collections.singleton(new AutoConfigurationPackages .PackageImport(metadata)); } }
扫描主配置类所在包及子包
3.2.2. @Import({AutoConfigurationImportSelector.class}) 导入组件
AutoConfigurationImportSelector 组件选择器
将需要的组件以全类名的形式添加到容器中
给容器导入大量自动配置类xxxAutoConfiguration,给容器中导入场景所需组件并配置
如何知道配置类?
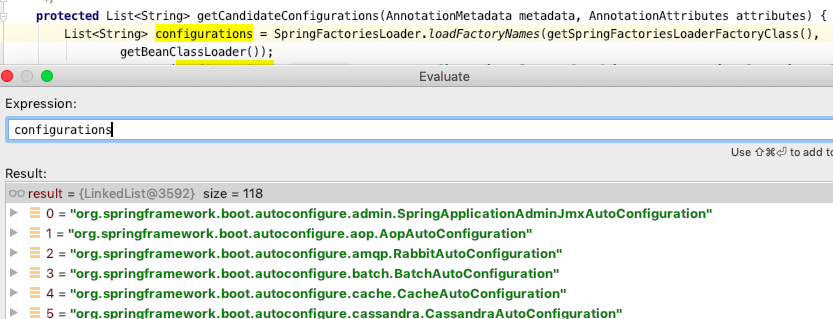
3.2.2.1. AutoConfigurationImportSelector.java 1 2 3 4 protected List<String> getCandidateConfigurations (AnnotationMetadata metadata, AnnotationAttributes attributes) { List<String> configurations = SpringFactoriesLoader.loadFactoryNames(getSpringFactoriesLoaderFactoryClass(),getBeanClassLoader()); return configurations; }
3.2.2.1.1. getSpringFactoriesLoaderFactoryClass 1 2 3 protected Class<?> getSpringFactoriesLoaderFactoryClass() { return EnableAutoConfiguration.class; }
3.2.2.1.2. SpringFactoriesLoader内部 1 2 3 LoadSpringFactories(Class<?> factoryClass, @Nullable ClassLoader classLoader) { Enumeration<URL> urls = classLoader != null ? classLoader.getResources("META-INF/spring.factories" ) : ClassLoader.getSystemResources("META-INF/spring.factories" ); }
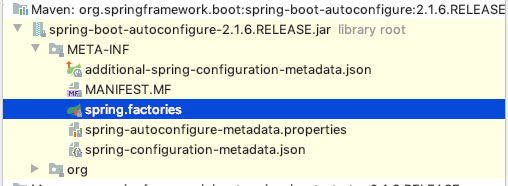
在spring-boot-autoconfigure-2.1.6.RELEASE.jar下/META-INF/spring.factories
1 2 3 4 5 6 org.springframework.boot.autoconfigure.EnableAutoConfiguration =\ org.springframework.boot.autoconfigure.admin.SpringApplicationAdminJmxAutoConfiguration,\ org.springframework.boot.autoconfigure.aop.AopAutoConfiguration,\ org.springframework.boot.autoconfigure.amqp.RabbitAutoConfiguration,\ ...
写明了配置类全路径名
Spring Boot在启动时从类路径下的META-INF/spring.factories中获取EnableAutoConfiguration指定值,作为自动配置类路径,进行自动配置
所有的配置声明在 org/springframework/boot/autoconfigure
3.3. 自动配置原理 xxxxAutoConfiguration 对应 xxxxProperties
3.3.1. SpringDataWebAutoConfiguration.java @EnableConfigurationProperties({SpringDataWebProperties.class})
1 2 3 4 5 6 7 8 9 10 11 12 13 14 15 16 17 18 19 20 21 22 23 24 25 26 27 28 29 30 31 32 33 34 35 36 37 @Configuration( proxyBeanMethods = false ) @EnableSpringDataWebSupport @ConditionalOnWebApplication( type = Type.SERVLET ) @ConditionalOnClass({PageableHandlerMethodArgumentResolver.class, WebMvcConfigurer.class}) @ConditionalOnMissingBean({PageableHandlerMethodArgumentResolver.class}) @EnableConfigurationProperties({SpringDataWebProperties.class}) @AutoConfigureAfter({RepositoryRestMvcAutoConfiguration.class}) public class SpringDataWebAutoConfiguration { private final SpringDataWebProperties properties; public SpringDataWebAutoConfiguration (SpringDataWebProperties properties) { this .properties = properties; } @Bean @ConditionalOnMissingBean public PageableHandlerMethodArgumentResolverCustomizer pageableCustomizer () { return (resolver) -> { Pageable pageable = this .properties.getPageable(); resolver.setPageParameterName(pageable.getPageParameter()); resolver.setSizeParameterName(pageable.getSizeParameter()); resolver.setOneIndexedParameters(pageable.isOneIndexedParameters()); resolver.setPrefix(pageable.getPrefix()); resolver.setQualifierDelimiter(pageable.getQualifierDelimiter()); resolver.setFallbackPageable(PageRequest.of(0 , pageable.getDefaultPageSize())); resolver.setMaxPageSize(pageable.getMaxPageSize()); }; }
3.3.2. SpringDataWebProperties.java 这里实际表明可以配置的值 spring.data.web.x=?
所有配置文件中能配置的属性都在xxxxProperties类中封装
配置文件能配置什么就可以参照所需功能对应的属性类
1 2 3 4 5 6 7 8 9 10 11 12 13 14 15 @ConfigurationProperties("spring.data.web") public class SpringDataWebProperties { private final SpringDataWebProperties.Pageable pageable = new SpringDataWebProperties .Pageable(); public static class Pageable { private String pageParameter = "page" ; private String sizeParameter = "size" ; private boolean oneIndexedParameters = false ; private String prefix = "" ; private String qualifierDelimiter = "_" ; private int defaultPageSize = 20 ; private int maxPageSize = 2000 ; } }
application.properties
1 spring.data.web.pageable.prefix =
3.4. 精髓
SpringBoot启动加载大量自动配置类
需要的功能有没有springboot默认写好的自动配置类
看自动配置类中到底配置了那些组件
容器中自动配置类添加组件时,从properties类中获取属性,指定属性值
xxxxAutoConfiguration –> 添加组件 –> Properties封装配置文件相关属性
3.5. 自动配置报告 书写在application.properties中
控制台
1 2 3 4 5 6 7 8 9 10 11 12 13 14 15 16 17 18 19 20 ============================ CONDITIONS EVALUATION REPORT ============================ Positive matches: ----------------- DispatcherServletAutoConfiguration matched: - @ConditionalOnClass found required class 'org.springframework.web.servlet.DispatcherServlet' (OnClassCondition) - found 'session' scope (OnWebApplicationCondition) Negative matches: ----------------- AopAutoConfiguration: Did not match: - @ConditionalOnClass did not find required class 'org.aspectj.lang.annotation.Aspect' (OnClassCondition)
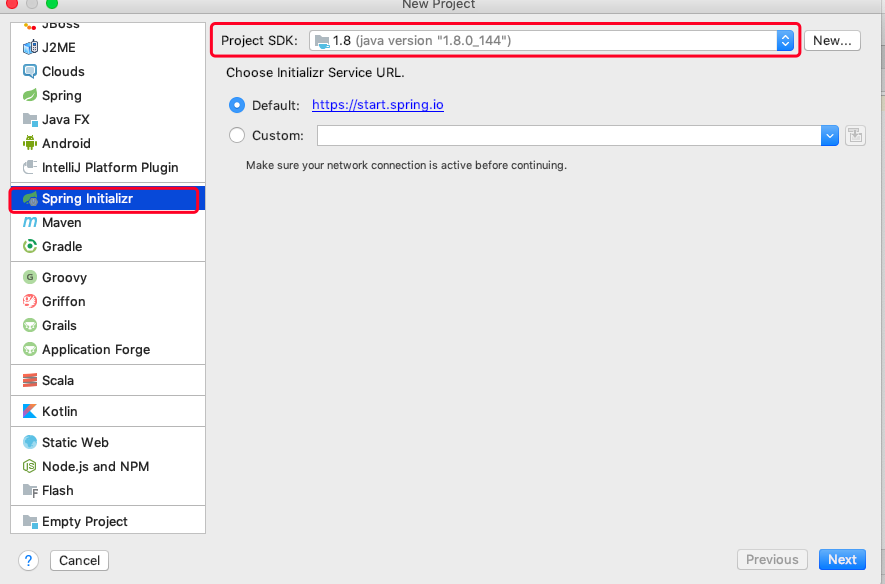
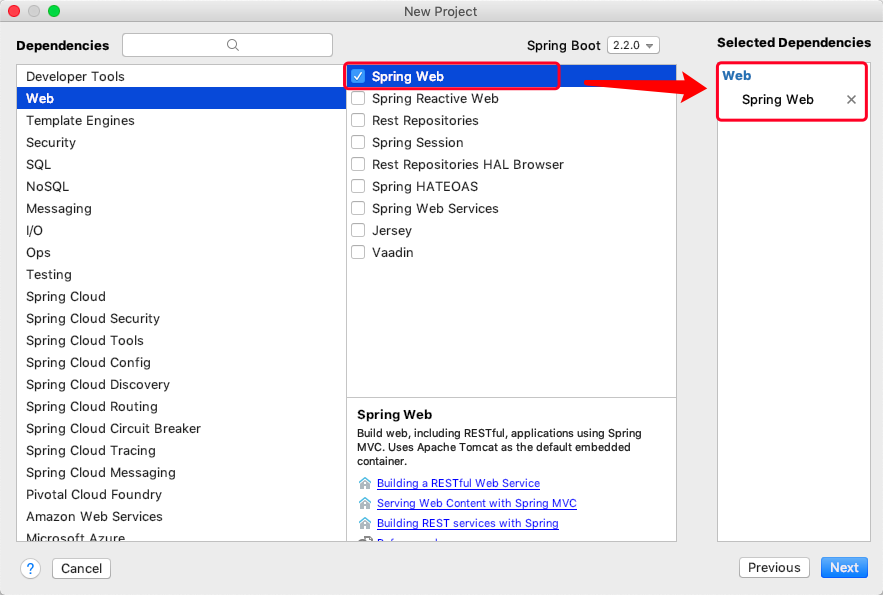
4. Spring Initializer创建SpringBoot new – > project –> Spring Initializr
直接联网生成一个初步的完备的springboot项目
4.1. pom.xml 1 2 3 4 5 6 7 8 9 10 11 12 13 14 15 16 17 18 19 20 21 22 23 24 25 26 27 28 29 30 31 32 33 34 35 36 37 38 39 40 41 42 43 44 45 46 47 48 49 50 <?xml version="1.0" encoding="UTF-8" ?> <project xmlns ="http://maven.apache.org/POM/4.0.0" xmlns:xsi ="http://www.w3.org/2001/XMLSchema-instance" xsi:schemaLocation ="http://maven.apache.org/POM/4.0.0 https://maven.apache.org/xsd/maven-4.0.0.xsd" > <modelVersion > 4.0.0</modelVersion > <parent > <groupId > org.springframework.boot</groupId > <artifactId > spring-boot-starter-parent</artifactId > <version > 2.2.0.RELEASE</version > <relativePath /> </parent > <groupId > com.runaccpeted</groupId > <artifactId > helloworld</artifactId > <version > 0.0.1-SNAPSHOT</version > <name > helloworld</name > <description > Demo project for Spring Boot</description > <properties > <java.version > 1.8</java.version > </properties > <dependencies > <dependency > <groupId > org.springframework.boot</groupId > <artifactId > spring-boot-starter-web</artifactId > </dependency > <dependency > <groupId > org.springframework.boot</groupId > <artifactId > spring-boot-starter-test</artifactId > <scope > test</scope > <exclusions > <exclusion > <groupId > org.junit.vintage</groupId > <artifactId > junit-vintage-engine</artifactId > </exclusion > </exclusions > </dependency > </dependencies > <build > <plugins > <plugin > <groupId > org.springframework.boot</groupId > <artifactId > spring-boot-maven-plugin</artifactId > </plugin > </plugins > </build > </project >
resources文件夹
—- static 保存静态资源 js css images
—- templates 保存所有模板页面,springboot默认jar包使用嵌入式tomcat,不支持jsp页面,支持模板引擎freemarker,thymeleaf
—- application.properties 配置文件
eg. server.port=8081
5. SpringBoot配置文件 有两种方式,文件名固定
5.1. application.yml 键值对
空格缩进控制层级,左对齐的是一级
大小写敏感
字面量:
k: v: 字面量直接写,不加引号
双引号:不会转义字符串中的特殊字符,特殊字符作为本身想表示的意思
name: “zhang \n” == “zhang 换行”
单引号:会转义字符串中的特殊字符,特殊字符最终只是一个普通的字符串数据
name: ‘zhang \n’ == ‘zhang \n’
对象:
k: v: 值
1 2 3 person: age: 18 name: zhangsan
行内写法:
1 person:{age:18,name:zhangsan}
数组
1 2 3 4 pets: - cat - dog - pig
行内写法
5.1.1. 配置springboot application.yml
1 2 3 4 user: id: 1 uname: wt pwd: 123
在pom.xml中添加依赖
1 2 3 4 5 <dependency > <groupId > org.springframework.boot</groupId > <artifactId > spring-boot-configuration-processor</artifactId > <optional > true</optional > </dependency >
User.java
配置@ConfigurationProperties 让springboot将application.yml中的配置项对应给User的bean
User 注册为一个bean @Component
1 2 3 4 5 6 7 8 9 10 11 12 13 14 15 16 17 18 19 20 21 22 23 24 25 26 27 28 29 30 31 32 33 34 35 36 37 38 39 40 41 42 43 44 45 package com.runaccpeted.pojo;import org.springframework.boot.context.properties.ConfigurationProperties;import org.springframework.stereotype.Component;@Component @ConfigurationProperties(prefix = "user") public class User { private int id; private String uname; private String pwd; public int getId () { return id; } public void setId (int id) { this .id = id; } public String getUname () { return uname; } public void setUname (String uname) { this .uname = uname; } public String getPwd () { return pwd; } public void setPwd (String pwd) { this .pwd = pwd; } @Override public String toString () { return "User{" + "id=" + id + ", uname='" + uname + '\'' + ", pwd='" + pwd + '\'' + '}' ; } }
添加单元测试依赖
1 2 3 4 5 6 <dependency > <groupId > junit</groupId > <artifactId > junit</artifactId > <version > 4.10</version > <scope > test</scope > </dependency >
测试类
1 2 3 4 5 6 7 8 9 10 11 12 13 14 15 16 17 18 19 20 21 22 package com.runaccpeted.helloworld;import com.runaccpeted.pojo.User;import org.junit.jupiter.api.Test;import org.junit.runner.RunWith;import org.springframework.beans.factory.annotation.Autowired;import org.springframework.boot.test.context.SpringBootTest;import org.springframework.test.context.junit4.SpringRunner;@RunWith(SpringRunner.class) @SpringBootTest class HelloworldApplicationTests { @Autowired User user; @Test public void contextLoads () { System.out.println(user); } }
Out: User{id=1, uname=’wt’, pwd=’123’}
5.2. application.properties 5.2.1. 配置SpringBoot 1 2 3 user.id =1 user.uname =wt user.pwd =123
5.2.2. @Value VS @ConfigurationProperities Value直接添加到变量上
1 2 3 4 5 6 @Value("${user.id}") private int id;@Value("${user.uname}") private String uname;@Value("${user.pwd}") private String pwd;
ConfigurationProperities添加到类上
1 2 @ConfigurationProperties(prefix = "user") public class User {}
比较
@ConfigurationProperities
@Value
功能
批量注入配置文件中的值
一一对应
松散语法
支持,user.uname name 可以对应
必须一一对应
SpEL
不支持
支持 ${1+2}
JSR303数据检验
@Size(min = 0) 支持
不支持
复杂类型注入
支持map,list,set
不支持
5.2.3. 配置文件占位符${} 1 2 3 4 user: id: 2 username: 张三_${user.id}_${random.uuid} password: 123456
5.3. @PropertySource指定properties文件 User.properties
1 2 3 user.id =1 user.uname =wt user.pwd =123456
指定特定配置文件
1 2 3 4 @Component @PropertySource(value = {"classpath:User.properties"}) @ConfigurationProperties(prefix = "user") public class User {}
5.4. @ImportSource指定xml文件 导入Spring 配置文件,让内容生效
beans.xml
1 2 3 4 5 6 7 8 9 10 11 12 <?xml version="1.0" encoding="UTF-8" ?> <beans xmlns ="http://www.springframework.org/schema/beans" xmlns:xsi ="http://www.w3.org/2001/XMLSchema-instance" xsi:schemaLocation ="http://www.springframework.org/schema/beans http://www.springframework.org/schema/beans/spring-beans.xsd" > <bean id ="u" class ="com.runaccpeted.pojo.User" > <property name ="id" value ="3" > </property > <property name ="uname" value ="abc" > </property > <property name ="pwd" value ="123" > </property > </bean > </beans >
注解
@ImportResource(locations= {“classpath:beans.xml”})
1 2 3 4 5 6 7 8 @ImportResource(locations= {"classpath:beans.xml"}) @SpringBootApplication public class HelloworldApplication { public static void main (String[] args) { SpringApplication.run(HelloworldApplication.class, args); } }
测试
1 2 3 4 5 6 7 8 9 10 11 12 13 14 15 import org.junit.jupiter.api.Test;import org.junit.runner.RunWith;import org.springframework.test.context.junit4.SpringRunner;@RunWith(SpringRunner.class) @SpringBootTest class HelloworldApplicationTests { @Autowired ApplicationContext ac; @Test void contextLoads () { User user = ac.getBean(User.class); System.out.println(user); } }
5.5. 全注解方式向容器中添加bean 5.5.1. @Configuration配置类 1 2 3 4 5 6 7 8 9 10 11 12 import com.runaccpeted.firstboot.service.HelloService;import org.springframework.context.annotation.Bean;import org.springframework.context.annotation.Configuration;@Configuration public class MyAppConfig { @Bean public HelloService helloService () { return new HelloService (); } }
5.5.2. 测试bean是否注册到容器中 1 2 3 4 5 6 7 8 9 10 11 12 13 14 15 16 17 18 19 20 21 22 23 package com.runaccpeted.firstboot;import org.junit.jupiter.api.Test;import org.junit.runner.RunWith;import org.springframework.beans.factory.annotation.Autowired;import org.springframework.boot.test.context.SpringBootTest;import org.springframework.context.ApplicationContext;import org.springframework.test.context.junit4.SpringRunner;@RunWith(SpringRunner.class) @SpringBootTest class FirstbootApplicationTests { @Autowired ApplicationContext ac; @Test void TestBean () { boolean flag = ac.containsBean("helloService" ); System.out.println(flag); } }
6. 多个profile开发环境 6.1. application.properties 新建多个配置文件
application-{环境}.properties
application-dev.properties
application.properties
1 2 3 server.port =8081 spring.profiles.active =dev
默认生效的是application.properties
Tomcat started on port(s): 8082 (http) with context path ‘’
6.2. application.yml 多个代码块
— 分割文档
spring.profiles.active 指定哪个profiles被激活,默认为8081
1 2 3 4 5 6 7 8 9 10 11 12 13 14 15 server: port: 8081 spring: profiles: active: dev --- server: port: 8082 spring: profiles: dev --- server: port: 8083 spring: profiles: prod
Tomcat started on port(s): 8082 (http) with context path ‘’
当不设定active时,
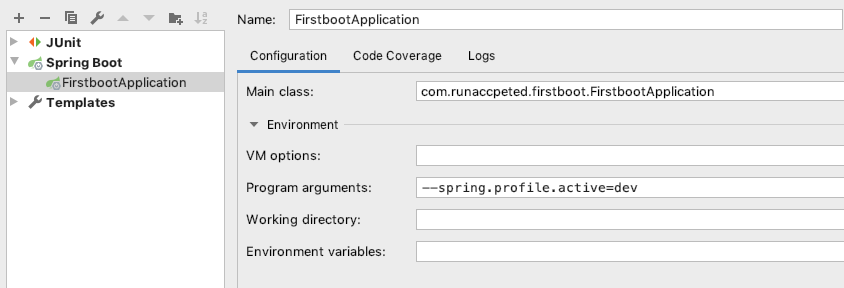
6.3. 命令行 –spring.profiles.active=dev
7. 配置文件加载位置 file:./config/
file:./
classpath:/config/ 为resources:/config/
classpath:/
优先级从高到低,高优先级会覆盖低优先级内容
springboot会从4个位置全部加载配置文件,可以实现互补配置
config/application.properties 下配置 server.port=8081
src/main/resources/application.properties 下配置 server.servlet.context-path=/boot 项目根目录
实现 访问 http://localhost:8081/boot/test
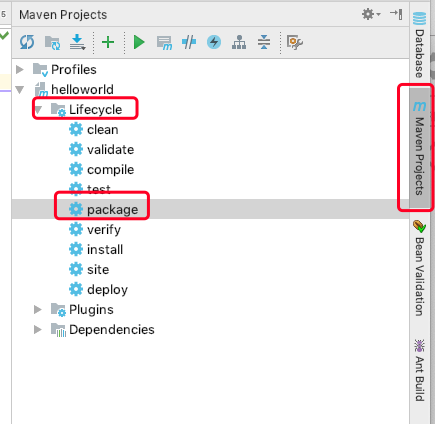
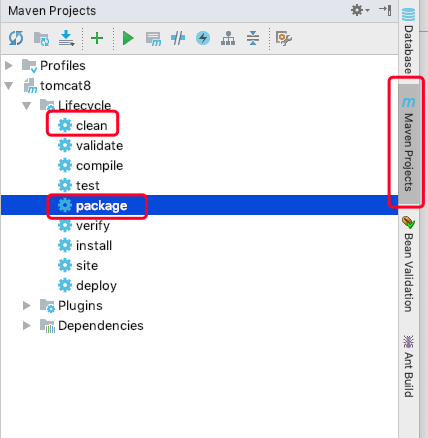
7.1. 命令行指定配置文件位置 打包项目
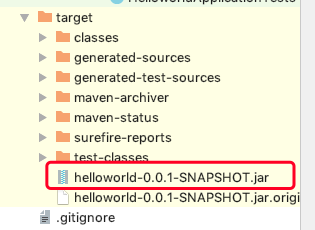
maven projects –> package –> target下生成一个jar文件
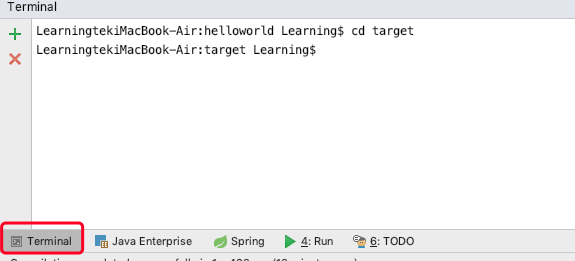
命令行
java -jar helloworld-0.0.1-SNAPSHOT.jar –spring.config.location=/Users/Learning/application.properties
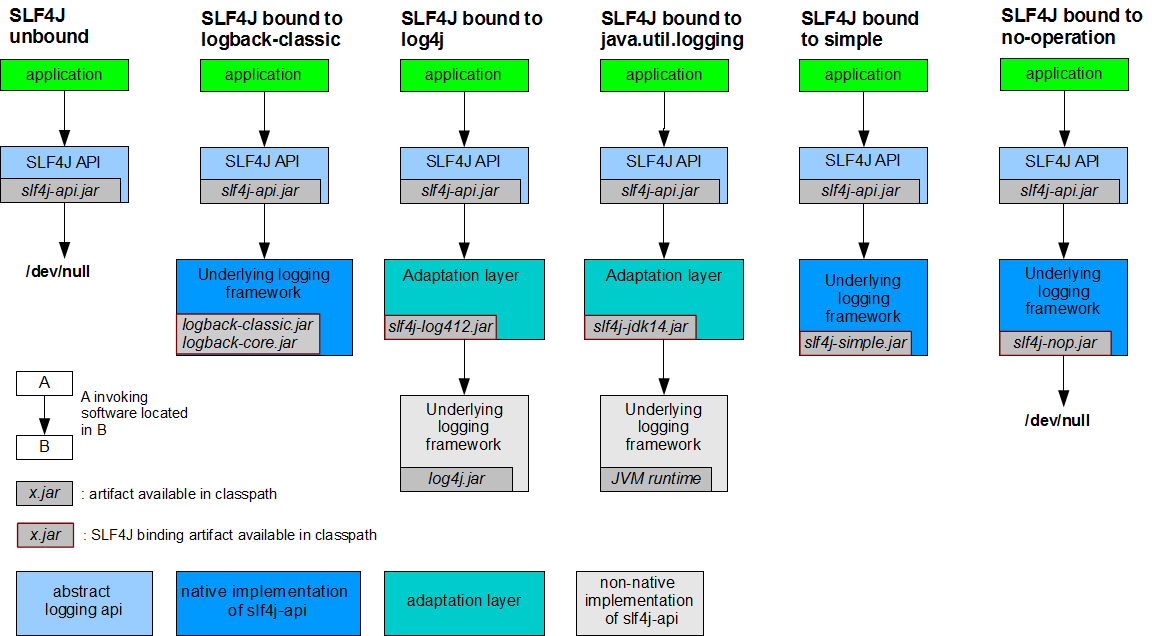
8. 日志
日志门面-抽象层
日志实现
JCL(Jakarta Commons Logging) SLF4j jboos-logging
Log4j JUL(java util logging) log4j2 Logback
日志门面(抽象)SLF4j和日志实现(实现类)logback
Simple Logging Facade for Java
1 2 3 4 5 6 7 8 9 import org.slf4j.Logger;import org.slf4j.LoggerFactory;public class HelloWorld { public static void main (String[] args) { Logger logger = LoggerFactory.getLogger(HelloWorld.class); logger.info("Hello World" ); } }
slf4j-api.jar – slf4j-xx.jar – xx.jar
抽象类 – 适配层 – 实现类
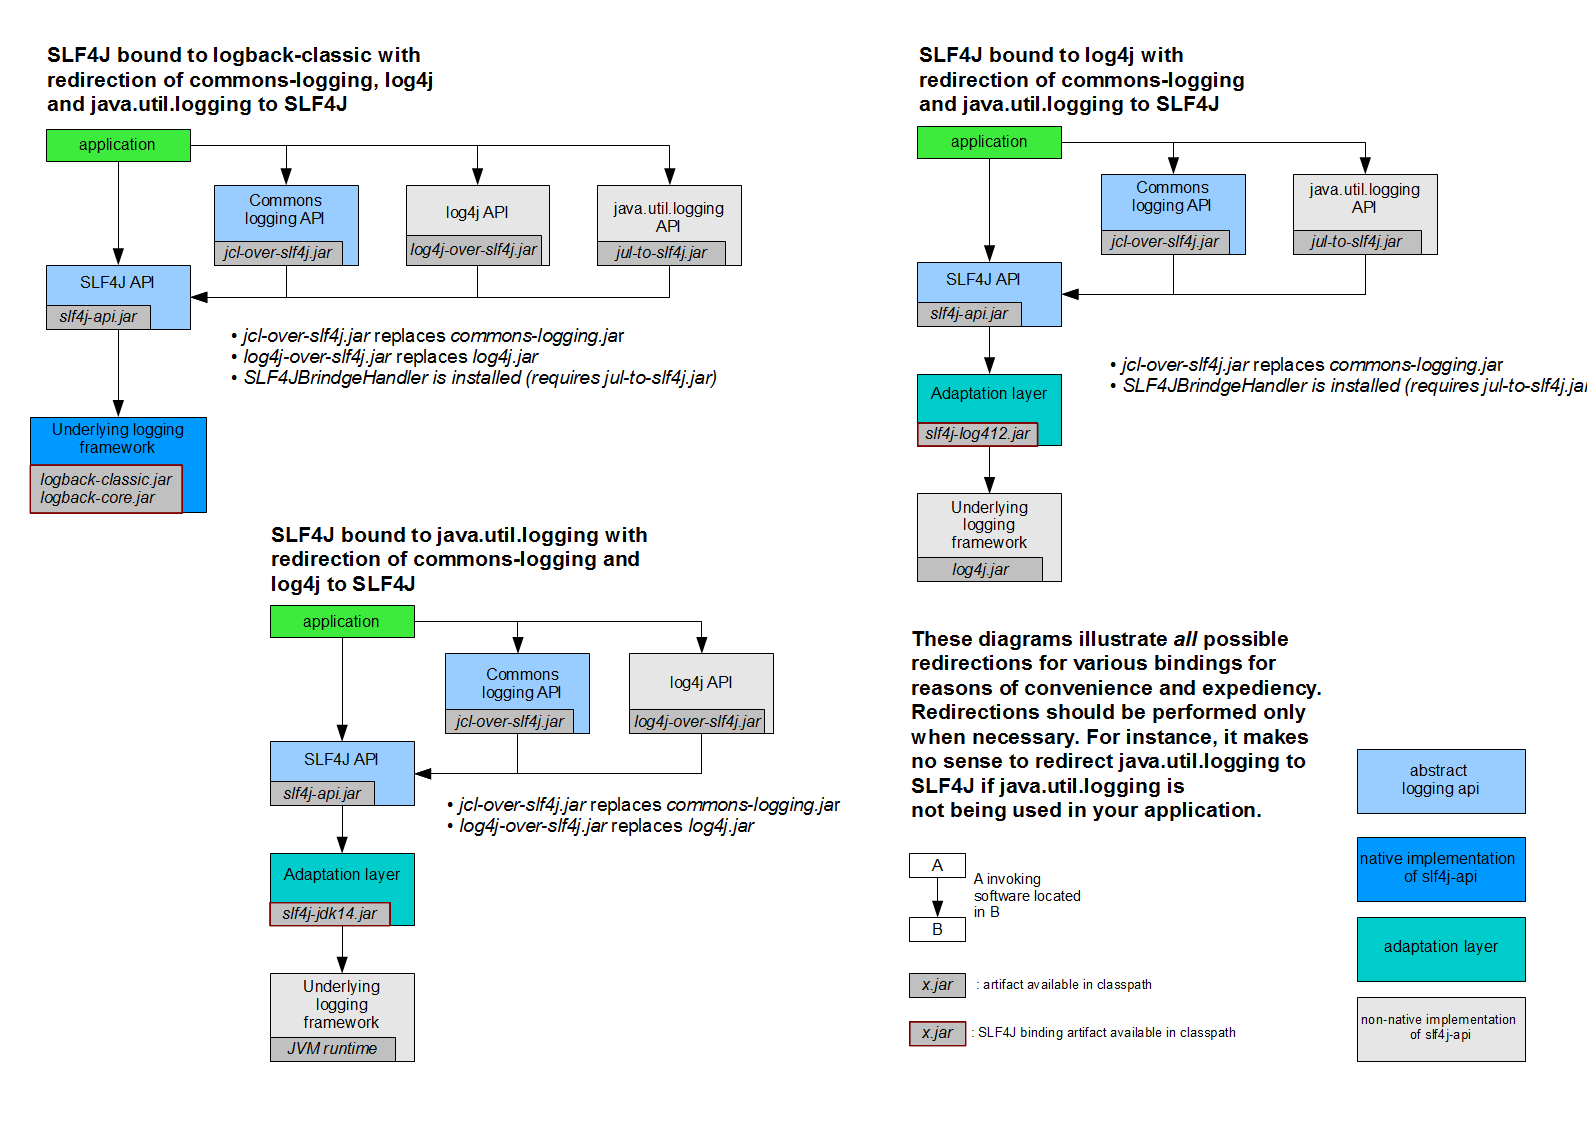
统一所有日志:
排除其他日志框架
用中间包替换原有的日志框架,功能不变
导入sjf4j的其他实现包
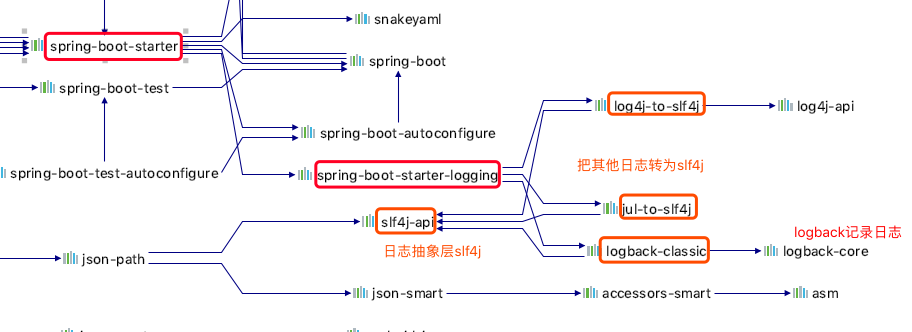
SpringBoot中的log引入
中间包底层直接用slf4j
引用代码
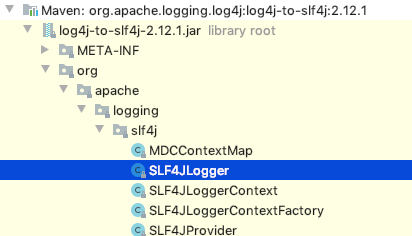
1 2 3 4 5 6 7 8 9 10 11 12 13 14 15 16 17 18 19 20 21 <dependency > <groupId > org.springframework.boot</groupId > <artifactId > spring-boot-starter-logging</artifactId > <version > 2.2.0.RELEASE</version > <scope > compile</scope > </dependency > <dependency > <groupId > org.apache.logging.log4j</groupId > <artifactId > log4j-to-slf4j</artifactId > <version > 2.12.1</version > <scope > compile</scope > </dependency > <dependency > <groupId > org.apache.logging.log4j</groupId > <artifactId > log4j-api</artifactId > </dependency >
8.1. 实践 日志级别 trace < debug < info < warn < error
1 2 3 4 5 6 7 8 9 import org.slf4j.Logger;import org.slf4j.LoggerFactory;Logger logger= LoggerFactory.getLogger(this .getClass()); logger.trace("trace" ); logger.debug("debug" ); logger.info("info" ); logger.warn("warn" ); logger.error("error" );
8.1.1. 调整日志级别 application.properties调整 默认日志级别info
1 logging.level.com.runaccpeted =trace
设定日志级别
指定日志文件名和路径
不指定默认为控制台
生成在项目根目录下
1 2 3 4 5 6 7 8 9 logging.file.name =spring.log logging.file.path =/log #好像没什么用 loggin.file.max-size =10MB logging.file.max-history =7
8.1.2. 日志格式 %d 日期时间
%thread 线程
%-5level 级别从左显示5个字符宽度
%logger{50} logger名字最长50个字符,否则按照句点分割
%msg 日志消息
%n 换行符
1 2 3 4 5 logging.pattern.console =%d{yyyy-MM-dd HH:mm:ss.SSS} {%thread} %-5level %logger{50} - %msg%n logging.pattern.file =%d{yyyy-MM-dd} {%thread} %-5level %logger{50} - %msg%n
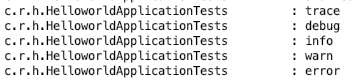
e.g.
2019-10-07 16:46:47.726 {main} INFO c.r.helloworld.HelloworldApplicationTests - Started HelloworldApplicationTests in 5.292 seconds (JVM running for 8.207)
默认配置
spring-boot-2.2.0.RELEASE
org.springframework.boot.logging.logback.base.xml
指定默认为INFO
1 2 3 4 5 6 7 8 9 10 <included > <include resource ="org/springframework/boot/logging/logback/defaults.xml" /> <property name ="LOG_FILE" value ="${LOG_FILE:-${LOG_PATH:-${LOG_TEMP:-${java.io.tmpdir:-/tmp}}}/spring.log}" /> <include resource ="org/springframework/boot/logging/logback/console-appender.xml" /> <include resource ="org/springframework/boot/logging/logback/file-appender.xml" /> <root level ="INFO" > <appender-ref ref ="CONSOLE" /> <appender-ref ref ="FILE" /> </root > </included >
org.springframework.boot.logging.logback.defaults.xml
1 2 3 4 5 6 7 8 9 10 11 12 13 14 15 <included > <conversionRule conversionWord ="clr" converterClass ="org.springframework.boot.logging.logback.ColorConverter" /> <conversionRule conversionWord ="wex" converterClass ="org.springframework.boot.logging.logback.WhitespaceThrowableProxyConverter" /> <conversionRule conversionWord ="wEx" converterClass ="org.springframework.boot.logging.logback.ExtendedWhitespaceThrowableProxyConverter" /> <property name ="CONSOLE_LOG_PATTERN" value ="${CONSOLE_LOG_PATTERN:-%clr(%d{${LOG_DATEFORMAT_PATTERN:-yyyy-MM-dd HH:mm:ss.SSS}}){faint} %clr(${LOG_LEVEL_PATTERN:-%5p}) %clr(${PID:- }){magenta} %clr(---){faint} %clr([%15.15t]){faint} %clr(%-40.40logger{39}){cyan} %clr(:){faint} %m%n${LOG_EXCEPTION_CONVERSION_WORD:-%wEx}}" /> <property name ="FILE_LOG_PATTERN" value ="${FILE_LOG_PATTERN:-%d{${LOG_DATEFORMAT_PATTERN:-yyyy-MM-dd HH:mm:ss.SSS}} ${LOG_LEVEL_PATTERN:-%5p} ${PID:- } --- [%t] %-40.40logger{39} : %m%n${LOG_EXCEPTION_CONVERSION_WORD:-%wEx}}" /> <logger name ="org.apache.catalina.startup.DigesterFactory" level ="ERROR" /> <logger name ="org.apache.catalina.util.LifecycleBase" level ="ERROR" /> <logger name ="org.apache.coyote.http11.Http11NioProtocol" level ="WARN" /> <logger name ="org.apache.sshd.common.util.SecurityUtils" level ="WARN" /> <logger name ="org.apache.tomcat.util.net.NioSelectorPool" level ="WARN" /> <logger name ="org.eclipse.jetty.util.component.AbstractLifeCycle" level ="ERROR" /> <logger name ="org.hibernate.validator.internal.util.Version" level ="WARN" /> </included >
8.2. 指定配置 给类路径下放每个日志框架自己的配置文件
Logging System
Customization
Logback
logback-spring.xml, logback-spring.groovy, logback.xml, or logback.groovy
Log4j2
log4j2-spring.xml or log4j2.xml
JUL (Java Util Logging)
logging.properties
logback.xml:直接被日志框架识别
8.2.1. logback-spring.xml 日志框架不直接加载日志配置项,SpringBoot解析日志配置,使用SpringBoot高级profile功能
1 2 3 4 5 6 7 8 9 10 11 12 13 14 15 16 17 18 19 20 21 22 23 24 25 26 27 28 29 30 31 32 33 34 35 36 37 38 39 40 41 42 43 44 45 46 47 48 49 50 51 52 53 54 55 56 57 58 59 60 61 62 63 64 65 66 67 68 69 70 71 72 73 74 75 76 77 78 79 80 81 82 83 84 85 86 87 88 89 <?xml version="1.0" encoding="UTF-8" ?> <configuration scan ="false" scanPeriod ="60 seconds" debug ="false" > <property name ="LOG_HOME" value ="log" /> <property name ="appName" value ="springboot" > </property > <appender name ="stdout" class ="ch.qos.logback.core.ConsoleAppender" > <layout class ="ch.qos.logback.classic.PatternLayout" > <springProfile name ="dev" > <pattern > %d{yyyy-MM-dd HH:mm:ss.SSS} === [%thread] %-5level %logger{50} - %msg%n</pattern > </springProfile > <springProfile name ="!dev" > <pattern > %d{yyyy-MM-dd HH:mm:ss.SSS} ---> [%thread] %-5level %logger{50} - %msg%n</pattern > </springProfile > </layout > </appender > <appender name ="appLogAppender" class ="ch.qos.logback.core.rolling.RollingFileAppender" > <file > ${LOG_HOME}/${appName}.log</file > <rollingPolicy class ="ch.qos.logback.core.rolling.TimeBasedRollingPolicy" > <fileNamePattern > ${LOG_HOME}/${appName}-%d{yyyy-MM-dd}-%i.log</fileNamePattern > <MaxHistory > 365</MaxHistory > <timeBasedFileNamingAndTriggeringPolicy class ="ch.qos.logback.core.rolling.SizeAndTimeBasedFNATP" > <maxFileSize > 100MB</maxFileSize > </timeBasedFileNamingAndTriggeringPolicy > </rollingPolicy > <layout class ="ch.qos.logback.classic.PatternLayout" > <pattern > %d{yyyy-MM-dd HH:mm:ss.SSS} [ %thread ] - [ %-5level ] [ %logger{50} : %line ] - %msg%n</pattern > </layout > </appender > <logger name ="com.atguigu" level ="debug" /> <logger name ="org.springframework" level ="debug" additivity ="false" > </logger > <root level ="info" > <appender-ref ref ="stdout" /> <appender-ref ref ="appLogAppender" /> </root > </configuration >
logback-spring.xml
确定开发环境:
1 2 3 4 5 6 <springProfile name ="dev" > <pattern > %d{yyyy-MM-dd HH:mm:ss.SSS} === [%thread] %-5level %logger{50} - %msg%n</pattern > </springProfile > <springProfile name ="!dev" > <pattern > %d{yyyy-MM-dd HH:mm:ss.SSS} ---> [%thread] %-5level %logger{50} - %msg%n</pattern > </springProfile >
在application.properties中配置dev
1 spring.profiles.active =dev
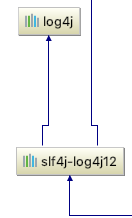
8.3. 切换日志框架 8.3.1. log4j❌不推荐❌ 剔除原有
log4j-to-slf4j
ch.qos.logback
1 2 3 4 5 6 7 8 9 10 11 12 13 14 <dependency > <groupId > org.springframework.boot</groupId > <artifactId > spring-boot-starter-web</artifactId > <exclusions > <exclusion > <artifactId > log4j-to-slf4j</artifactId > <groupId > org.apache.logging.log4j</groupId > </exclusion > <exclusion > <artifactId > logback-classic</artifactId > <groupId > ch.qos.logback</groupId > </exclusion > </exclusions > </dependency >
添加log4j
1 2 3 4 <dependency > <groupId > org.slf4j</groupId > <artifactId > slf4j-log4j12</artifactId > </dependency >
添加log4j.properties
1 2 3 4 5 6 7 8 9 10 11 12 13 14 15 16 17 log4j.rootLogger =debug,stdout,D log4j.appender.stdout =org.apache.log4j.ConsoleAppender log4j.appender.stdout.Target =System.out log4j.appender.stdout.layout =org.apache.log4j.PatternLayout log4j.appender.stdout.layout.ConversionPattern =%d{ABSOLUTE} ---> %5p %c{1}:%L - %m%n log4j.appender.D =org.apache.log4j.DailyRollingFileAppender log4j.appender.D.File =logs/log.log log4j.appender.D.Append =true log4j.appender.D.Threshold =DEBUG log4j.appender.D.layout =org.apache.log4j.PatternLayout log4j.appender.D.layout.ConversionPattern =%-d{yyyy-MM-dd HH:mm:ss} [%t:%r] - [%p] %m%n
切换记录类
1 2 3 4 5 6 7 import org.apache.log4j.Logger;Logger logger = Logger.getLogger(this .getClass());logger.trace("trace" ); logger.debug("debug" ); logger.info("info" ); logger.warn("warn" ); logger.error("error" );
记录日志
1 2 3 4 [main:7073] - [DEBUG] debug [main:7073] - [INFO] info [main:7074] - [WARN] warn [main:7074] - [ERROR] error
8.3.2. log4j2 1 2 3 4 5 6 7 8 9 10 11 12 13 14 15 <dependency > <groupId > org.springframework.boot</groupId > <artifactId > spring-boot-starter-web</artifactId > <exclusions > <exclusion > <artifactId > spring-boot-starter-logging</artifactId > <groupId > org.springframework.boot</groupId > </exclusion > </exclusions > </dependency > <dependency > <groupId > org.springframework.boot</groupId > <artifactId > spring-boot-starter-log4j2</artifactId > </dependency >
配置文件
8.3.2.1. log4j2-spring.xml 9. SpringBoot与Web开发 9.1. 静态资源映射 9.1.1. WebMvcAutoConfiguration.java 1 2 3 4 5 6 7 8 9 10 11 12 13 14 15 16 17 18 19 20 21 22 23 @Override public void addResourceHandlers (ResourceHandlerRegistry registry) { if (!this .resourceProperties.isAddMappings()) { logger.debug("Default resource handling disabled" ); return ; } Duration cachePeriod = this .resourceProperties.getCache().getPeriod(); CacheControl cacheControl = this .resourceProperties.getCache().getCachecontrol().toHttpCacheControl(); if (!registry.hasMappingForPattern("/webjars/**" )) { customizeResourceHandlerRegistration(registry.addResourceHandler("/webjars/**" ) .addResourceLocations("classpath:/META-INF/resources/webjars/" ) .setCachePeriod(getSeconds(cachePeriod)).setCacheControl(cacheControl)); } String staticPathPattern = this .mvcProperties.getStaticPathPattern(); if (!registry.hasMappingForPattern(staticPathPattern)) { customizeResourceHandlerRegistration(registry.addResourceHandler(staticPathPattern) .addResourceLocations(getResourceLocations(this .resourceProperties.getStaticLocations())) .setCachePeriod(getSeconds(cachePeriod)).setCacheControl(cacheControl)); } }
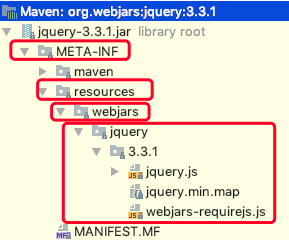
/webjars/** 映射到/META-INF/resources/webjars/
webjar
将js,css以jar的形式加载到项目中
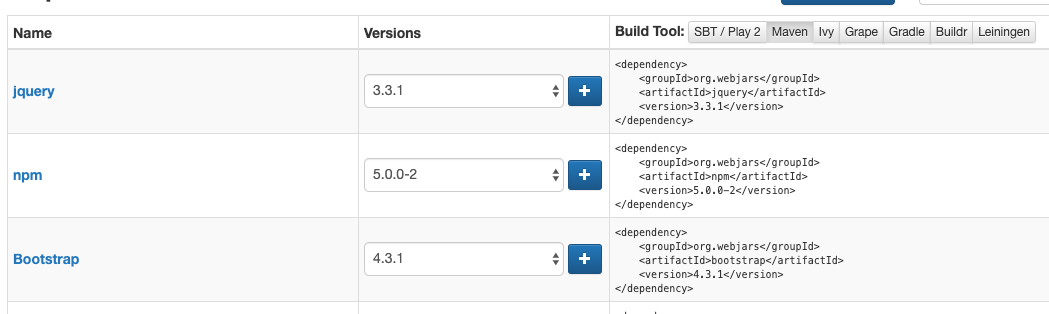
导入jquery
1 2 3 4 5 <dependency > <groupId > org.webjars</groupId > <artifactId > jquery</artifactId > <version > 3.3.1</version > </dependency >
导入的maven依赖
访问路径:localhost:8080/webjars/jquery/3.3.1/jquery.js
9.2. 文件自定义静态资源 9.2.1. WebMvcAutoConfigurationAdapter.java 9.2.2. ResourceProperties 1 2 3 4 5 6 7 8 9 @EnableConfigurationProperties({ WebMvcProperties.class, ResourceProperties.class }) @Order(0) public static class WebMvcAutoConfigurationAdapter implements WebMvcConfigurer {} @ConfigurationProperties(prefix = "spring.resources", ignoreUnknownFields = false) public class ResourceProperties { private static final String[] CLASSPATH_RESOURCE_LOCATIONS = { "classpath:/META-INF/resources/" , "classpath:/resources/" , "classpath:/static/" , "classpath:/public/" }; }
默认在下列路径找静态资源
/ == 项目名
1 2 3 4 5 classpath :/META-INF/resources/ classpath :/resources/ classpath :/static/ classpath :/public/
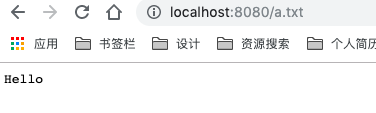
resources/resources/a.txt == Hello
resources/static/a.txt == hello world
显示的还是Hello
9.3. 欢迎页 9.3.1. WebMvcAutoConfiguration.java 1 2 3 4 5 6 7 8 9 10 11 12 13 14 15 16 17 18 19 20 21 22 23 24 public interface ResourceLoader { String CLASSPATH_URL_PREFIX = "classpath:" ; Resource getResource (String var1) ; } private Resource getIndexHtml (String location) { return this .resourceLoader.getResource(location + "index.html" ); } private Optional<Resource> getWelcomePage () { String[] locations = getResourceLocations(this .resourceProperties.getStaticLocations()); return Arrays.stream(locations).map(this ::getIndexHtml).filter(this ::isReadable).findFirst(); } @Bean public WelcomePageHandlerMapping welcomePageHandlerMapping (ApplicationContext applicationContext, FormattingConversionService mvcConversionService, ResourceUrlProvider mvcResourceUrlProvider) { WelcomePageHandlerMapping welcomePageHandlerMapping = new WelcomePageHandlerMapping ( new TemplateAvailabilityProviders (applicationContext), applicationContext, getWelcomePage(), this .mvcProperties.getStaticPathPattern()); welcomePageHandlerMapping.setInterceptors(getInterceptors(mvcConversionService, mvcResourceUrlProvider)); return welcomePageHandlerMapping; }
9.3.2. WebMvcProperties.java getStaticPathPattern() 静态资源文件夹下所有index.html页面
1 2 3 4 @ConfigurationProperties(prefix = "spring.mvc") public class WebMvcProperties { private String staticPathPattern = "/**" ; }
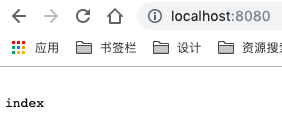
resources/public/index.html == index
9.4. 图标 静态资源文件夹下所有favicon.ico
9.4.1. 自定义静态资源路径 1 spring.resources.static-locations =classpath:/hello/,classpath:/test/
配置后,原配置路径失效
10. Thymeleaf模板引擎 1 2 3 4 5 6 7 8 9 10 11 12 13 14 15 16 17 18 19 <dependency > <groupId > org.springframework.boot</groupId > <artifactId > spring-boot-starter-thymeleaf</artifactId > </dependency > <properties > <java.version > 1.8</java.version > <thymeleaf.version > 3.0.11.RELEASE</thymeleaf.version > <thymeleaf-layout-dialect.version > 2.4.1</thymeleaf-layout-dialect.version > </properties > <dependency > <groupId > nz.net.ultraq.thymeleaf</groupId > <artifactId > thymeleaf-layout-dialect</artifactId > <version > ${thymeleaf-layout-dialect.version}</version > </dependency >
10.1. ThymeleafAutoConfiguration 1 2 3 4 5 @Configuration(proxyBeanMethods = false) @EnableConfigurationProperties(ThymeleafProperties.class) @ConditionalOnClass({ TemplateMode.class, SpringTemplateEngine.class }) @AutoConfigureAfter({ WebMvcAutoConfiguration.class, WebFluxAutoConfiguration.class }) public class ThymeleafAutoConfiguration {}
10.2. ThymeleafProperties 1 2 3 4 5 6 7 8 @ConfigurationProperties(prefix = "spring.thymeleaf") public class ThymeleafProperties { private static final Charset DEFAULT_ENCODING = StandardCharsets.UTF_8; public static final String DEFAULT_PREFIX = "classpath:/templates/" ; public static final String DEFAULT_SUFFIX = ".html" ;
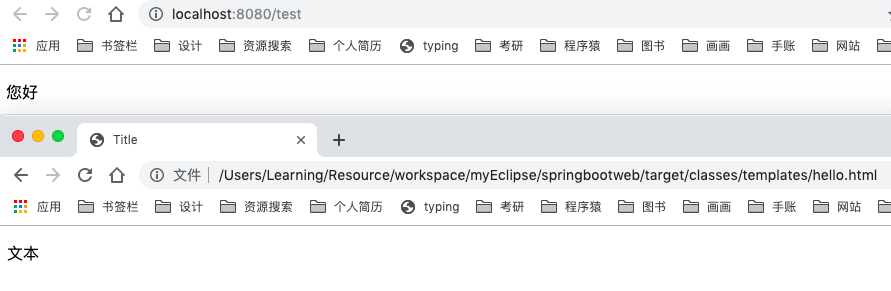
10.3. TestController 对应 classpath:/templates/ 下 .html
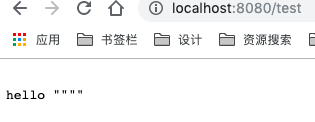
1 2 3 4 5 6 7 8 @Controller public class TestController { @RequestMapping("/test") public String test () { return "hello" ; } }
hello.html
1 2 3 4 5 6 7 8 9 10 <!DOCTYPE html > <html lang ="en" > <head > <meta charset ="UTF-8" > <title > Title</title > </head > <body > hello """" </body > </html >
结果
10.4. 语法规则 1 <html lang ="en" xmlns:th ="http://www.thymeleaf.org" >
导入语法提示
10.4.1. th: 10.4.1.1. th:text 改变元素文本内容 resource/templates/hello.html
1 2 3 4 <!DOCTYPE html > <html lang ="en" xmlns:th ="http://www.thymeleaf.org" > <div th:text ="${hello}" > 显示文字</div > </html >
传入的值
1 2 3 4 5 6 7 8 9 @Controller public class HelloController { @RequestMapping("/hello") public String hello (Map<String,String> m) { m.put("hello" ,"您好" ); return "hello" ; } }
10.4.1.2. unbescape SpringBoot集成Thymeleaf 出现java.lang.ClassNotFoundException: org.unbescape.html.HtmlEscape异常问题
1 2 3 4 5 6 7 8 9 <dependency > <groupId > net.sourceforge.nekohtml</groupId > <artifactId > nekohtml</artifactId > </dependency > <dependency > <groupId > org.unbescape</groupId > <artifactId > unbescape</artifactId > <version > 1.1.1.RELEASE</version > </dependency >
unbescape 版本过低
10.4.1.3. th: 改变组件任意属性 1 <div th:id ="${}" th:class ="${}" > </div >
10.4.2. 类比
10.4.3. 表达式 10.4.3.1. Simple expressions表达式语法 10.4.3.1.1. VariableExpressions获取变量值 ${…} 1 2 3 4 5 6 7 8 9 10 11 12 13 14 15 16 17 18 19 20 21 22 23 24 25 26 27 28 29 30 31 32 33 34 VariableExpressions获取变量值 : ${...} 获取对象属性,调用方法 - 使用内置基本对象: ${foo} ${param.foo} ${param.size()} ${param.isEmpty()} ${param.containKey('foo')} ${session.foo} ${application.foo} - 内置工具对象 ${#strings.toString(obj)}
10.4.3.1.2. SelectionVariableExpressions选择表达式 *{…} 1 2 3 4 5 6 7 SelectionVariableExpressions选择表达式 功能同${}: *{...} 配合th :object使用,对象成员变量 <div th:object="${session.user}"> <p>Age : <span th:text="*{age}?: '(no age specified)'">27</span>. </p> </div>
10.4.3.1.3. MessageExpressions获取国际化内容: #{…} 10.4.3.1.4. LinkURLExpressions定义URL: @{…} 1 th:href="@{http://localhost:8080/gtvg/order/details(orderId=${o.id})}
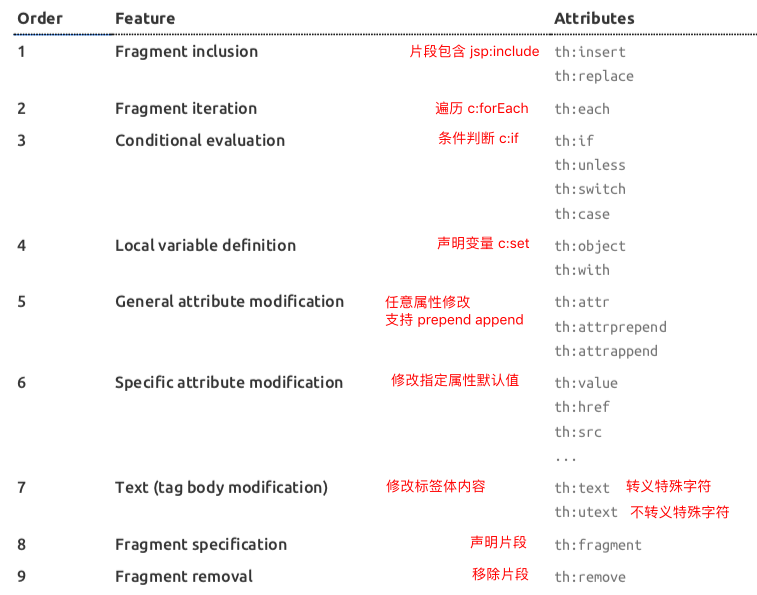
10.4.3.1.5. Fragment Expressions 片段引用表达式: ~{…} 1 <div th:insert ="~{commons :: main}" > ...</div >
10.4.3.2. Literals 字面量 1 2 3 4 5 Text literals: 'one text' , 'Another one!' ,... Number literals: 0 , 34 , 3.0 , 12.3 ,... Boolean literals: true , false Nullliteral : null Literal tokens: one , sometext , main ,...
10.4.3.3. Text operations: 文本 1 2 Stringconcatenation : + Literal substitutions: |The name is ${name}|
10.4.3.4. Arithmetic operations: 数学运算 1 2 Binaryoperators : +, -, *, /, % Minussign(unaryoperator) : -
10.4.3.5. Boolean operations: 布尔运算 1 2 Binary operators: and , or Boolean negation (unary operator): ! , not
10.4.3.6. Comparisons and equality: 比较运算 1 2 Comparators : >, <, >=, <= (gt, lt, ge, le) Equality operators: == , != ( eq , ne )
10.4.3.7. Conditional operators: 条件运算符 三元 1 2 3 If-then : (if) ? (then) If-then-else : (if) ? (then) : (else) Default : (value) ?: (defaultvalue)
10.4.3.8. Special tokens: 特殊操作 10.4.3.8.1. No-Operation: _ 10.4.4. 实例 值来自map
1 2 3 <p th:text ="${hello}" > 文本 </p >
TestController.java
1 2 3 4 5 @RequestMapping("/test") public String test (HashMap<String,String> map) { map.put("hello" ,"您好" ); return "hello" ; }
实现前后端分离
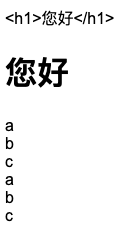
10.4.5. 实例2 th:each 1 2 3 4 5 6 7 @RequestMapping("/test") public String test (HashMap<String,Object> map) { map.put("hello" ,"<h1>您好</h1>" ); map.put("user" , Arrays.asList("a" ,"b" ,"c" )); return "hello" ; }
前端
1 2 3 4 5 6 7 8 <div th:text ="${hello}" > </div > <div th:utext ="${hello}" > </div > <div th:each ="u:${user}" > [[${u}]]</div > <div th:each ="u:${user}" th:text ="${u}" > </div >
实现
11. web自动配置 https://docs.spring.io/spring-boot/docs/2.2.0.RELEASE/reference/html/spring-boot-features.html#boot-features-spring-mvc-auto-configuration
11.1. 7.1.1. Spring MVC Auto-configuration org.springframework.boot.autoconfigure.web
Spring Boot provides auto-configuration for Spring MVC that works well with most applications.
SpringBoot提供了SpringMVC的自动配置
The auto-configuration adds the following features on top of Spring’s defaults:
自动配置添加了以下Spring配置:
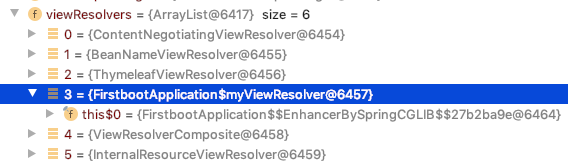
Inclusion of ContentNegotiatingViewResolver and BeanNameViewResolver beans.
在WebMvcAutoConfiguration中实现ContentNegotiatingViewResolver,组合所有的视图解析器
自动配置ViewResolver视图解析器,根据方法的返回值视图对象决定对视图对象的转发?重定向?
WebMvcAutoConfiguration.java
1 2 3 4 5 6 7 8 9 10 11 @Bean @ConditionalOnBean(ViewResolver.class) @ConditionalOnMissingBean(name = "viewResolver", value = ContentNegotiatingViewResolver.class) public ContentNegotiatingViewResolver viewResolver (BeanFactory beanFactory) { ContentNegotiatingViewResolver resolver = new ContentNegotiatingViewResolver (); resolver.setContentNegotiationManager(beanFactory.getBean(ContentNegotiationManager.class)); resolver.setOrder(Ordered.HIGHEST_PRECEDENCE); return resolver; }
ContentNegotiatingViewResolver.java
从bean工厂加载所有视图解析器
1 2 3 4 5 6 7 8 9 10 11 12 13 14 15 16 17 18 19 20 21 22 23 24 25 26 27 28 29 30 31 32 public class ContentNegotiatingViewResolver extends WebApplicationObjectSupport implements ViewResolver , Ordered, InitializingBean { @Nullable private List<ViewResolver> viewResolvers; @Override protected void initServletContext (ServletContext servletContext) { Collection<ViewResolver> matchingBeans = BeanFactoryUtils.beansOfTypeIncludingAncestors(obtainApplicationContext(), ViewResolver.class).values(); if (this .viewResolvers == null ) { this .viewResolvers = new ArrayList <>(matchingBeans.size()); for (ViewResolver viewResolver : matchingBeans) { if (this != viewResolver) { this .viewResolvers.add(viewResolver); } } } else { for (int i = 0 ; i < this .viewResolvers.size(); i++) { ViewResolver vr = this .viewResolvers.get(i); if (matchingBeans.contains(vr)) { continue ; } String name = vr.getClass().getName() + i; obtainApplicationContext().getAutowireCapableBeanFactory().initializeBean(vr, name); } } AnnotationAwareOrderComparator.sort(this .viewResolvers); this .cnmFactoryBean.setServletContext(servletContext); } }
编写自定义视图解析器
实现ViewResolver接口
1 2 3 4 5 6 7 8 9 10 11 @Bean public ViewResolver myView () { ViewResolver r=new myViewResolver (); return r; } private class myViewResolver implements ViewResolver { @Override public View resolveViewName (String viewName, Locale locale) throws Exception { return null ; } }
断点470行 DispatcherServlet的doDispatch方法 debug运行项目,自定义视图添加到容器
Support for serving static resources, including support for WebJars (covered later in this document )).
Automatic registration of Converter, GenericConverter, and Formatter beans.
Converter 转换器,将public String test(){ return “hello”;}–> hello.html
Formatter 格式化器,将2017-10-9 –> Date
1 2 3 4 5 6 7 8 9 10 11 12 13 14 15 16 @Bean @Override public FormattingConversionService mvcConversionService () { WebConversionService conversionService = new WebConversionService (this .mvcProperties.getDateFormat()); addFormatters(conversionService); return conversionService; } @ConfigurationProperties(prefix = "spring.mvc") public class WebMvcProperties { private String dateFormat; }
Support for HttpMessageConverters (covered later in this document ).
SpringMVC用来转换Http请求和响应的: User对象转为Json发送到前台
1 2 3 public class HttpMessageConverters implements Iterable <HttpMessageConverter<?>>{ private final List<HttpMessageConverter<?>> converters; }
HttpMessageConverters从容器中确定,获取所有的HttpMessageConverter
给容器中加HttpMessageConverter,只需要将组件注册到容器中
Automatic registration of MessageCodesResolver (covered later in this document ).
定义错误代码格式
1 2 3 4 5 6 7 8 9 10 11 12 13 14 15 16 17 18 19 20 21 22 23 24 25 26 27 28 29 30 31 32 33 34 35 36 @Override public MessageCodesResolver getMessageCodesResolver () { if (this .mvcProperties.getMessageCodesResolverFormat() != null ) { DefaultMessageCodesResolver resolver = new DefaultMessageCodesResolver (); resolver.setMessageCodeFormatter(this .mvcProperties.getMessageCodesResolverFormat()); return resolver; } return null ; } public enum Format implements MessageCodeFormatter { PREFIX_ERROR_CODE { @Override public String format (String errorCode, @Nullable String objectName, @Nullable String field) { return toDelimitedString(errorCode, objectName, field); } }, POSTFIX_ERROR_CODE { @Override public String format (String errorCode, @Nullable String objectName, @Nullable String field) { return toDelimitedString(objectName, field, errorCode); } }; }
Static index.html support.
Custom Favicon support (covered later in this document ).
Automatic use of a ConfigurableWebBindingInitializer bean (covered later in this document ).
从容器中取Bean this.beanFactory.getBean()
1 2 3 4 5 6 7 8 9 10 11 @Override protected ConfigurableWebBindingInitializer getConfigurableWebBindingInitializer ( FormattingConversionService mvcConversionService, Validator mvcValidator) { try { return this .beanFactory.getBean(ConfigurableWebBindingInitializer.class); } catch (NoSuchBeanDefinitionException ex) { return super .getConfigurableWebBindingInitializer(mvcConversionService, mvcValidator); } }
1 2 3 4 5 6 7 ```java /** * Return the {@link ConfigurableWebBindingInitializer} to use for * initializing all {@link WebDataBinder} instances. */ protected ConfigurableWebBindingInitializer getConfigurableWebBindingInitializer(}
If you want to keep Spring Boot MVC features and you want to add additional MVC configuration (interceptors, formatters, view controllers, and other features), you can add your own @Configuration class of type WebMvcConfigurer but without @EnableWebMvc. If you wish to provide custom instances of RequestMappingHandlerMapping, RequestMappingHandlerAdapter, or ExceptionHandlerExceptionResolver, you can declare a WebMvcRegistrationsAdapter instance to provide such components.
If you want to take complete control of Spring MVC, you can add your own @Configuration annotated with @EnableWebMvc.
编写一个配置类 标注为@Configuration,实现WebMvcConfigurer
1 2 3 4 5 6 7 @Configuration public class WebMvc implements WebMvcConfigurer { @Override public void addViewControllers (ViewControllerRegistry registry) { registry.addViewController("/Hello" ).setViewName("hello" ); } }
11.2. 原理 WebMvcAutoConfiguration在做其他自动配置时导入
11.2.1. @Import(EnableWebMvcConfiguration.class) 1 2 3 4 5 6 7 8 9 10 11 12 13 14 15 16 17 18 19 20 21 22 23 24 25 26 27 28 29 30 31 32 33 34 35 36 37 38 @Import(EnableWebMvcConfiguration.class) public static class WebMvcAutoConfigurationAdapter implements WebMvcConfigurer {} @Configuration(proxyBeanMethods = false) public static class EnableWebMvcConfiguration extends DelegatingWebMvcConfiguration implements ResourceLoaderAware { @Autowired(required = false) public void setConfigurers (List<WebMvcConfigurer> configurers) { if (!CollectionUtils.isEmpty(configurers)) { this .configurers.addWebMvcConfigurers(configurers); } } @Override protected void addViewControllers (ViewControllerRegistry registry) { this .configurers.addViewControllers(registry); } } @Override public void addViewControllers (ViewControllerRegistry registry) { for (WebMvcConfigurer delegate : this .delegates) { delegate.addViewControllers(registry); } } public ViewControllerRegistration addViewController (String urlPath) { ViewControllerRegistration registration = new ViewControllerRegistration (urlPath); registration.setApplicationContext(this .applicationContext); this .registrations.add(registration); return registration; }
故容器中所有的WebMvcConfigurer相关配置都会被调用
自定义配置类也会被调用
11.3. 修改SpringBoot默认配置 SpringBoot在自动配置组件的时候,先看容器中有没有用户自己配置的bean,没有才进行配置,还可以将用户配置的和自动配置的组合起来
xxConfigurer 扩展配置
xxCustomizer 自定义配置
11.4. 全面接管SpringMVC @EnableWebMvc 使自动配置失效
WebMvcAutoConfiguration只有当容器中没有WebMvcConfigurationSupport时才生效
1 2 3 4 5 6 7 8 9 10 11 12 @Retention(RetentionPolicy.RUNTIME) @Target(ElementType.TYPE) @Documented @Import(DelegatingWebMvcConfiguration.class) public @interface EnableWebMvc {} @Configuration(proxyBeanMethods = false) public class DelegatingWebMvcConfiguration extends WebMvcConfigurationSupport {}@ConditionalOnMissingBean(WebMvcConfigurationSupport.class) public class WebMvcAutoConfiguration {}
12. web开发 12.1. index.html 12.1.1. 到templates下找 .html 12.1.1.1. @RequestMapping({“/“,”index.html”}) 1 2 3 4 @RequestMapping({"/","index.html"}) public String index () { return "index" ; }
12.1.1.2. 使用自定义配置类 1 2 3 4 5 6 7 8 9 10 11 12 13 14 15 16 17 18 @Configuration public class WebMvc implements WebMvcConfigurer { @Override public void addViewControllers (ViewControllerRegistry registry) { registry.addViewController("/index.html" ).setViewName("index" ); } @Bean public WebMvcConfigurer webMvcConfigurer () { WebMvcConfigurer configurer = new WebMvcConfigurer () { @Override public void addViewControllers (ViewControllerRegistry registry) { registry.addViewController("/index" ).setViewName("index" ); } }; return configurer; } }
12.2. 加载css-th:href, jquery-th:src pom.xml 添加依赖
1 2 3 4 5 6 7 8 9 10 <dependency > <groupId > org.webjars.bower</groupId > <artifactId > jquery</artifactId > <version > 3.4.1</version > </dependency > <dependency > <groupId > org.webjars</groupId > <artifactId > bootstrap</artifactId > <version > 4.4.1-1</version > </dependency >
th:src=”@{/webjars/jquery/3.3.1/jquery.js}
th:href=”@{/webjars/bootstrap/4.0.0/css/bootstrap.css}
而且是自适应的 项目server.servlet.context-path=/web 目录改为web,js,css仍然能访问到
1 2 <link th:href ="@{/webjars/bootstrap/4.4.1-1/css/bootstrap.css}" rel ="stylesheet" > <script th:src ="@{/webjars/jquery/3.4.1/src/jquery.js}" type ="text/javascript" > </script >
如传入一个json数据,用ajax异步读取
1 2 3 4 5 6 7 8 9 10 @RequestMapping("/user") @ResponseBody public User list () { User u = new User (); u.setId(0 ); u.setUname("a" ); u.setPwd("123" ); return u; }
前端
$.post(“请求映射”,”请求参数”,”返回数据”,”响应方式”);
1 2 3 4 5 6 7 8 9 10 11 12 13 14 15 16 17 18 19 20 21 22 23 24 <!DOCTYPE html > <html lang ="en" xmlns:th ="http://www.thymeleaf.org" > <head > <meta charset ="UTF-8" > <title > Title</title > <script type ="text/javascript" th:src ="@{/webjars/jquery/3.3.1/jquery.js}" > </script > <link th:href ="@{/webjars/bootstrap/4.0.0/css/bootstrap.css}" rel ="stylesheet" > <script type ="text/javascript" > $(function ( $.post ("./user" ,"" ,function (data ){ alert (data); },"html" ); }); </script > </head > <body > <div class ="container" > <div class ="jumbotron" > <h1 > 我的第一个 Bootstrap 页面</h1 > <p > 重置窗口大小,查看响应式效果!</p > </div > </div > </body > </html >
效果
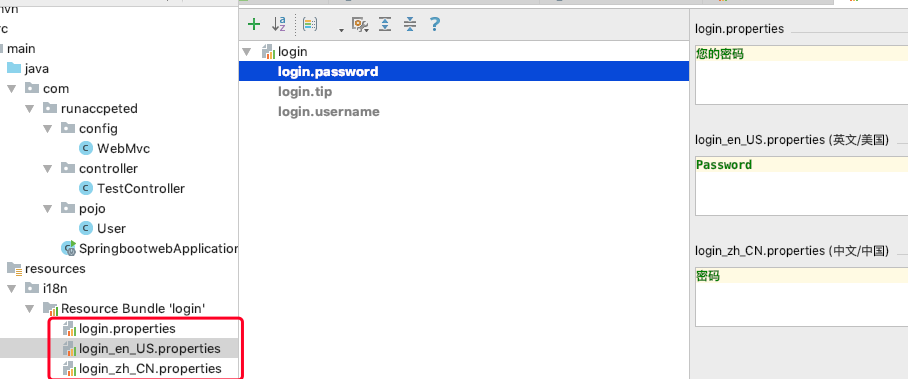
12.3. 国际化 新建i18n文件,新建login.properties,login_en_US.properties,login_zh_CN.properties
按Resource Bundle调出面板
Spring中配置国际化:使用ResourceBundleMessageSource管理,fmt:message取出内容
SpringBoot:
12.3.1. MessageSourceAutoConfiguration MessageSourceAutoConfiguration内部配置了ResourceBundleMessageSource的bean
12.3.1.1. ResourceBundleMessageSource 1 2 3 4 5 6 7 8 9 10 11 12 13 14 15 16 17 18 19 20 21 22 23 24 25 26 27 28 29 30 31 32 33 34 35 36 public class MessageSourceProperties { private String basename = "messages" ; } public class MessageSourceAutoConfiguration { @Bean @ConfigurationProperties(prefix = "spring.messages") public MessageSourceProperties messageSourceProperties () { return new MessageSourceProperties (); } @Bean public MessageSource messageSource (MessageSourceProperties properties) { ResourceBundleMessageSource messageSource = new ResourceBundleMessageSource (); if (StringUtils.hasText(properties.getBasename())) { messageSource.setBasenames(StringUtils .commaDelimitedListToStringArray(StringUtils.trimAllWhitespace(properties.getBasename()))); } if (properties.getEncoding() != null ) { messageSource.setDefaultEncoding(properties.getEncoding().name()); } messageSource.setFallbackToSystemLocale(properties.isFallbackToSystemLocale()); Duration cacheDuration = properties.getCacheDuration(); if (cacheDuration != null ) { messageSource.setCacheMillis(cacheDuration.toMillis()); } messageSource.setAlwaysUseMessageFormat(properties.isAlwaysUseMessageFormat()); messageSource.setUseCodeAsDefaultMessage(properties.isUseCodeAsDefaultMessage()); return messageSource; } }
设置语言位置
1 spring.messages.basename =i18n.login
测试页面
#{}就表示取message的值
1 2 3 4 5 6 7 <html lang ="en" xmls:th ="http://www.themeleaf.org" > <form action ="/login" method ="post" enctype ="application/x-www-form-urlencoded" > <span th:text ="#{login.username}" > </span > <input type ="text" name ="uname" id ="uname" > <span th:text ="#{login.password}" > </span > <input type ="password" name ="pwd" > <input type ="submit" th:value ="#{login.tip}" > </form > </html >
chrome中测试
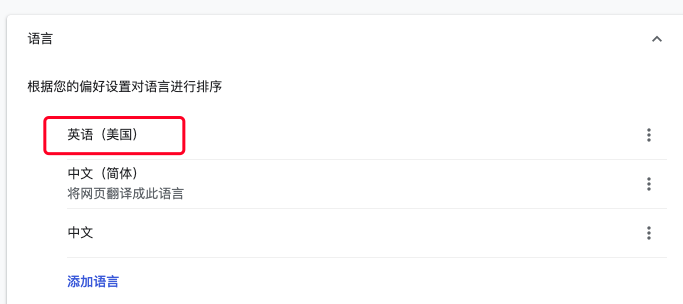
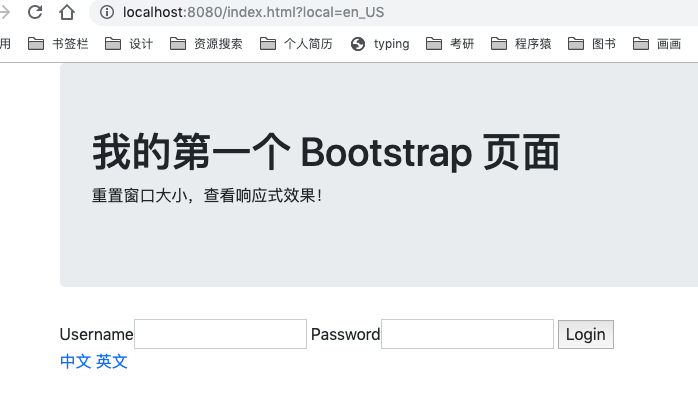
设置– >高级 –> 语言 –> 英语(美国) –> 移到顶部
测试
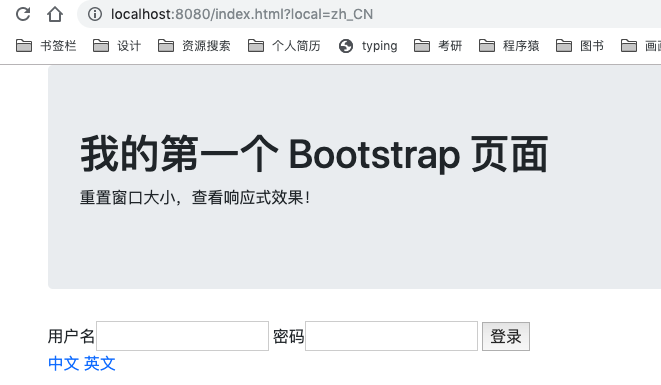
设置– >高级 –> 语言 –> 中文(简体) –> 移到顶部
乱码问题
12.3.2. 原理 国际化Locale区域信息对象;LocaleResolver获取区域信息对象
在WebMvcAutoConfiguration中定义区域视图解析器 LocaleResolver
区域信息来自于默认或请求头
@ConditionalOnMissingBean 当容器中没有区域视图解析器,才自动配置
1 2 3 4 5 6 7 8 9 10 11 12 13 14 @Bean @ConditionalOnMissingBean @ConditionalOnProperty(prefix = "spring.mvc", name = "locale") public LocaleResolver localeResolver () { if (this .mvcProperties.getLocaleResolver() == WebMvcProperties.LocaleResolver.FIXED) { return new FixedLocaleResolver (this .mvcProperties.getLocale()); } AcceptHeaderLocaleResolver localeResolver = new AcceptHeaderLocaleResolver (); localeResolver.setDefaultLocale(this .mvcProperties.getLocale()); return localeResolver; }
12.3.2.1. 自定义LocaleSesolver 1 2 3 4 5 6 7 8 9 10 11 12 13 14 15 16 17 18 19 20 21 22 23 24 25 26 27 28 package com.runaccpeted.viewresolver;import org.springframework.web.servlet.LocaleResolver;import javax.servlet.http.HttpServletRequest;import javax.servlet.http.HttpServletResponse;import java.util.Locale;public class myLocaleResolver implements LocaleResolver { @Override public Locale resolveLocale (HttpServletRequest request) { String local = request.getParameter("local" ); Locale locale = Locale.getDefault(); if (local!=null &&local!="" ){ String[] split=local.split("_" ); locale= new Locale (split[0 ],split[1 ]); } return locale; } @Override public void setLocale (HttpServletRequest request, HttpServletResponse response, Locale locale) { } }
注册到容器中
1 2 3 4 5 6 7 8 9 10 11 12 @Configuration public class WebMvc implements WebMvcConfigurer { @Override public void addViewControllers (ViewControllerRegistry registry) { registry.addViewController("/" ).setViewName("index" ); registry.addViewController("/index.html" ).setViewName("index" ); } @Bean public LocaleResolver localeResolver () { return new myLocaleResolver (); } }
Thymeleaf设定链接
(local=’zh_CN’)表示请求参数 ==> ?local=zh_CN
1 2 <a th:href ="@{/index.html(local='zh_CN')}" > 中文</a > <a th:href ="@{/index.html(local='en_US')}" > 英文</a >
实现
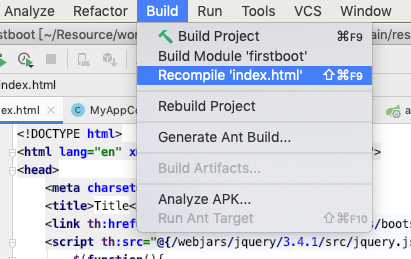
12.4. 修改后立即编译html 禁用缓存
1 2 spring.thymeleaf.cache =false
重新编译html
12.5. 登录实例 1 2 3 4 5 6 7 8 9 10 @PostMapping("login") public String login (@RequestParam(value = "uname") String uname,String pwd,HashMap<String,String> map) { if (uname.equals("a" )&&pwd.equals("123" )) { map.put("success" ,"欢迎" ); return "hello" ; } map.put("error" ,"用户名或密码错误" ); return "index" ; }
@PostMapping
1 2 @RequestMapping(method = RequestMethod.POST) public @interface PostMapping {}
12.5.1. 错误提示 th:if 优先级高于th:text
error不为空 div才会显示
1 <div th:text ="${error}" th:if ="${not #strings.isEmpty(error)}" > </div >
登录成功应该采用重定向,防止重复提交
1 2 3 4 5 6 7 8 @PostMapping("login") public String login (@RequestParam("uname") String uname,String pwd,HashMap<String,String> map) { if (uname.equals("a" )&&pwd.equals("123" )) { return "redirect:/main.html" ; } map.put("error" ,"用户名或密码错误" ); return "index" ; }
main.html映射到dashboard.html 这样dashboard.html内样式不会改变
1 registry.addViewController("/main.html" ).setViewName("dashboard" );
但这样登录就没有意义了,其他浏览器可以直接访问main.html
12.5.2. 拦截器 请求处理
1 2 3 4 5 6 7 8 9 10 11 12 @PostMapping("login") public String login (@RequestParam("uname") String uname, String pwd, HashMap<String,String> map, HttpSession session) { if (uname.equals("a" )&&pwd.equals("123" )) { User u = new User (); u.setUname(uname); u.setPwd(pwd); session.setAttribute("user" ,u); return "redirect:/main.html" ; } map.put("error" ,"用户名或密码错误" ); return "index" ; }
12.5.2.1. 自定义拦截器–实现HandlerInterceptor 1 2 3 4 5 6 7 8 9 10 11 12 13 14 15 16 17 18 19 20 21 22 23 24 25 26 27 28 29 30 31 32 33 34 35 36 37 package com.runaccpeted.interceptor;import org.springframework.web.servlet.HandlerInterceptor;import org.springframework.web.servlet.ModelAndView;import javax.servlet.http.HttpServletRequest;import javax.servlet.http.HttpServletResponse;import javax.servlet.http.HttpSession;public class LoginInterceptor implements HandlerInterceptor { @Override public boolean preHandle (HttpServletRequest request, HttpServletResponse response, Object handler) throws Exception { Object user = request.getSession().getAttribute("user" ); if (user!=null ){ return true ; } else { request.setAttribute("error" ,"没有权限" ); request.getRequestDispatcher("/index.html" ).forward(request,response); return false ; } } @Override public void postHandle (HttpServletRequest request, HttpServletResponse response, Object handler, ModelAndView modelAndView) throws Exception { } @Override public void afterCompletion (HttpServletRequest request, HttpServletResponse response, Object handler, Exception ex) throws Exception { } }
注册拦截器
/** 拦截所有映射
excludePathPatterns 剔除映射 /webjars/** 静态资源也会被拦截
1 2 3 4 5 @Override public void addInterceptors (InterceptorRegistry registry) { registry.addInterceptor(new LoginInterceptor ()).addPathPatterns("/**" ) .excludePathPatterns("/" ,"/index.html" ,"/login" ,"/webjars/**" ); }
12.6. Thymeleaf公共页面抽取th:fragment 1 2 3 4 5 <div th:fragment ="copy" > © 2011 The Good Thymes Virtual Grocery</div > <div th:insert ="~{footer :: copy}" > </div >
~{templatename::selector} 模板名:选择器
~{templatename::fragmentname} 模板名:片段名
例如
dashboard.html
1 2 3 4 5 6 <div class ="container" th:fragment ="uname" > <div class ="jumbotron" > <h1 th:text ="${session.user.uname}" > </h1 > </div > </div >
detail.html
1 <div th:insert ="~{dashboard::uname}" > </div >
12.6.1. th:insert,th:replace,th:include th:insert 将公共片段整个插入到声明引入的元素中
th:replace 将声明引入的元素替换为公共片段
th:include 将被引入的片段内容插入到元素中
1 2 3 4 5 6 7 8 9 10 11 12 13 14 15 16 17 <div th:insert ="footer :: copy" > </div > <div th:replace ="footer :: copy" > </div > <div th:include ="footer :: copy" > </div > <div > <footer > © 2011 The Good Thymes Virtual Grocery </footer > </div > <footer > © 2011 The Good Thymes Virtual Grocery </footer > <div > © 2011 The Good Thymes Virtual Grocery </div >
12.6.2. th:fragment传参 ~{模板名:片段名(参数)}
dashboard.html
1 2 3 4 5 6 <div class ="container" th:fragment ="uname" > <div class ="jumbotron" > <h1 th:text ="${session.user.uname}" > </h1 > <h1 th:text ="${value}=='12'?'active':''" > </h1 > </div > </div >
detail.html
1 <div th:insert ="~{dashboard::uname(value='12')}" > </div >
12.7. #dates 1 2 3 4 5 ${#dates.format(date, 'dd/MMM/yyyy HH:mm')} ${#dates.createNow()}
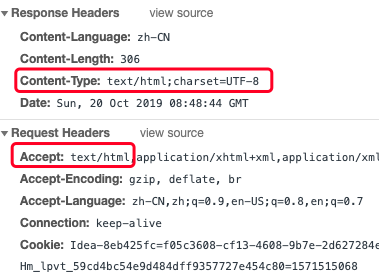
13. 错误机制 13.1. 错误页面 13.1.1. 浏览器
请求头accpet的是text/html
响应的content-type是text/html
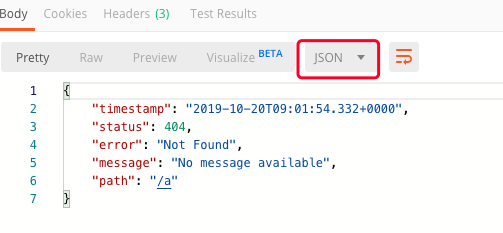
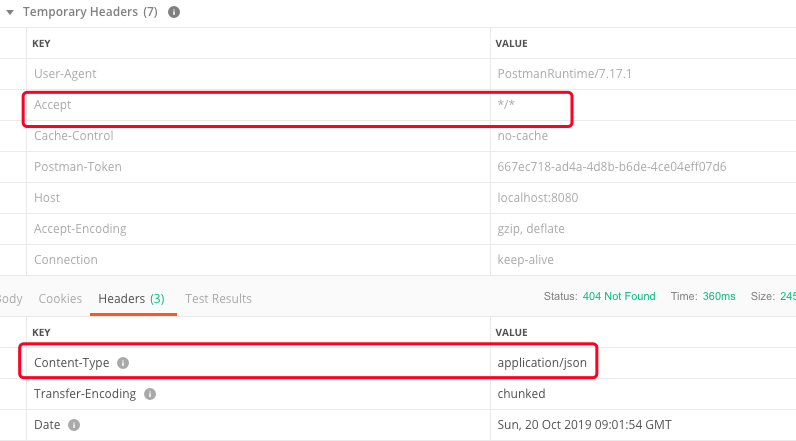
13.1.2. Postman 以json数据形式返回
请求头accpet的是 */*
响应的content-type是application/json
13.2. 原理ErrorMvcAutoConfiguration ErrorMvcAutoConfiguration 错误处理自动配置
一旦系统出现4xx或5xx错误,ErrorPageCustomizer就会生效,定制错误的响应规则,默认转到/error,BasicErrorController处理/error请求,
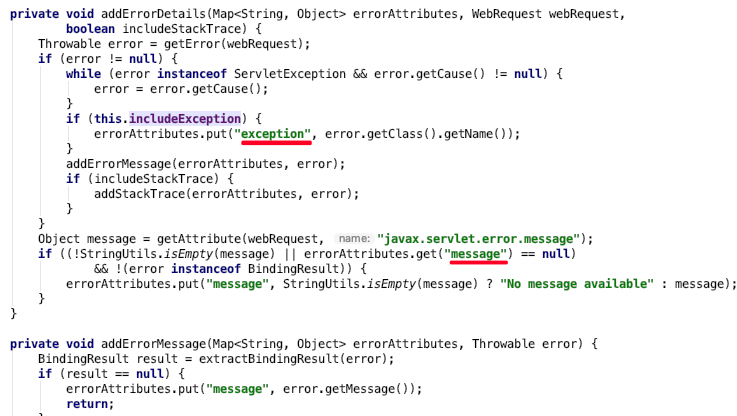
13.2.1. DefaultErrorAttributes 在页面共享信息
1 2 3 4 5 6 7 8 9 10 11 12 13 14 15 16 @Bean @ConditionalOnMissingBean(value = ErrorAttributes.class, search = SearchStrategy.CURRENT) public DefaultErrorAttributes errorAttributes () { return new DefaultErrorAttributes (this .serverProperties.getError().isIncludeException()); } @Override public Map<String, Object> getErrorAttributes (WebRequest webRequest, boolean includeStackTrace) { Map<String, Object> errorAttributes = new LinkedHashMap <>(); errorAttributes.put("timestamp" , new Date ()); addStatus(errorAttributes, webRequest); addErrorDetails(errorAttributes, webRequest, includeStackTrace); addPath(errorAttributes, webRequest); return errorAttributes; }
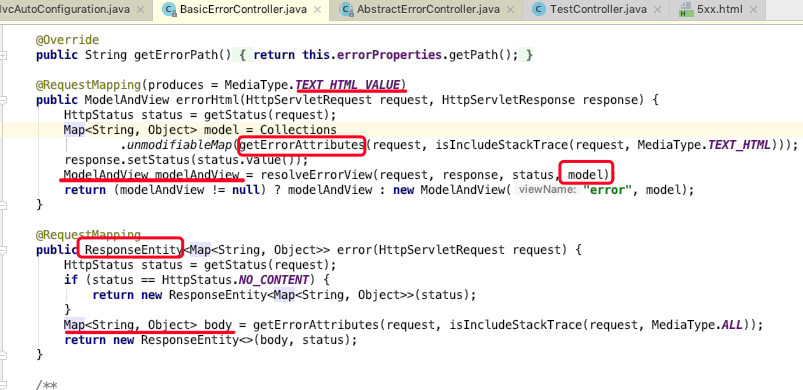
13.2.2. BasicErrorController 1 2 3 4 5 6 7 8 9 10 11 12 13 14 15 16 17 18 19 20 21 22 23 24 25 26 27 28 29 30 31 32 33 34 35 36 37 38 39 @Bean @ConditionalOnMissingBean(value = ErrorController.class, search = SearchStrategy.CURRENT) public BasicErrorController basicErrorController (ErrorAttributes errorAttributes, ObjectProvider<ErrorViewResolver> errorViewResolvers) { return new BasicErrorController (errorAttributes, this .serverProperties.getError(), errorViewResolvers.orderedStream().collect(Collectors.toList())); } @Controller @RequestMapping("${server.error.path:${error.path:/error}}") public class BasicErrorController extends AbstractErrorController { @RequestMapping(produces = MediaType.TEXT_HTML_VALUE) public ModelAndView errorHtml (HttpServletRequest request, HttpServletResponse response) { HttpStatus status = getStatus(request); Map<String, Object> model = Collections .unmodifiableMap(getErrorAttributes(request, isIncludeStackTrace(request, MediaType.TEXT_HTML))); response.setStatus(status.value()); ModelAndView modelAndView = resolveErrorView(request, response, status, model); return (modelAndView != null ) ? modelAndView : new ModelAndView ("error" , model); } @RequestMapping public ResponseEntity<Map<String, Object>> error (HttpServletRequest request) { HttpStatus status = getStatus(request); if (status == HttpStatus.NO_CONTENT) { return new ResponseEntity <Map<String, Object>>(status); } Map<String, Object> body = getErrorAttributes(request, isIncludeStackTrace(request, MediaType.ALL)); return new ResponseEntity <>(body, status); } }
13.2.3. ErrorPageCustomizer 1 2 3 4 5 6 7 8 9 10 11 12 13 14 15 16 private static class ErrorPageCustomizer implements ErrorPageRegistrar , Ordered { protected ErrorPageCustomizer (ServerProperties properties, DispatcherServletPath dispatcherServletPath) { this .properties = properties; this .dispatcherServletPath = dispatcherServletPath; } } @NestedConfigurationProperty private final ErrorProperties error = new ErrorProperties ();@Value("${error.path:/error}") private String path = "/error" ;
13.2.4. DefaultErrorViewResolver 1 2 3 4 5 6 7 8 9 10 11 12 13 14 15 16 17 18 19 20 21 22 23 24 25 26 27 28 29 30 31 32 33 34 35 36 37 38 39 40 41 42 43 44 45 46 47 48 49 50 51 52 53 54 55 @Bean @ConditionalOnBean(DispatcherServlet.class) @ConditionalOnMissingBean(ErrorViewResolver.class) DefaultErrorViewResolver conventionErrorViewResolver () { return new DefaultErrorViewResolver (this .applicationContext, this .resourceProperties); } public class DefaultErrorViewResolver implements ErrorViewResolver , Ordered { static { Map<Series, String> views = new EnumMap <>(Series.class); views.put(Series.CLIENT_ERROR, "4xx" ); views.put(Series.SERVER_ERROR, "5xx" ); SERIES_VIEWS = Collections.unmodifiableMap(views); } @Override public ModelAndView resolveErrorView (HttpServletRequest request, HttpStatus status, Map<String, Object> model) { ModelAndView modelAndView = resolve(String.valueOf(status.value()), model); if (modelAndView == null && SERIES_VIEWS.containsKey(status.series())) { modelAndView = resolve(SERIES_VIEWS.get(status.series()), model); } return modelAndView; } private ModelAndView resolve (String viewName, Map<String, Object> model) { String errorViewName = "error/" + viewName; TemplateAvailabilityProvider provider = this .templateAvailabilityProviders.getProvider(errorViewName, this .applicationContext); if (provider != null ) { return new ModelAndView (errorViewName, model); } return resolveResource(errorViewName, model); } private ModelAndView resolveResource (String viewName, Map<String, Object> model) { for (String location : this .resourceProperties.getStaticLocations()) { try { Resource resource = this .applicationContext.getResource(location); resource = resource.createRelative(viewName + ".html" ); if (resource.exists()) { return new ModelAndView (new HtmlResourceView (resource), model); } } catch (Exception ex) { } } return null ; } }
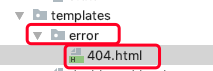
13.3. 自定义错误页面 13.3.1. 有模板引擎:/error/错误码.html 将错误页面放在模板引擎文件夹下的error文件夹下
可以用4xx,5xx命名.html,用于匹配这种类型的所有错误,优先匹配最精确的404.html
eg.404
404.html
页面
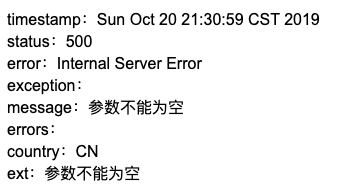
页面能获取的信息 来自DefaultErrorAttributes
timestamp:时间戳
status:错误状态
error:错误提示
exception:异常信息
message:异常消息
errors:JSR303数据校验的错误
1 2 3 4 5 6 <h1 th:text ="${timestamp}" > </h1 > <h1 th:text ="${status}" > </h1 > <h1 th:text ="${error}" > </h1 > <h1 th:text ="${exception}" > </h1 > <h1 th:text ="${message}" > </h1 > <h1 th:text ="${errors}" > </h1 >
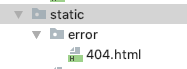
13.3.2. 没有模板引擎 static/error/错误码.html resources文件下static/error/错误码.html
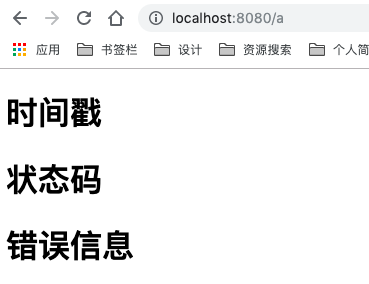
1 2 3 <h1 th:text ="${timestamp}" > 时间戳</h1 > <h1 th:text ="${status}" > 状态码</h1 > <h1 th:text ="${error}" > 错误信息</h1 >
13.3.3. SpringBoot默认错误页面 response.getWriter().append(builder.toString()); 拼接一个响应页面
1 2 3 4 5 6 7 8 9 10 11 12 13 14 15 16 17 18 19 20 21 22 23 24 25 26 27 28 29 30 31 32 33 34 35 36 37 38 private static class StaticView implements View { private static final MediaType TEXT_HTML_UTF8 = new MediaType ("text" , "html" , StandardCharsets.UTF_8); private static final Log logger = LogFactory.getLog(StaticView.class); @Override public void render (Map<String, ?> model, HttpServletRequest request, HttpServletResponse response) throws Exception { if (response.isCommitted()) { String message = getMessage(model); logger.error(message); return ; } response.setContentType(TEXT_HTML_UTF8.toString()); StringBuilder builder = new StringBuilder (); Date timestamp = (Date) model.get("timestamp" ); Object message = model.get("message" ); Object trace = model.get("trace" ); if (response.getContentType() == null ) { response.setContentType(getContentType()); } builder.append("<html><body><h1>Whitelabel Error Page</h1>" ).append( "<p>This application has no explicit mapping for /error, so you are seeing this as a fallback.</p>" ) .append("<div id='created'>" ).append(timestamp).append("</div>" ) .append("<div>There was an unexpected error (type=" ).append(htmlEscape(model.get("error" ))) .append(", status=" ).append(htmlEscape(model.get("status" ))).append(").</div>" ); if (message != null ) { builder.append("<div>" ).append(htmlEscape(message)).append("</div>" ); } if (trace != null ) { builder.append("<div style='white-space:pre-wrap;'>" ).append(htmlEscape(trace)).append("</div>" ); } builder.append("</body></html>" ); response.getWriter().append(builder.toString()); }
13.4. 定制错误json数据 13.4.1. 浏览器和postman返回的是一样的数据 自定义异常类myException 继承RuntimeException
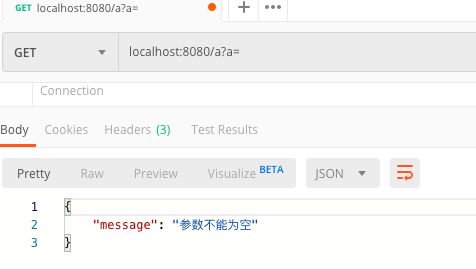
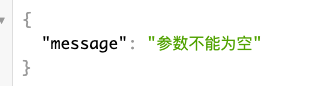
1 2 3 4 5 6 7 8 package com.runaccpeted.exception;public class myException extends RuntimeException { public myException () { super ("参数不能为空" ); } }
添加异常管理handler类
注解为@ExceptionHandler 处理myException异常数据
1 2 3 4 5 6 7 8 9 10 11 12 13 14 15 16 17 18 19 20 21 package com.runaccpeted.handler;import com.runaccpeted.exception.myException;import org.springframework.web.bind.annotation.ControllerAdvice;import org.springframework.web.bind.annotation.ExceptionHandler;import org.springframework.web.bind.annotation.ResponseBody;import java.util.HashMap;import java.util.Map;@ControllerAdvice public class myExceptionHandler { @ExceptionHandler(myException.class) @ResponseBody public Map<String, Object> handleException (Exception e) { Map<String,Object> map=new HashMap <>(); map.put("message" ,e.getMessage()); return map; } }
编写异常
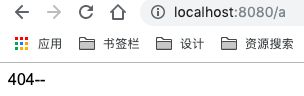
1 2 3 4 5 6 7 @RequestMapping("/a") public String exception (String a) { if (a.length()==0 ){ throw new myException (); } return "index" ; }
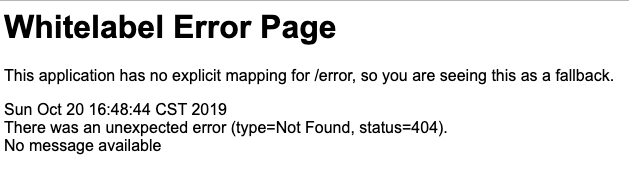
测试Postman
测试浏览器
13.4.2. 自适应浏览器和postman BasicErrorController中getStatus来自request的
request.getAttribute(“javax.servlet.error.status_code”);
1 2 3 4 5 6 7 8 9 10 11 12 protected HttpStatus getStatus (HttpServletRequest request) { Integer statusCode = (Integer) request.getAttribute("javax.servlet.error.status_code" ); if (statusCode == null ) { return HttpStatus.INTERNAL_SERVER_ERROR; } try { return HttpStatus.valueOf(statusCode); } catch (Exception ex) { return HttpStatus.INTERNAL_SERVER_ERROR; } }
实现自适应
请求转发到/error,使其调用ErrorMvcAutoConfiguration中的BasicErrorController处理/error
必须指定状态码,否则状态码为200
1 2 3 4 5 6 7 8 9 10 11 12 13 14 15 16 17 18 19 20 21 22 23 package com.runaccpeted.handler;import com.runaccpeted.exception.myException;import org.springframework.web.bind.annotation.ControllerAdvice;import org.springframework.web.bind.annotation.ExceptionHandler;import org.springframework.web.bind.annotation.ResponseBody;import javax.servlet.http.HttpServletRequest;import java.util.HashMap;import java.util.Map;@ControllerAdvice public class myExceptionHandler { @ExceptionHandler(myException.class) public String handleException (Exception e, HttpServletRequest request) { Map<String,Object> map=new HashMap <>(); request.setAttribute("javax.servlet.error.status_code" ,500 ); map.put("message" ,e.getMessage()); return "forward:/error" ; } }
但map.put(“message”,e.getMessage()); 没用
/error是被BasicErrorController接管的,该控制器返回一个ModelAndView,其中携带状态码,请求和响应,model,model来自于getErrorAttributes,getErrorAttributes来自于BasicErrorController的父类AbstractErrorController
1 2 3 4 protected Map<String, Object> getErrorAttributes (HttpServletRequest request, boolean includeStackTrace) { WebRequest webRequest = new ServletWebRequest (request); return this .errorAttributes.getErrorAttributes(webRequest, includeStackTrace); }
传入数据策略:
编写一个ErrorController实现类或AbstractErrorController子类放在容器中
数据通过errorAttributes.getErrorAttributes得到
ErrorMvcAutoConfiguration中定义容器中没有ErrorAttributes时自动配置DefaultErrorAttributes
1 2 3 4 5 @Bean @ConditionalOnMissingBean(value = ErrorAttributes.class, search = SearchStrategy.CURRENT) public DefaultErrorAttributes errorAttributes () { return new DefaultErrorAttributes (this .serverProperties.getError().isIncludeException()); }
在DefaultErrorAttributes中定义时间戳等信息
13.4.2.1. extends DefaultErrorAttributes 自定义ErrorAttributes继承DefaultErrorAttributes,注册到容器中,重写getErrorAttributes方法,添加信息
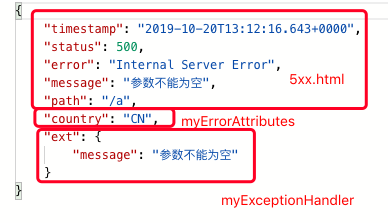
1 2 3 4 5 6 7 8 9 10 11 12 13 14 15 16 17 18 19 20 21 22 23 24 25 26 27 28 29 30 31 32 33 package com.runaccpeted.error; import org.springframework.boot.web.servlet.error.DefaultErrorAttributes; import org.springframework.stereotype.Component; import org.springframework.web.context.request.WebRequest; import java.util.Map; @Component public class myErrorAttributes extends DefaultErrorAttributes { @Override public Map<String, Object> getErrorAttributes (WebRequest webRequest, boolean includeStackTrace) { Map<String,Object> map=super .getErrorAttributes(webRequest, includeStackTrace); map.put("country" ,"CN" ); Map<String,Object> ext=(Map<String, Object>) webRequest.getAttribute("map" ,0 ); map.put("ext" ,ext); return map; } }
获得数据
浏览器
14. tomcat SpringBoot采用内置tomcat
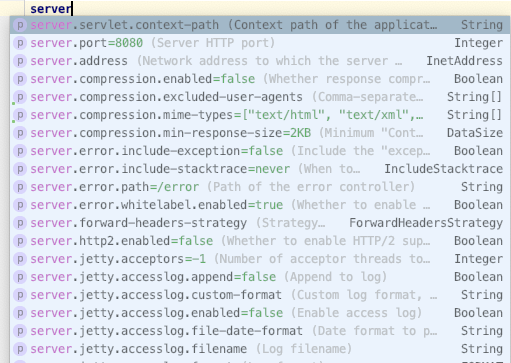
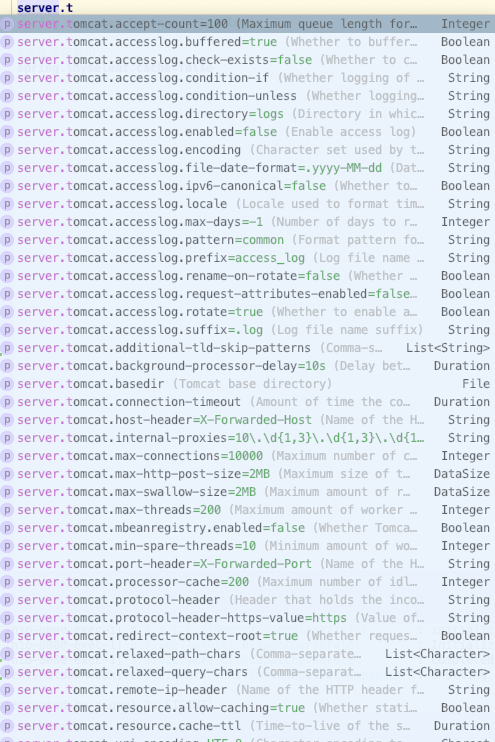
14.1. 修改tomcat相关配置 14.1.1. application.properties
也可以配置tomcat
配置来源于ServerProperties.java
1 2 3 4 5 6 7 8 9 10 11 12 @ConfigurationProperties(prefix = "server", ignoreUnknownFields = true) public class ServerProperties { private final Tomcat tomcat = new Tomcat (); private final Servlet servlet = new Servlet (); private Integer port; private InetAddress address; private final ErrorProperties error = new ErrorProperties (); public static class Tomcat { private Charset uriEncoding = StandardCharsets.UTF_8; } }
对应于ServletWebServerFactoryAutoConfiguration类
1 2 3 4 5 6 7 8 9 10 @EnableConfigurationProperties(ServerProperties.class) public class ServletWebServerFactoryAutoConfiguration { @Bean @ConditionalOnClass(name = "org.apache.catalina.startup.Tomcat") public TomcatServletWebServerFactoryCustomizer tomcatServletWebServerFactoryCustomizer ( ServerProperties serverProperties) { return new TomcatServletWebServerFactoryCustomizer (serverProperties); } }
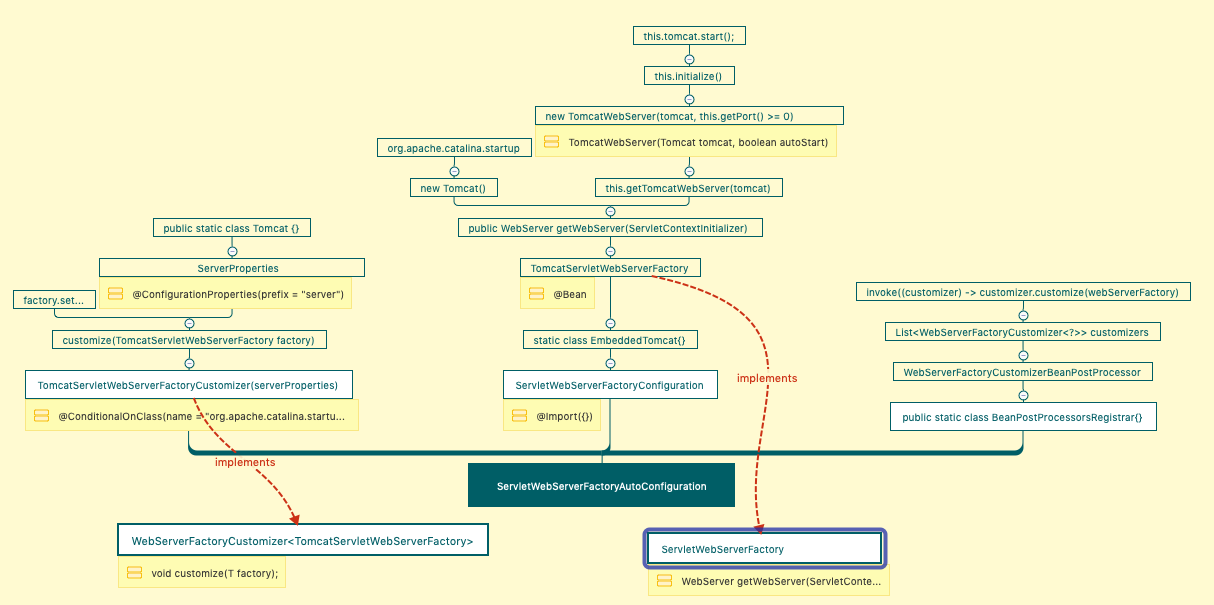
14.1.2. implements WebServerFactoryCustomizer< TomcatServletWebServerFactory> TomcatServletWebServerFactoryCustomizer是实现了WebServerFactoryCustomizer接口的,接口中只有一个方法customize(T factory),TomcatServletWebServerFactory 继承自AbstractServletWebServerFactory,AbstractServletWebServerFactory继承自AbstractConfigurableWebServerFactory,AbstractServletWebServerFactory中定义了tomcat默认接口中配置信息
1 2 3 4 5 6 7 8 9 10 11 12 13 14 15 16 17 18 19 20 21 22 23 24 25 26 27 28 public class TomcatServletWebServerFactoryCustomizer implements WebServerFactoryCustomizer <TomcatServletWebServerFactory>{ } @FunctionalInterface public interface WebServerFactoryCustomizer <T extends WebServerFactory > { void customize (T factory) ; } public class TomcatServletWebServerFactory extends AbstractServletWebServerFactory implements ConfigurableTomcatWebServerFactory , ResourceLoaderAware {} public abstract class AbstractServletWebServerFactory extends AbstractConfigurableWebServerFactory implements ConfigurableServletWebServerFactory { private String contextPath = "" ; } public abstract class AbstractConfigurableWebServerFactory implements ConfigurableWebServerFactory { private int port = 8080 ; @Override public void setPort (int port) { this .port = port; } }
像TomcatServletWebServerFactoryCustomizer一样实现
WebServerFactoryCustomizer< TomcatServletWebServerFactory>注册到环境中,修改端口号
1 2 3 4 5 6 7 8 9 10 11 12 13 14 15 16 17 18 19 20 21 package com.runaccpeted.tomcat;import org.springframework.boot.web.embedded.tomcat.TomcatServletWebServerFactory;import org.springframework.boot.web.server.WebServerFactoryCustomizer;public class myServletWebServerFactoryCustomizer implements WebServerFactoryCustomizer <TomcatServletWebServerFactory>{ @Override public void customize (TomcatServletWebServerFactory factory) { factory.setPort(8083 ); } } @Configuration public class WebMvc implements WebMvcConfigurer { @Bean public WebServerFactoryCustomizer<TomcatServletWebServerFactory> webServerFactoryWebServerFactoryCustomizer () { return new myServletWebServerFactoryCustomizer (); } }
运行
1 INFO 6396 --- [ main] o.s.b.w.embedded.tomcat.TomcatWebServer : Tomcat started on port(s): 8083 (http) with context path ''
14.2. 注册Serlvet, Listener, Filter
14.2.1. ServletRegistrationBean 定义一个Servlet
service方法响应一句话
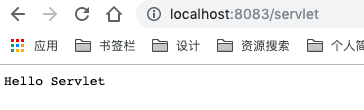
1 2 3 4 5 6 7 8 9 10 11 12 13 14 15 16 17 18 package com.runaccpeted.servlet;import org.springframework.boot.web.servlet.ServletComponentScan;import javax.servlet.ServletException;import javax.servlet.annotation.WebServlet;import javax.servlet.http.HttpServlet;import javax.servlet.http.HttpServletRequest;import javax.servlet.http.HttpServletResponse;import java.io.IOException;public class myServlet extends HttpServlet { @Override protected void service (HttpServletRequest req, HttpServletResponse resp) throws ServletException, IOException { resp.getWriter().write("Hello Servlet" ); } }
注册到容器中
1 2 3 4 5 6 7 8 9 10 @Configuration public class WebMvc implements WebMvcConfigurer { @Bean public ServletRegistrationBean servletRegistrationBean () { ServletRegistrationBean registrationBean = new ServletRegistrationBean (new myServlet (),"/servlet" ); return registrationBean; } }
访问localhost:8083/serlvet
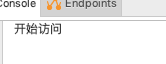
14.2.2. ServletListenerRegistrationBean 定义一个Listener
当开始请求时输出到控制台
1 2 3 4 5 6 7 8 9 10 11 12 13 package com.runaccpeted.listener;import javax.servlet.ServletRequestEvent;import javax.servlet.ServletRequestListener;import javax.servlet.http.HttpServletRequest;public class myServletListener implements ServletRequestListener { @Override public void requestInitialized (ServletRequestEvent sre) { System.out.println("开始访问" ); } }
注册监听器
1 2 3 4 5 6 7 8 9 @Configuration public class WebMvc implements WebMvcConfigurer { @Bean public ServletListenerRegistrationBean servletListenerRegistrationBean () { ServletListenerRegistrationBean listenerRegistrationBean = new ServletListenerRegistrationBean (new myServletListener ()); return listenerRegistrationBean; } }
访问任意localhost:8083/test
14.2.3. FilterRegistrationBean 定义一个拦截器
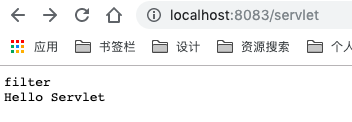
1 2 3 4 5 6 7 8 9 10 11 12 13 14 15 16 17 18 19 20 21 package com.runaccpeted.filter;import javax.servlet.*;import java.io.IOException;public class myFilter implements Filter { @Override public void init (FilterConfig filterConfig) throws ServletException { } @Override public void doFilter (ServletRequest request, ServletResponse response, FilterChain chain) throws IOException, ServletException { response.getWriter().write("filter\n" ); chain.doFilter(request,response); } @Override public void destroy () { } }
注册
拦截刚定义的myServlet对应的/servlet
1 2 3 4 5 6 7 8 9 @Configuration public class WebMvc implements WebMvcConfigurer { @Bean public FilterRegistrationBean filterRegistrationBean () { FilterRegistrationBean registrationBean = new FilterRegistrationBean (new myFilter (),servletRegistrationBean()); return registrationBean; } }
或者定义拦截哪些uri
1 2 3 4 5 6 7 8 @Bean public FilterRegistrationBean filterRegistrationBean () { FilterRegistrationBean registrationBean = new FilterRegistrationBean (); registrationBean.setFilter(new myFilter ()); registrationBean.setUrlPatterns(Arrays.asList("/servlet" ,"/test" )); return registrationBean; }
访问localhost:8083/servlet
14.2.4. 原理 DispatcherServletAutoConfiguration 注册了DispatcherServlet
1 2 3 4 5 6 7 8 9 10 @Bean(name = DEFAULT_DISPATCHER_SERVLET_BEAN_NAME) public DispatcherServlet dispatcherServlet (HttpProperties httpProperties, WebMvcProperties webMvcProperties) { DispatcherServlet dispatcherServlet = new DispatcherServlet (); dispatcherServlet.setDispatchOptionsRequest(webMvcProperties.isDispatchOptionsRequest()); dispatcherServlet.setDispatchTraceRequest(webMvcProperties.isDispatchTraceRequest()); dispatcherServlet.setThrowExceptionIfNoHandlerFound(webMvcProperties.isThrowExceptionIfNoHandlerFound()); dispatcherServlet.setPublishEvents(webMvcProperties.isPublishRequestHandledEvents()); dispatcherServlet.setEnableLoggingRequestDetails(httpProperties.isLogRequestDetails()); return dispatcherServlet; }
注册了dispatcherServletRegistration
1 2 3 4 5 6 7 8 9 10 11 12 13 14 15 16 17 18 19 20 21 22 23 24 25 26 27 28 29 30 31 32 33 34 35 @Configuration(proxyBeanMethods = false) @Conditional(DispatcherServletRegistrationCondition.class) @ConditionalOnClass(ServletRegistration.class) @EnableConfigurationProperties(WebMvcProperties.class) @Import(DispatcherServletConfiguration.class) protected static class DispatcherServletRegistrationConfiguration { @Bean(name = DEFAULT_DISPATCHER_SERVLET_REGISTRATION_BEAN_NAME) @ConditionalOnBean(value = DispatcherServlet.class, name = DEFAULT_DISPATCHER_SERVLET_BEAN_NAME) public DispatcherServletRegistrationBean dispatcherServletRegistration (DispatcherServlet dispatcherServlet, WebMvcProperties webMvcProperties, ObjectProvider<MultipartConfigElement> multipartConfig) { DispatcherServletRegistrationBean registration = new DispatcherServletRegistrationBean (dispatcherServlet, webMvcProperties.getServlet().getPath()); registration.setName(DEFAULT_DISPATCHER_SERVLET_BEAN_NAME); registration.setLoadOnStartup(webMvcProperties.getServlet().getLoadOnStartup()); multipartConfig.ifAvailable(registration::setMultipartConfig); return registration; } }
14.3. 容器工厂
14.4. jetty容器–长连接 1 2 3 4 5 6 7 8 9 10 11 12 13 14 15 16 17 18 <dependencies > <dependency > <groupId > org.springframework.boot</groupId > <artifactId > spring-boot-starter-web</artifactId > <exclusions > <exclusion > <groupId > org.springframework.boot</groupId > <artifactId > spring-boot-starter-tomcat</artifactId > </exclusion > </exclusions > </dependency > <dependency > <groupId > org.springframework.boot</groupId > <artifactId > spring-boot-starter-jetty</artifactId > </dependency > </dependencies >
默认为0.0.0:8080
1 2 3 INFO 7475 --- [ main] o.e.jetty.server.AbstractConnector : Started ServerConnector@15bcf458{HTTP/1.1,[http/1.1]}{0.0.0.0:8080} INFO 7475 --- [ main] o.s.b.web.embedded.jetty.JettyWebServer : Jetty started on port(s) 8080 (http/1.1) with context path '/' INFO 7475 --- [ main] c.runaccpeted.SpringbootwebApplication : Started SpringbootwebApplication in 6.32 seconds (JVM running for 8.188)
14.5. undertow容器–不支持JSP 1 2 3 4 <dependency > <groupId > org.springframework.boot</groupId > <artifactId > spring-boot-starter-undertow</artifactId > </dependency >
localhost:8080
1 2 3 4 INFO 7670 --- [ main] io.undertow : starting server: Undertow - 2.0.27.Final INFO 7670 --- [ main] org.xnio : XNIO version 3.3.8.Final INFO 7670 --- [ main] org.xnio.nio : XNIO NIO Implementation Version 3.3.8.Final INFO 7670 --- [ main] o.s.b.w.e.u.UndertowServletWebServer : Undertow started on port(s) 8080 (http) with context path ''
14.6. 嵌入式Servlet容器自动配置原理
14.7. ServletWebServerFactoryAutoConfiguration 1 2 3 4 5 6 7 8 9 10 11 12 13 14 15 16 17 18 19 @Configuration(proxyBeanMethods = false) @AutoConfigureOrder(Ordered.HIGHEST_PRECEDENCE) @ConditionalOnClass(ServletRequest.class) @ConditionalOnWebApplication(type = Type.SERVLET) @EnableConfigurationProperties(ServerProperties.class) @Import({ ServletWebServerFactoryAutoConfiguration.BeanPostProcessorsRegistrar.class, ServletWebServerFactoryConfiguration.EmbeddedTomcat.class, ServletWebServerFactoryConfiguration.EmbeddedJetty.class, ServletWebServerFactoryConfiguration.EmbeddedUndertow.class }) public class ServletWebServerFactoryAutoConfiguration { @Bean @ConditionalOnClass(name = "org.apache.catalina.startup.Tomcat") public TomcatServletWebServerFactoryCustomizer tomcatServletWebServerFactoryCustomizer ( ServerProperties serverProperties) { return new TomcatServletWebServerFactoryCustomizer (serverProperties); } }
14.7.1. WebServerFactoryCustomizer 1 2 3 4 @FunctionalInterface public interface WebServerFactoryCustomizer <T extends WebServerFactory > { void customize (T factory) ; }
14.7.1.1. TomcatServletWebServerFactoryCustomizer 14.7.1.1.1. ServerProperties 14.7.1.1.2. TomcatServletWebServerFactory 1 2 3 4 5 6 7 8 9 10 11 12 13 14 15 16 17 18 19 20 21 22 23 24 25 public class TomcatServletWebServerFactoryCustomizer implements WebServerFactoryCustomizer <TomcatServletWebServerFactory>, Ordered { private final ServerProperties serverProperties; public TomcatServletWebServerFactoryCustomizer (ServerProperties serverProperties) { this .serverProperties = serverProperties; } @Override public void customize (TomcatServletWebServerFactory factory) { ServerProperties.Tomcat tomcatProperties = this .serverProperties.getTomcat(); if (!ObjectUtils.isEmpty(tomcatProperties.getAdditionalTldSkipPatterns())) { factory.getTldSkipPatterns().addAll(tomcatProperties.getAdditionalTldSkipPatterns()); } if (tomcatProperties.getRedirectContextRoot() != null ) { customizeRedirectContextRoot(factory, tomcatProperties.getRedirectContextRoot()); } if (tomcatProperties.getUseRelativeRedirects() != null ) { customizeUseRelativeRedirects(factory, tomcatProperties.getUseRelativeRedirects()); } factory.setDisableMBeanRegistry(!tomcatProperties.getMbeanregistry().isEnabled()); } }
14.7.2. ServletWebServerFactoryConfiguration 14.7.2.1. EmbeddedTomcat 14.7.2.1.1. TomcatServletWebServerFactory 1 2 3 4 5 6 7 8 9 10 11 12 13 14 15 16 17 18 19 20 21 22 23 24 25 @Configuration(proxyBeanMethods = false) class ServletWebServerFactoryConfiguration { @Configuration(proxyBeanMethods = false) @ConditionalOnClass({ Servlet.class, Tomcat.class, UpgradeProtocol.class }) @ConditionalOnMissingBean(value = ServletWebServerFactory.class, search = SearchStrategy.CURRENT) static class EmbeddedTomcat { @Bean TomcatServletWebServerFactory tomcatServletWebServerFactory ( ObjectProvider<TomcatConnectorCustomizer> connectorCustomizers, ObjectProvider<TomcatContextCustomizer> contextCustomizers, ObjectProvider<TomcatProtocolHandlerCustomizer<?>> protocolHandlerCustomizers) { TomcatServletWebServerFactory factory = new TomcatServletWebServerFactory (); factory.getTomcatConnectorCustomizers() .addAll(connectorCustomizers.orderedStream().collect(Collectors.toList())); factory.getTomcatContextCustomizers() .addAll(contextCustomizers.orderedStream().collect(Collectors.toList())); factory.getTomcatProtocolHandlerCustomizers() .addAll(protocolHandlerCustomizers.orderedStream().collect(Collectors.toList())); return factory; } } }
14.7.2.2. ServletWebServerFactory 1 2 3 4 @FunctionalInterface public interface ServletWebServerFactory { WebServer getWebServer (ServletContextInitializer... initializers) ; }
14.7.2.2.1. TomcatServletWebServerFactory 类中实例化一个tomcat,这个tomcat位于org.apache.catalina.startup包下,最终实例化生成对象使得TomcatServletWebServerFactoryCustomizer能被注册到容器中
getWebServer方法返回的TomcatWebServer构造器中真正定义tomcat启动
1 2 3 4 5 6 7 8 9 10 11 12 13 14 15 16 17 18 19 20 21 22 23 24 25 26 27 28 public class TomcatServletWebServerFactory extends AbstractServletWebServerFactory implements ConfigurableTomcatWebServerFactory , ResourceLoaderAware { @Override public WebServer getWebServer (ServletContextInitializer... initializers) { if (this .disableMBeanRegistry) { Registry.disableRegistry(); } Tomcat tomcat = new Tomcat (); File baseDir = (this .baseDirectory != null ) ? this .baseDirectory : createTempDir("tomcat" ); tomcat.setBaseDir(baseDir.getAbsolutePath()); Connector connector = new Connector (this .protocol); connector.setThrowOnFailure(true ); tomcat.getService().addConnector(connector); customizeConnector(connector); tomcat.setConnector(connector); tomcat.getHost().setAutoDeploy(false ); configureEngine(tomcat.getEngine()); for (Connector additionalConnector : this .additionalTomcatConnectors{ tomcat.getService().addConnector(additionalConnector); } prepareContext(tomcat.getHost(), initializers); return getTomcatWebServer(tomcat); } protected TomcatWebServer getTomcatWebServer (Tomcat tomcat) { return new TomcatWebServer (tomcat, getPort() >= 0 ); } }
14.7.2.2.1.1. Tomcat 1 2 3 4 5 6 7 8 package org.apache.catalina.startup;public class Tomcat { private static final StringManager sm = StringManager.getManager(Tomcat.class); protected Server server; protected int port = 8080 ; protected String hostname = "localhost" ; protected String basedir; }
14.7.2.2.1.2. TomcatWebServer 1 2 3 4 5 6 7 8 9 10 11 12 13 14 15 16 17 public TomcatWebServer (Tomcat tomcat, boolean autoStart) { Assert.notNull(tomcat, "Tomcat Server must not be null" ); this .tomcat = tomcat; this .autoStart = autoStart; initialize(); } private void initialize () throws WebServerException { synchronized (this .monitor) { try { this .tomcat.start(); } catch (Exception ex) { } } }
14.7.3. BeanPostProcessorsRegistrar 给容器中导入一些组件
1 2 3 4 5 6 7 8 9 10 11 12 13 14 15 16 17 18 19 public class ServletWebServerFactoryAutoConfiguration { public static class BeanPostProcessorsRegistrar implements ImportBeanDefinitionRegistrar , BeanFactoryAware { @Override public void registerBeanDefinitions (AnnotationMetadata importingClassMetadata, BeanDefinitionRegistry registry) { if (this .beanFactory == null ) { return ; } registerSyntheticBeanIfMissing(registry, "webServerFactoryCustomizerBeanPostProcessor" , WebServerFactoryCustomizerBeanPostProcessor.class); registerSyntheticBeanIfMissing(registry, "errorPageRegistrarBeanPostProcessor" , ErrorPageRegistrarBeanPostProcessor.class); } } }
14.7.3.1. WebServerFactoryCustomizerBeanPostProcessor后置处理器 1 2 3 4 5 6 7 8 9 10 11 12 13 14 15 16 17 18 19 20 21 22 23 24 25 26 27 28 29 30 31 32 33 34 35 36 37 38 39 40 41 42 public class WebServerFactoryCustomizerBeanPostProcessor implements BeanPostProcessor , BeanFactoryAware { private ListableBeanFactory beanFactory; private List<WebServerFactoryCustomizer<?>> customizers; public WebServerFactoryCustomizerBeanPostProcessor () { } public void setBeanFactory (BeanFactory beanFactory) { Assert.isInstanceOf(ListableBeanFactory.class, beanFactory, "WebServerCustomizerBeanPostProcessor can only be used with a ListableBeanFactory" ); this .beanFactory = (ListableBeanFactory)beanFactory; } @Override public Object postProcessBeforeInitialization (Object bean, String beanName) throws BeansException { if (bean instanceof WebServerFactory) { postProcessBeforeInitialization((WebServerFactory) bean); } return bean; } private void postProcessBeforeInitialization (WebServerFactory webServerFactory) { LambdaSafe.callbacks(WebServerFactoryCustomizer.class, getCustomizers(), webServerFactory) .withLogger(WebServerFactoryCustomizerBeanPostProcessor.class) .invoke((customizer) -> customizer.customize(webServerFactory)); } private Collection<WebServerFactoryCustomizer<?>> getCustomizers() { if (this .customizers == null ) { this .customizers = new ArrayList <>(getWebServerFactoryCustomizerBeans()); this .customizers.sort(AnnotationAwareOrderComparator.INSTANCE); this .customizers = Collections.unmodifiableList(this .customizers); } return this .customizers; } private Collection<WebServerFactoryCustomizer<?>> getWebServerFactoryCustomizerBeans() { return (Collection) this .beanFactory.getBeansOfType(WebServerFactoryCustomizer.class, false , false ).values(); } }
14.7.3.2. LambdaSafe 1 2 3 4 5 6 7 8 9 10 11 12 13 14 15 16 17 18 public static <C, A> Callbacks<C, A> callbacks (Class<C> callbackType, Collection<? extends C> callbackInstances,A argument, Object... additionalArguments) { return new Callbacks <>(callbackType, callbackInstances, argument, additionalArguments); } private Callbacks (Class<C> callbackType, Collection<? extends C> callbackInstances, A argument,Object[] additionalArguments) { super (callbackType, argument, additionalArguments); this .callbackInstances = callbackInstances; } public void invoke (Consumer<C> invoker) { this .callbackInstances.forEach((callbackInstance) -> { invoke(callbackInstance, () -> { invoker.accept(callbackInstance); return null ; }); }); }
14.7.4. 配置步骤
SpringBoot根据导入的依赖,给容器中添加相应的TomcatServletWebServerFactory,factory中配置了tomcat
ServletWebServerFactoryAutoConfiguration中导入ServletWebServerFactoryConfiguration.EmbeddedTomcat.class,根据org.apache.catalina.startup.Tomcat配置TomcatServletWebServerFactoryCustomizer
容器中某个组件要创建对象时惊动WebServerFactoryCustomizerBeanPostProcessor,这个类只要是嵌入式的serlvet容器工厂,后置处理器就工作
后置处理器从容器中获取所有的WebServerFactoryCustomizer,调用定制器的定制方法
14.7.5. 启动原理 - IoC容器启动创建嵌入式的Servlet容器 14.7.5.1. SpringApplication启动run方法 14.7.5.2. refreshContext(context) SpringBoot刷新Ioc容器,创建IoC容器对象并初始化容器,创建容器中的每一个组件,web应用创建web环境org.springframework.boot.web.servlet.context.AnnotationConfigServletWebServerApplicationContext,不是web应用创建org.springframework.context.annotation.AnnotationConfigApplicationContext
1 2 3 4 5 6 7 8 9 10 11 12 13 14 15 16 17 18 19 20 21 22 23 24 25 26 27 28 29 30 31 32 33 34 35 36 37 38 39 40 41 42 43 44 45 public class SpringApplication { public static final String DEFAULT_CONTEXT_CLASS = "org.springframework.context.annotation.AnnotationConfigApplicationContext" ; public static final String DEFAULT_SERVLET_WEB_CONTEXT_CLASS = "org.springframework.boot.web.servlet.context.AnnotationConfigServletWebServerApplicationContext" ; public static ConfigurableApplicationContext run (Class<?> primarySource, String... args) { return run(new Class <?>[] { primarySource }, args); } public static ConfigurableApplicationContext run (Class<?>[] primarySources, String[] args) { return new SpringApplication (primarySources).run(args); } public ConfigurableApplicationContext run (String... args) { ConfigurableApplicationContext context = null ; context = this .createApplicationContext(); refreshContext(context); } protected ConfigurableApplicationContext createApplicationContext () { Class<?> contextClass = this .applicationContextClass; if (contextClass == null ) { try { switch (this .webApplicationType) { case SERVLET: contextClass = Class.forName("org.springframework.boot.web.servlet.context.AnnotationConfigServletWebServerApplicationContext" ); break ; case REACTIVE: contextClass = Class.forName("org.springframework.boot.web.reactive.context.AnnotationConfigReactiveWebServerApplicationContext" ); break ; default : contextClass = Class.forName("org.springframework.context.annotation.AnnotationConfigApplicationContext" ); } } catch (ClassNotFoundException var3) { throw new IllegalStateException ("Unable create a default ApplicationContext, please specify an ApplicationContextClass" , var3); } } return (ConfigurableApplicationContext)BeanUtils.instantiateClass(contextClass); } }
14.7.5.3. refresh(context); 刷新刚创建的IoC容器
1 2 3 4 5 6 private void refreshContext (ConfigurableApplicationContext context) { refresh(context); } protected void refresh (ApplicationContext applicationContext) { ((AbstractApplicationContext) applicationContext).refresh(); }
14.7.5.4. AbstractApplicationContext的refresh() 1 2 3 4 5 6 7 8 9 10 11 12 13 14 15 16 17 18 19 20 21 22 23 24 25 26 27 28 29 30 31 32 33 34 35 36 37 38 39 40 41 42 43 44 45 46 47 48 49 50 51 52 53 54 55 56 57 58 59 60 public void refresh () throws BeansException, IllegalStateException { synchronized (this .startupShutdownMonitor) { this .prepareRefresh(); ConfigurableListableBeanFactory beanFactory = this .obtainFreshBeanFactory(); this .prepareBeanFactory(beanFactory); try { this .postProcessBeanFactory(beanFactory); this .invokeBeanFactoryPostProcessors(beanFactory); this .registerBeanPostProcessors(beanFactory); this .initMessageSource(); this .initApplicationEventMulticaster(); this .onRefresh(); this .registerListeners(); this .finishBeanFactoryInitialization(beanFactory); this .finishRefresh(); }catch (BeansException var9) { if (this .logger.isWarnEnabled()) { this .logger.warn("Exception encountered during context initialization - cancelling refresh attempt: " + var9); } this .destroyBeans(); this .cancelRefresh(var9); throw var9; } finally { resetCommonCaches(); } } }
14.7.5.5. ServletWebServerApplicationContext的onRefresh()
web的IoC容器重写了onRefresh()方法
1 2 3 4 5 6 7 8 9 10 11 12 13 14 15 16 17 18 19 20 21 22 23 24 25 26 27 28 29 30 31 public class ServletWebServerApplicationContext extends GenericWebApplicationContext implements ConfigurableWebServerApplicationContext { protected void onRefresh () { super .onRefresh(); try { createWebServer(); } catch (Throwable ex) { throw new ApplicationContextException ("Unable to start web server" , ex); } } private void createWebServer () { WebServer webServer = this .webServer; ServletContext servletContext = getServletContext(); if (webServer == null && servletContext == null ) { ServletWebServerFactory factory = getWebServerFactory(); this .webServer = factory.getWebServer(getSelfInitializer()); } else if (servletContext != null ) { try { getSelfInitializer().onStartup(servletContext); } catch (ServletException ex) { throw new ApplicationContextException ("Cannot initialize servlet context" , ex); } } initPropertySources(); } }
14.7.5.6. 获取嵌入式的Servlet容器工厂 ServletWebServerFactory factory = getWebServerFactory();
从IoC容器中获取ServletWebServerFactory,为TomcatServletWebServerFactory创建对象,后置处理器就获取所有定制器定制tomcat配置
14.7.5.7. 使用容器工厂获取嵌入式的servlet容器 this.webServer = factory.getWebServer(getSelfInitializer());
14.7.5.8. 嵌入式的servlet容器创建对象并启动Servlet容器 1 getSelfInitializer().onStartup(servletContext);
14.7.5.9. 先启动嵌入式的servlet容器,再将IoC容器中剩下没有创建出来的对象获取出来 1 2 3 4 5 6 7 public abstract class AbstractApplicationContext { public void refresh () throws BeansException, IllegalStateException{ finishBeanFactoryInitialization(beanFactory); } }
15. SpringBoot运行在外部tomcat 15.1. springboot以war项目运行 生成webapp文件夹和web.xml文件
15.2. 运行本地tomcat
报错:org.springframework.beans.factory.BeanCreationException: Error creating bean with name ‘defaultValidator’ defined in class path resource
解决:使用tomcat 8.5版本
测试类
TestController
1 2 3 4 5 6 7 8 9 @Controller public class TestController { @RequestMapping("/test") @ResponseBody public String test () { return "Hello" ; } }
测试
15.3. 运行jsp jsp文件放于webapp/WEB-INF内
使用视图解析器规定前后缀
1 2 spring.mvc.view.prefix =/WEB-INF/ spring.mvc.view.suffix =.jsp
15.4. 运行原理 15.4.1. SpringServletContainerInitializer /org/springframework/spring-web/5.2.3.RELEASE/spring-web-5.2.3.RELEASE.jar!/META-INF/services/javax.servlet.ServletContainerInitializer文件内容
org.springframework.web.SpringServletContainerInitializer
1 2 3 4 5 6 7 8 9 10 11 12 13 14 15 16 17 18 19 20 @HandlesTypes({WebApplicationInitializer.class}) public class SpringServletContainerInitializer implements ServletContainerInitializer { public void onStartup (@Nullable Set<Class<?>> webAppInitializerClasses, ServletContext servletContext) throws ServletException { List<WebApplicationInitializer> initializers = new LinkedList (); initializers.add((WebApplicationInitializer)ReflectionUtils .accessibleConstructor(waiClass, new Class [0 ]).newInstance()); Iterator var4; var4 = initializers.iterator(); while (var4.hasNext()) { WebApplicationInitializer initializer = (WebApplicationInitializer)var4.next(); initializer.onStartup(servletContext); } }
15.4.2. WebApplicationInitializer
15.4.3. SpringBootServletInitializer 这个类是WebApplicationInitializer的实现类,故也会被反射创建实例并调用onStartup方法
1 2 3 4 5 6 7 8 9 10 11 12 13 14 15 16 17 18 19 20 21 22 23 24 25 26 27 28 29 30 31 32 33 34 35 36 37 38 39 40 41 42 43 44 45 46 47 48 49 50 51 public abstract class SpringBootServletInitializer implements WebApplicationInitializer { public void onStartup (ServletContext servletContext) throws ServletException { this .logger = LogFactory.getLog(this .getClass()); WebApplicationContext rootAppContext = this .createRootApplicationContext(servletContext); if (rootAppContext != null ) { servletContext.addListener(new ContextLoaderListener (rootAppContext) { public void contextInitialized (ServletContextEvent event) { } }); } else { this .logger.debug("No ContextLoaderListener registered, as createRootApplicationContext() did not return an application context" ); } } protected WebApplicationContext createRootApplicationContext (ServletContext servletContext) { SpringApplicationBuilder builder = this .createSpringApplicationBuilder(); builder.main(this .getClass()); ApplicationContext parent = this .getExistingRootWebApplicationContext(servletContext); if (parent != null ) { this .logger.info("Root context already created (using as parent)." ); servletContext.setAttribute(WebApplicationContext.ROOT_WEB_APPLICATION_CONTEXT_ATTRIBUTE, (Object)null ); builder.initializers(new ApplicationContextInitializer []{new ParentContextApplicationContextInitializer (parent)}); } builder.initializers(new ApplicationContextInitializer []{new ServletContextApplicationContextInitializer (servletContext)}); builder.contextClass(AnnotationConfigServletWebServerApplicationContext.class); builder = this .configure(builder); builder.listeners(new ApplicationListener []{new SpringBootServletInitializer .WebEnvironmentPropertySourceInitializer(servletContext)}); SpringApplication application = builder.build(); if (application.getAllSources().isEmpty() && MergedAnnotations.from(this .getClass(), SearchStrategy.TYPE_HIERARCHY).isPresent(Configuration.class)) { application.addPrimarySources(Collections.singleton(this .getClass())); } Assert.state(!application.getAllSources().isEmpty(), "No SpringApplication sources have been defined. Either override the configure method or add an @Configuration annotation" ); if (this .registerErrorPageFilter) { application.addPrimarySources(Collections.singleton(ErrorPageFilterConfiguration.class)); } return this .run(application); } }
16. SpringBoot部署到外部tomcat 16.1. 项目打包到war 1 <packaging > war</packaging >
16.2. 内置tomcat环境为provided 将内置的tomcat的jar设置成provided级别的, 对于编译和测试classpath有效,但在运行时候无效,避免与外部tomcat包中jar相冲
1 2 3 4 5 <dependency > <groupId > org.springframework.boot</groupId > <artifactId > spring-boot-starter-tomcat</artifactId > <scope > provided</scope > </dependency >
16.3. 配置jsp解析jar包 1 2 3 4 5 <dependency > <groupId > org.apache.tomcat.embed</groupId > <artifactId > tomcat-embed-jasper</artifactId > <scope > provided</scope > </dependency >
16.4. 修改启动类 添加ServletInitializer类,继承SpringBootServletInitializer,重写configure方法,SpringApplicationBuilder链接到拥有主方法的Tomcat8Application类
1 2 3 4 5 6 7 8 9 10 11 12 package com.runaccpeted;import org.springframework.boot.builder.SpringApplicationBuilder;import org.springframework.boot.web.servlet.support.SpringBootServletInitializer;public class ServletInitializer extends SpringBootServletInitializer { @Override protected SpringApplicationBuilder configure (SpringApplicationBuilder application) { return application.sources(Tomcat8Application.class); } }
16.5. 添加jsp页面 webapp/WEB-INF/login.jsp
16.6. 配置前后缀 1 2 spring.mvc.view.prefix =/WEB-INF/ spring.mvc.view.suffix =.jsp
16.7. 配置视图 1 2 3 4 @RequestMapping("/login") public String login () { return "login" ; }
访问 http://localhost:8080/login
16.8. 打包war
16.9. 将war复制到tomcat8的webapps下 运行tomcat8 /tomcat8/bin/catalina.sh run
访问 localhost:端口号/项目名/URl –> localhost:8080/tomcat8-0.0.1-SNAPSHOT/login
org.apache.jasper.JasperException: java.lang.IllegalStateException: No output folder 权限不够
sudo /tomcat8/bin/catalina.sh run
超级用户访问
/tomcat8/bin/catalina.sh stop
17. 外部运行原理 jar:执行springboot的main方法,启动IoC容器,创建嵌入式serlvet容器
war:启动服务器,服务器启动SpringBoot应用,启动IoC容器