POI导入分类信息 - 前端操作分类
1. 数据库表设计
1.1. edu_subject 科目表
parent_id 用于创建多级分类
1
2
3
4
5
6
7
8
9
10
11
12
| drop table if exits edu_subject;
create table edu_subject(
id char(19) not null comment '课程类别ID',
title varchar(10) not null comment '类别名称',
parent_id char(19) not null default '0' comment '父课程ID',
sort int(10) unsigned not null default '0' comment '排序字段',
gmt_create datetime not null comment '创建时间',
gmt_modified datetime not null comment '更新时间',
primary key (id),
key idx_parent_id (parent_id)
)
|
1.2. edu_course 课程表
teacher_id 对应讲师表 一个讲师对应多个课程
subject_id 对应科目表 一个科目对应多个课程
1
2
3
4
5
6
7
8
9
10
11
12
13
14
15
16
17
18
19
| create table edu_course (
id char(19) not null comment '课程ID',
teacher_id char(19) not null comment '课程讲师ID',
subject_id char(19) not null comment '课程专业ID',
title varchar(50) not null comment '课程标题',
price decimal(10,4) unsigned not null default '0.0000' comment '课程销售价格,设置为0则可免费观看',
lesson_num int(10) unsigned not null default '0' comment '总课时',
cover varchar(255) CHARACTER SET utf8 not null comment '课程封面图片路径',
buy_count bigint(10) unsigned not null default'0' COMMENT '销售数量',
view_count bigint(10) unsigned not null default '0' COMMENT '浏览数量',
version bigint(20) unsigned not null default '1' COMMENT '乐观锁',
status varchar(10) not null default 'Draft' comment '视频状态 Draft未发布 Normal已发布',
gmt_create datetime not null comment '创建时间',
gmt_modified datetime not null comment '更新时间',
primary key (id),
key idx_title (title),
key idx_subject_id (subject_id),
key idx_teacher_id (teacher_id)
)
|
1.3. edu_course_description 课程描述表
与课程表1对1 ,同时插入操作
1
2
3
4
5
6
7
8
9
| drop table if exists edu_course_description;
create table edu_course_description (
id char(19) not null comment '课程ID',
description text comment '课程简介',
gmt_create datetime not null comment '创建时间',
gmt_modified datetime not null comment '更新时间',
primary key (id)
)
|
1.4. edu_chapter 章节表
course_id 对应课程表,一个课程多个章节
1
2
3
4
5
6
7
8
9
10
11
12
| drop table if exists edu_chapter
create table edu_chapter (
id char(19) not null comment '章节ID',
course_id char(19) not null comment '课程ID',
title varchar(50) not null comment '章节名称',
sort int(10) unsigned not null default '0' comment '显示排序',
gmt_create datetime not null comment '创建时间',
gmt_modified datetime not null comment '更新时间',
primary key (id),
key idx_course_id (course_id)
)
|
1.5. edu_video 小节表
chapter_id 对应章节表 一个章节多个小节
course_id 所属课程
1
2
3
4
5
6
7
8
9
10
11
12
13
14
15
16
17
18
19
20
21
| drop table if exists edu_video
create table edu_video (
id char(19) not null comment '视频ID',
course_id char(19) not null comment '课程ID',
chapter_id char(19) not null comment '章节ID',
title varchar(50) not null comment '节点名称',
sort int(10) unsigned not null default '0' comment '排序字段',
play_count bigint(20) unsigned not null default '0' comment '播放次数',
is_free tinyint(1) unsigned not null default '0' comment '是否可以试听:0免费 1收费',
video_source_id varchar(100) default null comment '视频资源',
duration float not null default '0' comment '视频时长(秒)',
status varchar(20) not null default '' comment '视频状态:见阿里云文档',
size bigint(20) unsigned not null default '0' comment '视频源文件大小(字节)',
version bigint(20) unsigned not null default '1' comment '乐观锁',
gmt_create datetime not null comment '创建时间',
gmt_modified datetime not null comment '更新时间',
primary key (id),
KEY idx_course_id (course_id),
KEY idx_chapter_id (chapter_id)
)
|
2. codeGenerator
运行mybatis-plus的自动生成插件生成edu_subject相关类
1
2
3
4
5
6
7
8
9
10
11
12
13
14
15
16
17
18
19
20
21
22
23
24
25
26
27
28
29
30
31
32
33
34
35
36
37
38
39
40
41
42
43
44
45
46
47
48
49
50
51
52
53
54
55
56
57
58
59
60
61
62
63
64
65
66
67
68
69
70
71
72
73
74
75
76
77
78
79
80
81
82
83
84
85
86
87
88
89
90
91
92
| package com.online.edu.eduservice;
import com.baomidou.mybatisplus.annotation.IdType;
import com.baomidou.mybatisplus.generator.AutoGenerator;
import com.baomidou.mybatisplus.generator.config.*;
import com.baomidou.mybatisplus.generator.config.rules.DateType;
import com.baomidou.mybatisplus.generator.config.rules.NamingStrategy;
import org.junit.jupiter.api.Test;
import org.springframework.boot.test.context.SpringBootTest;
@SpringBootTest
public class CodeGenerator {
@Test
public void run() {
AutoGenerator mpg = new AutoGenerator();
GlobalConfig gc = new GlobalConfig();
String projectPath = System.getProperty("user.dir");
gc.setOutputDir(projectPath + "/src/main/java");
gc.setAuthor("Wang T");
gc.setOpen(false);
gc.setFileOverride(false);
gc.setServiceName("%sService");
gc.setIdType(IdType.ASSIGN_ID);
gc.setDateType(DateType.ONLY_DATE);
gc.setSwagger2(true);
mpg.setGlobalConfig(gc);
DataSourceConfig dsc = new DataSourceConfig();
dsc.setUrl("jdbc:mysql://localhost:3306/online?useUnicode=true&useSSL=false&characterEncoding=utf8");
dsc.setDriverName("com.mysql.cj.jdbc.Driver");
dsc.setUsername("root");
dsc.setPassword("mysql123//");
mpg.setDataSource(dsc);
PackageConfig pc = new PackageConfig();
pc.setModuleName("eduservice");
pc.setParent("com.online.edu");
pc.setController("controller");
pc.setService("service");
pc.setEntity("entity");
pc.setMapper("mapper");
mpg.setPackageInfo(pc);
StrategyConfig strategy = new StrategyConfig();
strategy.setInclude("edu_subject");
strategy.setNaming(NamingStrategy.underline_to_camel);
strategy.setTablePrefix(pc.getModuleName() + "_");
strategy.setColumnNaming(NamingStrategy.underline_to_camel);
strategy.setEntityLombokModel(true);
strategy.setRestControllerStyle(true);
strategy.setControllerMappingHyphenStyle(true);
mpg.setStrategy(strategy);
mpg.execute();
}
}
|
3. 后端开发 - POI导入xlsx
3.1. Maven依赖
定义在父项目中
1
2
3
4
5
6
7
8
9
10
11
12
13
14
15
16
17
| <properties>
<poi.version>4.1.2</poi.version>
</properties>
<dependencyManagement>
<dependency>
<groupId>org.apache.poi</groupId>
<artifactId>poi</artifactId>
<version>${poi.version}</version>
</dependency>
<dependency>
<groupId>org.apache.poi</groupId>
<artifactId>poi-ooxml</artifactId>
<version>${poi.version}</version>
</dependency>
</dependencyManagement>
|
导入在eduservice项目中
1
2
3
4
5
6
7
8
9
10
|
<dependency>
<groupId>org.apache.poi</groupId>
<artifactId>poi</artifactId>
</dependency>
<dependency>
<groupId>org.apache.poi</groupId>
<artifactId>poi-ooxml</artifactId>
</dependency>
|
3.2. 自动填充时间-EduSubject
1
2
3
4
5
6
7
| @ApiModelProperty(value = "创建时间")
@TableField(fill = FieldFill.INSERT)
private Date gmtCreate;
@ApiModelProperty(value = "更新时间")
@TableField(fill = FieldFill.INSERT_UPDATE)
private Date gmtModified;
|
3.3. eduSubjectServiceImpl
实现从xlsx中导入分级列表
代码
从Excel中得到行数,循环每一行,通过行得到列数,循环每一列,即扫描每一个单元格
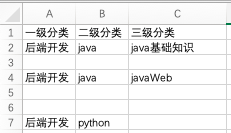
每一个单元格都需要通过 select * from edu_subject where title=? and parent_id=? 判断是否存在于数据库中,没有则新增。其中需要记录parent_id,即每一级的父级,第一级为0
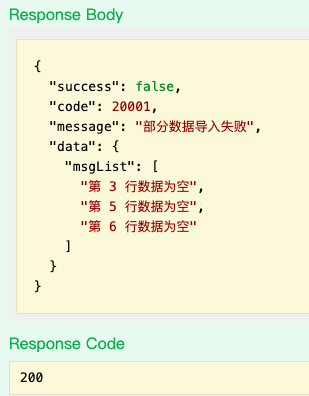
像上表样式的表格,对于空行则continue,即跳过这一行,方法向用户返回这个行空信息
1
2
3
4
5
6
7
8
9
10
11
12
13
14
15
16
17
18
19
20
21
22
23
24
25
26
27
28
29
30
31
32
33
34
35
36
37
38
39
40
41
42
43
44
45
46
47
48
49
50
51
52
53
54
55
56
57
58
59
60
61
62
63
64
65
66
67
68
69
70
71
72
73
74
75
76
77
78
79
80
81
82
83
84
85
86
87
88
89
90
91
92
93
94
95
96
97
98
| package com.online.edu.eduservice.service.impl;
import com.baomidou.mybatisplus.core.conditions.query.QueryWrapper;
import com.online.edu.eduservice.entity.EduSubject;
import com.online.edu.eduservice.exception.EduException;
import com.online.edu.eduservice.mapper.EduSubjectMapper;
import com.online.edu.eduservice.service.EduSubjectService;
import com.baomidou.mybatisplus.extension.service.impl.ServiceImpl;
import org.apache.poi.ss.usermodel.Cell;
import org.apache.poi.ss.usermodel.Row;
import org.apache.poi.ss.usermodel.Sheet;
import org.apache.poi.ss.usermodel.Workbook;
import org.apache.poi.xssf.streaming.SXSSFWorkbook;
import org.apache.poi.xssf.usermodel.XSSFWorkbook;
import org.springframework.stereotype.Service;
import org.springframework.web.multipart.MultipartFile;
import java.io.IOException;
import java.io.InputStream;
import java.util.ArrayList;
import java.util.List;
@Service
public class EduSubjectServiceImpl extends ServiceImpl<EduSubjectMapper, EduSubject> implements EduSubjectService {
@Override
public List<String> importSubject(MultipartFile file) {
List<String> list = new ArrayList<>();
try {
InputStream in = file.getInputStream();
Workbook workbook = new XSSFWorkbook(in);
Sheet sheet = workbook.getSheetAt(0);
int rowIndex = sheet.getLastRowNum();
Row row = null;
for (int i=1;i<=rowIndex;i++){
row = sheet.getRow(i);
if(row == null){
list.add("第 "+(i+1)+" 行数据为空");
continue;
}
int cellIndex =row.getLastCellNum();
String parentId = "0";
for (int j=0; j < cellIndex; j++){
Cell cell = row.getCell(j);
if(cell == null){
list.add("第 "+ (i+1) +" 行 第 " +(j+1)+" 列数据为空");
continue;
}
String cellValue=cell.getStringCellValue();
EduSubject eduSubject = existSubject(cellValue,parentId);
if(eduSubject == null){
eduSubject = new EduSubject();
eduSubject.setTitle(cellValue);
eduSubject.setParentId(parentId);
eduSubject.setSort(0);
baseMapper.insert(eduSubject);
}
parentId = eduSubject.getId();
}
}
} catch (IOException e) {
throw new EduException(20001,"导入xlsx文件失败");
}
return list;
}
private EduSubject existSubject(String name,String parentId){
QueryWrapper<EduSubject> queryWrapper = new QueryWrapper<>();
queryWrapper.eq("title",name).eq("parent_id",parentId);
return baseMapper.selectOne(queryWrapper);
}
}
|
3.4. EduSubjectController
返回单元格空信息
1
2
3
4
5
6
7
8
9
10
11
12
13
14
15
16
17
18
19
20
21
22
23
24
25
26
27
28
29
30
31
32
33
34
35
36
37
38
39
| package com.online.edu.eduservice.controller;
import com.online.edu.common.R;
import com.online.edu.eduservice.service.EduSubjectService;
import io.swagger.annotations.Api;
import io.swagger.annotations.ApiParam;
import org.springframework.beans.factory.annotation.Autowired;
import org.springframework.web.bind.annotation.PostMapping;
import org.springframework.web.bind.annotation.RequestMapping;
import org.springframework.web.bind.annotation.RequestParam;
import org.springframework.web.bind.annotation.RestController;
import org.springframework.web.multipart.MultipartFile;
import java.util.List;
@Api("科目分类管理")
@RestController
@RequestMapping("/eduservice/edu-subject")
@CrossOrigin
public class EduSubjectController {
@Autowired
EduSubjectService eduSubjectService;
@PostMapping("/import")
public R importExcelSubject(@ApiParam(name = "file", value = "文件", required = true)
@RequestParam("file") MultipartFile file){
List<String> list=eduSubjectService.importSubject(file);
if(list.size() >0){
return R.error().data("msgList",list).message("部分数据导入失败");
}
else{
return R.ok().message("批量导入成功");
}
}
}
|
3.5. 测试上表
http://localhost:8080/swagger-ui.html
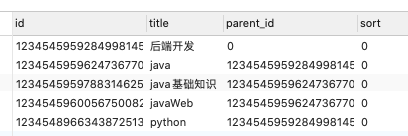
3.6. 查询数据库
4. 前端开发 - vue
4.1. 定义路由 - router/index.js
1
2
3
4
5
6
7
8
9
10
11
12
13
14
15
16
17
18
19
20
21
| {
path: '/subject',
component: Layout,
redirect: '/subject/list',
name: '分类管理',
meta: { title: '分类管理', icon: 'example' },
children: [
{
path: 'list',
name: '分类列表',
component: () => import('@/views/edu/subject/index'),
meta: { title: '分类列表', icon: 'table' }
},
{
path: 'import',
name: '导入分类',
component: () => import('@/views/edu/subject/import'),
meta: { title: '导入分类', icon: 'form' }
}
]
}
|
4.2. 视图 - views/edu/subject/import.vue
https://element.eleme.cn/#/zh-CN/component/upload 手动上传样式
4.2.1. html部分
1
2
3
4
5
6
7
8
9
10
11
12
13
14
15
16
17
18
19
20
21
22
23
24
25
26
27
28
29
30
31
32
33
34
35
36
37
38
39
40
41
42
43
44
45
46
47
48
49
50
51
52
53
54
| <template>
<div class="app-container">
<el-form label-width="120px">
<el-form-item label="信息描述">
<el-tag type="info">excel模版说明</el-tag>
<el-tag>
<i class="el-icon-download"/>
<!-- 文件放在public/file文件夹下 download定义下载文件名-->
<a href="/file/subject.xlsx" download="subject.xlsx">点击下载模版</a>
</el-tag>
</el-form-item>
<el-form-item label="选择Excel">
<!--
ref= 实现上传功能
:auto-upload= 是否在选取文件后立即进行上传
:on-change= 文件状态改变时的钩子,添加文件、上传成功和上传失败时都会被调用
:on-success=文件上传成功时
:on-error=文件上传失败时
:disabled=是否禁用
:limit="1"
:action=最大允许上传个数
name=上传的文件字段名
accept=接受上传的文件类型
-->
<el-upload
ref="upload"
:auto-upload="false"
:on-change="dealChange"
:on-success="fileUploadSuccess"
:on-error="fileUploadError"
:disabled="importBtnDisabled"
:limit="1"
:action="path"
name="file"
accept="application/vnd.ms-excel">
<!-- slot 触发文件选择框的内容-->
<el-button slot="trigger" size="small" type="primary">选取文件</el-button>
<el-button
:loading="loading"
style="margin-left: 10px;"
size="small"
type="success"
:disabled="uploadBtnDisabled"
@click="submitUpload">
{{ fileUploadBtnText }}
</el-button>
<!-- tip 提示说明文字-->
<div slot="tip" class="el-upload__tip">只能上传excel文件</div>
</el-upload>
</el-form-item>
</el-form>
</div>
</template>
|
4.3. 脚本部分
1
2
3
4
5
6
7
8
9
10
11
12
13
14
15
16
17
18
19
20
21
22
23
24
25
26
27
28
29
30
31
32
33
34
35
36
37
38
39
40
41
42
43
44
45
46
47
48
49
50
51
52
53
54
55
56
57
58
59
60
61
62
63
64
65
66
67
68
69
70
| <script>
export default {
//初始时选取文件按钮生效,上传服务器按钮禁用
data(){
return{
fileUploadBtnText:'上传到服务器',
loading:false,
importBtnDisabled:false,
path:'http://localhost:8080/eduservice/edu-subject/import',
uploadBtnDisabled:true
}
},
created(){
},
methods:{
//一旦开始操作文件,上传服务器按钮生效
dealChange(){
this.uploadBtnDisabled = false
},
//上传成功
fileUploadSuccess(response){
this.loading = false
if(response.success === true){
//导入成功,返回消息提示
this.fileUploadBtnText='导入成功'
this.$message({
type:'success',
message:response.message
})
}else{
//提示空行空列
this.fileUploadBtnText='导入成功'
//console.log(response)
const messages = response.data.msgList
//console.log(messages)
let msgStr = ''
messages.forEach(msg =>{
msgStr += `<span>${msg}</span><br/>`
})
//出现空行数据提示
this.$notify({
title: response.message,
dangerouslyUseHTMLString: true,
type: 'warning',
message: msgStr
})
}
},
//上传失败
fileUploadError(){
this.loading = false
this.$message({
type:'error',
message: '导入失败'
})
},
//提交表单
submitUpload(){
this.fileUploadBtnText = '正在上传'
this.importBtnDisabled = true
this.loading = true
//提交表单
this.$refs.upload.submit()
}
}
}
</script>
|
4.4. 视频演示
5. 显示分类信息
5.1. 后端开发-QuerySubject
参考/tree/index.vue
1
2
3
4
5
6
7
8
9
10
11
12
13
14
15
16
17
18
19
20
21
22
| :data="data2"
data2: [{
id: 1,
label: 'Level one 1',
children: [{
id: 4,
label: 'Level two 1-1',
children: [{
id: 9,
label: 'Level three 1-1-1'
}, {
id: 10,
label: 'Level three 1-1-2'
}]
}]
}]
defaultProps: {
children: 'children',
label: 'label'
}
|
创建科目bean,{id,title,children}
1
2
3
4
5
6
7
8
9
10
11
12
13
14
15
16
17
18
19
20
21
| package com.online.edu.eduservice.entity.query.subject;
import com.online.edu.eduservice.entity.EduSubject;
import io.swagger.annotations.ApiModel;
import io.swagger.annotations.ApiModelProperty;
import lombok.Data;
import javax.security.auth.Subject;
import java.util.ArrayList;
import java.util.List;
@Data
@ApiModel("每个科目显示结构")
public class QuerySubject {
@ApiModelProperty(value = "科目ID")
private String id;
@ApiModelProperty(value = "科目标题")
private String title;
@ApiModelProperty(value = "下级科目")
List<QuerySubject> children = new ArrayList<>();
}
|
5.2. 后端开发-EduSubjectServiceImpl
查询所有父级科目
数据存入subjects链表中
将科目存入subjctMap集合中,存入id-QuerySubject
记录id号 indexs链表
查询所有除父级外的所有科目
将科目存入subjctMap集合中
根据科目的parent_id找到map中的父科目,建立父子级连接parentQuery.getChildren().add(query)
依旧记录id号 indexs链表
根据indexs中的id号,查询map集合,建立分层连接 subject = subjectMap.get(subject.getId())
将父科目存于QuerySubject的链表中
父科目中存入了后几层科目信息
1
2
3
4
5
6
7
8
9
10
11
12
13
14
15
16
17
18
19
20
21
22
23
24
25
26
27
28
29
30
31
32
33
34
35
36
37
38
39
40
41
42
43
44
45
46
47
48
49
50
51
52
53
54
55
56
57
58
59
60
61
62
63
64
65
66
67
68
69
| @Override
public List<QuerySubject> nestedList() {
List<QuerySubject> querySubjects = new ArrayList<>();
QueryWrapper<EduSubject> queryMapper = new QueryWrapper<>();
queryMapper.eq("parent_id","0");
queryMapper.orderByAsc("sort","id");
List<EduSubject> subjects =baseMapper.selectList(queryMapper);
List<String> indexs = new ArrayList<>();
Map<String,QuerySubject> subjectMap = new HashMap<>();
for(EduSubject subject:subjects){
String index=subject.getId();
QuerySubject querySubject = new QuerySubject();
querySubject.setId(index);
querySubject.setTitle(subject.getTitle());
subjectMap.put(index,querySubject);
indexs.add(index);
}
queryMapper = new QueryWrapper<>();
queryMapper.ne("parent_id","0");
queryMapper.orderByAsc("sort","id");
List<EduSubject> subSubjects =baseMapper.selectList(queryMapper);
int secondNum = subSubjects.size();
for(int i=0;i<secondNum;i++){
EduSubject subject = subSubjects.get(i);
String id = subject.getId();
String title =subject.getTitle();
String parentId = subject.getParentId();
QuerySubject query = new QuerySubject();
query.setId(id);
query.setTitle(title);
subjectMap.put(id,query);
QuerySubject parentQuery = subjectMap.get(parentId);
parentQuery.getChildren().add(query);
indexs.add(id);
}
QuerySubject endQuery = null;
for(String index:indexs) {
endQuery = subjectMap.get(index);
List<QuerySubject> childrens = endQuery.getChildren();
for (QuerySubject subject : childrens) {
subject = subjectMap.get(subject.getId());
}
}
for(EduSubject index:subjects){
querySubjects.add(subjectMap.get(index.getId()));
}
return querySubjects;
}
|
5.3. 后端开发-EduSubjectController
当科目无数据时输出信息,有数据时输出数据
1
2
3
4
5
6
7
8
9
| @GetMapping("/list")
public R nestedList(){
List<QuerySubject> list=eduSubjectService.nestedList();
if (list.size()==0){
return R.error().message("目前无科目数据");
}else {
return R.ok().data("nestedList",list);
}
}
|
5.4. 前端开发-api/edu/subject.js
1
2
3
4
5
6
7
8
9
10
11
12
| import request from '@/utils/request'
const base = '/eduservice/edu-subject'
export default{
getSubjectList(){
return request({
url:`${base}/list`,
method:'get'
})
}
}
|
5.5. 前端开发-views/edu/subject/index.vue
根据 component: () => import('@/views/edu/subject/index')定义创建文件
https://element.eleme.cn/#/zh-CN/component/tree 参考节点过滤
data 展示数据
props
- label指定节点标签为节点对象的某个属性值
- children指定子树为节点对象的某个属性值
default-expand-all 是否默认展开所有节点
filter-node-method 对树节点进行筛选时执行的方法,true 表示这个节点显示, false 表示这个节点被隐藏
1
2
3
4
5
6
7
8
9
10
11
12
13
14
15
16
17
18
19
20
21
22
23
24
25
26
27
28
29
30
31
32
33
34
35
36
37
38
39
40
41
42
43
44
45
46
47
48
49
50
51
52
53
54
55
56
57
58
59
60
61
| <template>
<div class="app-container">
<el-input v-model="filterText" placeholder="输入关键词查询" style="margin-bottom:30px;" />
<el-tree
ref="subjectTree"
:data="subjectList"
:props="defaultProps"
:filter-node-method="filterNode"
class="filter-tree"
default-expand-all
/>
</div>
</template>
<script>
import subject from '@/api/edu/subject'
export default {
data(){
return{
filterText :'',
subjectList :[],
defaultProps: {
children: 'children',
label: 'title'
}
}
},
created(){
this.getSubjectList()
},
watch: {
filterText(val) {
this.$refs.subjectTree.filter(val)
}
},
methods:{
getSubjectList(){
subject.getSubjectList().then(response=>{
//console.log(response)
if(response.success === true){
this.subjectList = response.data.nestedList
}
else{
this.$message({
type:'error',
message:response.message
})
}
//console.log(this.subjectList)
}).catch()
},
filterNode(value, data) {
if (!value) return true
return data.title.toLowerCase().indexOf(value.toLowerCase()) !== -1
}
}
}
</script>
|
6. 删除分类
6.1. 前端
https://element.eleme.cn/#/zh-CN/component/tree 自定义节点内容
添加两个按钮
node 取得当前节点
data 当前节点 id, title,children
1
2
3
4
5
6
7
8
9
10
11
12
13
14
15
16
| <span class="custom-tree-node" slot-scope="{ node, data }">
<span>{{ node.label }}</span>
<span>
<el-button
type="text"
size="mini"
@click="() => append(data)">
添加
</el-button>
<el-button
type="text"
size="mini"
@click="() => remove(node, data)">
删除
</el-button>
</span>
|
6.2. axios
1
2
3
4
5
6
7
8
9
10
11
12
13
14
15
16
17
18
19
20
21
22
23
24
25
26
27
28
29
30
31
32
33
34
35
36
37
38
39
40
| <script>
remove(node,data){
this.$confirm('此操作将永久删除科目及子科目信息, 是否继续?', '提示', {
confirmButtonText: '确定',
cancelButtonText: '取消',
type: 'warning'
})
.then(() => {
//return 后then方法才会执行
return subject.deleteById(data.id)
})
.then(response => {
//重新所有分类
//this.getSubjectList()
//不查询数据库
this.$refs.subjectTree.remove(node)
console.log(response.data.parent)
this.$message({
type: 'success',
message: response.message
})
}).catch(response => {
//判断错误操作类别
//console.log(response)
if(response === 'cancel'){
this.$message({
type: 'info',
message: '已取消删除'
})
} else{
this.$message({
type: 'error',
message: response.message
})
}
})
}
</script>
|
6.3. subject.js
1
2
3
4
5
6
| deleteById(id){
return request({
url:`${base}/delete/`+id,
method:'delete'
})
}
|
6.4. 后端
6.4.1. EduSubjectServiceImpl
删除id科目 并删除以此id为父id的科目
1
2
3
4
5
6
7
8
9
10
11
12
13
14
15
16
17
18
19
20
| @Override
public List<Integer> deleteSubjectById(String id) {
List<Integer> returnList = new ArrayList<>();
EduSubject subject = baseMapper.selectById(id);
String parentId = subject.getParentId();
int flag1 = baseMapper.deleteById(id);
QueryWrapper<EduSubject> queryWrapper = new QueryWrapper<>();
queryWrapper.eq("parent_id",id);
int flag2 = baseMapper.delete(queryWrapper);
returnList.add(flag1);
returnList.add(flag2);
return returnList;
}
|
6.4.2. EduSubjcetController
1
2
3
4
5
6
7
8
9
| @DeleteMapping("/delete/{id}")
public R deleteSubjetId(@ApiParam("科目ID")@PathVariable String id){
List<Integer> list= eduSubjectService.deleteSubjectById(id);
if (list.get(0)>0 || list.get(1)>0){
return R.ok().message("删除成功");
}else{
return R.error().message("删除失败");
}
}
|
7. 添加分类
7.1. 前端-出现弹框
https://element.eleme.cn/#/zh-CN/component/dialog 自定义内容
dialogFormVisible 控制框的出现
1
2
3
4
5
6
7
8
9
10
11
12
13
14
15
16
17
18
19
20
21
22
23
24
25
26
27
28
29
30
31
32
33
34
35
36
37
38
39
40
41
42
43
44
45
46
47
48
49
50
51
52
53
54
55
56
57
58
59
60
61
62
| <el-button type="text" size="mini" @click="insertFirst">
添加一级分类
</el-button>
<el-dialog title="添加科目" :visible.sync="dialogFormVisible">
<el-form :model="subjectObj">
<el-form-item label="科目名称" :label-width="formLabelWidth">
<el-input v-model="subjectObj.title" autocomplete="off"></el-input>
</el-form-item>
</el-form>
<div slot="footer" class="dialog-footer">
<el-button @click="dialogFormVisible = false">取 消</el-button>
<el-button type="primary" @click="insertSubject">确 定</el-button>
</div>
</el-dialog>
<script>
export default {
data(){
return{
dialogFormVisible: false,
formLabelWidth: '120px',
subjectObj:{
title:'',
parentId: ''
}
}
},
methods:{
//获取到节点id,节点id作为新添加id的父id
append(data){
this.dialogFormVisible = true
this.subjectObj.parentId = data.id
},
//处理添加
insertSubject(){
//弹框消失
this.dialogFormVisible = false
//后端交互
subject.insertSubject(this.subjectObj)
.then(response=>{
return this.$message({
message: response.message,
type:'success'
})
}).then(()=>{
//更新页面
this.getSubjectList()
}).catch(()=>{
this.$message({
message:response.message,
type:'error'
})
})
},
//一级节点的父id为0
insertFirst(){
this.dialogFormVisible = true
this.subjectObj.parentId = '0'
}
}
</script>
|
7.2. 后端-EduSubjectServiceImpl
1
2
3
4
5
6
7
8
9
10
11
12
13
14
15
16
17
18
19
20
21
22
23
24
25
26
27
| @Override
public List<Integer> insertEduSubject(EduSubject eduSubject) {
List<Integer> list = new ArrayList<>();
QueryWrapper<EduSubject> queryWrapper = new QueryWrapper<>();
queryWrapper.eq("title",eduSubject.getTitle());
queryWrapper.eq("parent_id",eduSubject.getParentId());
List<EduSubject> subject = baseMapper.selectList(queryWrapper);
queryWrapper = new QueryWrapper<>();
queryWrapper.eq("title",eduSubject.getTitle());
queryWrapper.eq("id",eduSubject.getParentId());
List<EduSubject> subjects = baseMapper.selectList(queryWrapper);
int exists = 0;
int flag = 0;
if(subject.size()==0&&subjects.size()==0){
flag =baseMapper.insert(eduSubject);
}else{
exists=1;
}
list.add(exists);
list.add(flag);
return list;
}
|
7.3. 后端-EduSubjectController
1
2
3
4
5
6
7
8
9
10
11
12
| @PostMapping("/insert")
public R insert(@ApiParam(value = "科目信息")@RequestBody EduSubject eduSubject){
List<Integer> list= eduSubjectService.insertEduSubject(eduSubject);
if (list.get(0) >0) {
return R.error().message("当前科目分类中已存在该科目");
}
if(list.get(1)>0){
return R.ok().message("添加成功");
}else{
return R.error().message("添加失败");
}
}
|
8. 优化前端-改为拖拉上传
https://element.eleme.cn/#/zh-CN/component/upload 参考拖拽上传和用户头像上传
1
2
3
4
5
6
7
8
9
10
11
12
13
14
15
16
17
18
19
20
21
22
23
24
25
26
27
28
29
30
31
32
33
34
35
36
37
38
39
40
41
42
43
44
45
46
47
48
49
50
51
52
53
54
55
56
57
58
59
60
61
62
63
64
65
66
67
68
69
70
71
72
73
74
75
76
77
78
79
80
81
82
83
84
85
86
87
88
89
90
91
92
93
94
95
96
97
98
99
100
101
102
103
104
105
106
| <template>
<div class="app-container">
<el-form label-width="120px">
<el-form-item label="信息描述">
<el-tag type="info">excel模版说明</el-tag>
<el-tag>
<i class="el-icon-download"/>
<a href="/file/subject.xlsx" download="subject.xlsx">点击下载模版</a>
</el-tag>
</el-form-item>
<el-form-item label="选择Excel">
<!--
drag 显示拖拉框
:on-success=文件上传成功时
:on-error=文件上传失败时
:limit=最大允许上传个数
:action=上传路径
name=上传的文件字段名
:before-upload=上传文件之前的钩子,参数为上传的文件
-->
<el-upload
drag
:action="path"
limit="1"
:on-success="fileUploadSuccess"
:on-error="fileUploadError"
name="file"
:before-upload="beforeAvatarUpload"
>
<i class="el-icon-upload"></i>
<div class="el-upload__text">将文件拖到此处,或<em>点击上传</em></div>
<div class="el-upload__tip" slot="tip">只能上传xlsx文件,且不超过2MB</div>
</el-upload>
</el-form-item>
</el-form>
</div>
</template>
<script>
export default {
data(){
return{
path:'http://localhost:8080/eduservice/edu-subject/import',
}
},
created(){
},
methods:{
beforeAvatarUpload(file) {
const isxlsx = file.type === 'application/vnd.openxmlformats-officedocument.spreadsheetml.sheet';
const isLt2M = file.size / 1024 / 1024 < 2;
if (!isxlsx) {
this.$message.error('上传文件只能是 xlsx 格式!');
}
if (!isLt2M) {
this.$message.error('上传文件不能超过 2MB!');
}
return isxlsx && isLt2M;
},
//上传成功
fileUploadSuccess(response){
if(response.success === true){
this.$message({
type:'success',
message:response.message
})
}else{
//console.log(response)
const messages = response.data.msgList
//console.log(messages)
let msgStr = ''
messages.forEach(msg =>{
msgStr += `<span>${msg}</span><br/>`
})
this.$notify({
title: response.message,
dangerouslyUseHTMLString: true,
type: 'warning',
message: msgStr
})
}
this.$router.push({
path:"/subject"
})
},
//上传失败
fileUploadError(){
this.$message({
type:'error',
message: '服务器正忙,稍后再试'
})
}
}
}
</script>
|
8.1. 效果显示