Spring框架总览
1. 框架
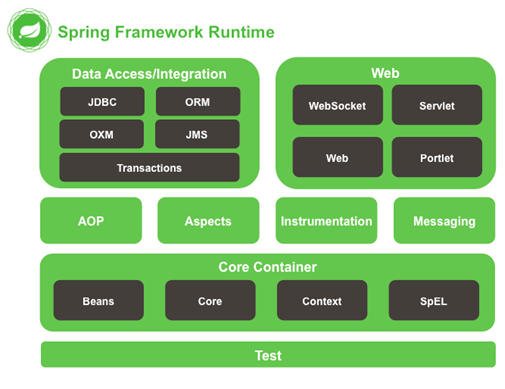
Spring当作一个 大容器
ApplicationContex接口承接所有BeanFactory功能
Test 单元测试
Core Container 核心容器。Spring启动基本条件
Beans 创建类对象并管理对象
Core 核心类
Context 上下文参数,获取外部资源或管理注解
SpEL experssion.jar
AOP AOP功能需要依赖
Aspects 切面AOP依赖包
Data Access/Integration 封装数据访问层内容
JDBC:对JDBC封装后代码
ORM 封装持久层框架代码 e.g. Hibernate
transactions 声明式事务使用
Web 完成web相关功能
2. 核心功能 2.1. IoC Inversion of Control 控制反转 IoC Inversion of Control
实例化对象转交给Spring负责,实现对象的 解耦
2.2. DI Depency Inject 依赖注入 一个类依赖于另一个类的对象时,把对象传递给需求类
2.3. AOP 面向切面编程 Aspect-Oriented Programming
在程序有纵向执行流程中,针对某一个或某一些方法 添加通知形成横切面过程,构造器无用
2.4. 声明式事务 3. 环境搭建
new -> web project
WebRoot -> WEB-INF -> lib ->导入jar包 依赖包下载
基本包
beans ,context,core,experssion,logging
在src下创建applicationContext.xml 内容最终存储在ApplicationContext容器中
spring配置文件基于schema
schema文件命名为.xsd
每次引入一个xsd文件是一个namespace
创建一个bean
User.java
1
2
3
4
5
6
7
8
9
10
11
12
13
14
15
16
17
18
19
20
21
22
package com.runaccpeted.pojo;public class User { private int id; private String name; public int getId () { return id; } public void setId (int id) { this .id = id; } public String getName () { return name; } public void setName (String name) { this .name = name; } @Override public String toString () { return "User [id=" + id + ", name=" + name + "]" ; } }
applicationContext.xml
< bean>
1
2
3
4
5
6
7
8
<?xml version="1.0" encoding="UTF-8" ?> <beans xmlns ="http://www.springframework.org/schema/beans" xmlns:xsi ="http://www.w3.org/2001/XMLSchema-instance" xsi:schemaLocation ="http://www.springframework.org/schema/beans https://www.springframework.org/schema/beans/spring-beans.xsd" > <bean id ="user" class ="com.runaccpeted.pojo.User" > </bean > </beans >
是否创建对象成功
文件被加载时对象被创建
1
2
3
4
5
6
7
8
9
10
11
12
13
14
15
16
17
18
19
20
package com.runaccpeted.test;import org.springframework.context.ApplicationContext;import org.springframework.context.support.ClassPathXmlApplicationContext;import com.runaccpeted.pojo.User;public class beanTest { public static void main (String[] args) { ApplicationContext context = new ClassPathXmlApplicationContext ("applicationContext.xml" ); User user=context.getBean(User.class); System.out.println(user.toString()); for (String str:context.getBeanDefinitionNames()){ System.out.println(str); } } }
4. 源码解析 4.1. ApplicationContext
ApplicationContext context = new ClassPathXmlApplicationContext(“applicationContext.xml”);
4.2. ClassPathXmlApplicationContext 1 2 3 4 5 6 7 8 9 10 11 12 13 public ClassPathXmlApplicationContext (String configLocation) throws BeansException { this (new String [] {configLocation}, true , null ); } public ClassPathXmlApplicationContext (String[] configLocations, boolean refresh, ApplicationContext parent) throws BeansException { super (parent); setConfigLocations(configLocations); if (refresh) { refresh(); } }
ApplicationContext初始化主要有refresh()方法实现。
在spring中,构建容器的过程都是同步的,保证线程安全性。
beanFactory是AplicationContext父接口,是spring框架中的顶级容器工厂对象,只管理bean对象。
1 2 3 4 5 6 7 8 9 10 11 12 13 14 15 16 17 18 19 20 21 22 23 24 25 26 27 28 29 30 31 32 33 34 35 36 37 38 39 40 41 42 43 44 45 46 47 48 49 50 51 52 53 54 55 56 57 58 59 60 61 62 63 64 @Override public void refresh () throws BeansException, IllegalStateException { synchronized (this .startupShutdownMonitor) { prepareRefresh(); ConfigurableListableBeanFactory beanFactory = obtainFreshBeanFactory(); prepareBeanFactory(beanFactory); try { postProcessBeanFactory(beanFactory); invokeBeanFactoryPostProcessors(beanFactory); registerBeanPostProcessors(beanFactory); initMessageSource(); initApplicationEventMulticaster(); onRefresh(); registerListeners(); finishBeanFactoryInitialization(beanFactory); finishRefresh(); } catch (BeansException ex) { logger.warn("Exception encountered during context initialization - cancelling refresh attempt" , ex); destroyBeans(); cancelRefresh(ex); throw ex; } } }
5. 创建对象三种方式 5.1. 构造方法创建
无参构造,默认
有参构造
index 参数索引,从0开始
name 参数名
value 参数赋值
type 参数类型 基本数据类型不同于其包装类
ref 其他对象
1 2 3 4 <bean id ="user" class ="com.runaccpeted.pojo.User" > <constructor-arg index ="0" name ="id" type ="int" value ="123" > </constructor-arg > <constructor-arg index ="1" name ="name" type ="java.lang.String" value ="a" > </constructor-arg > </bean >
工厂设计模式,一个工厂生产多个对象
5.2. 实例工厂 先创建工厂对象,再创建对象
1
2
3
4
5
6
7
8
9
10
package com.runaccpeted.factory;import com.runaccpeted.pojo.User;public class UserFactory { public User newInstance () { return new User (); } }
配置工厂对象
1 2 <bean id ="factory" class ="com.runaccpeted.factory.UserFactory" > </bean > <bean id ="user" factory-bean ="factory" factory-method ="newInstance" > </bean >
5.3. 静态工厂 不需要创建工厂对象 直接调用factory.newInstance()
1
2
3
4
5
6
7
8
9
10
package com.runaccpeted.factory;import com.runaccpeted.pojo.User;public class UserFactory { public static User newInstance () { return new User (); } }
不需要创建对象bean
1 <bean id ="user" class ="com.runaccpeted.factory.UserFactory" factory-method ="newInstance" > </bean >
6. bean赋值 6.1. 设值注入-set/get方法 1 2 3 4 <bean id ="user" class ="com.runaccpeted.pojo.User" > <property name ="id" value ="1" > </property > <property name ="name" value ="A" > </property > </bean >
等价于
1 2 3 4 5 <bean id ="user" class ="com.runaccpeted.pojo.User" > <property name ="id" > <value > 1</value > </property > </bean >
6.2. 当属性有set时 1 2 3 4 5 6 7 8 <bean id ="user" class ="com.runaccpeted.pojo.User" > <property name ="set" > <set > <value > 1</value > <value > 2</value > </set > </property > </bean >
6.3. 当属性有list时 1 2 3 4 5 6 7 private List<String> list;public List<String> getList () { return list; } public void setList (List<String> list) { this .list = list; }
注入
1 2 3 4 5 6 7 8 <property name ="list" > <list > <value > "A"</value > <value > "B"</value > <value > "C"</value > <value > "D"</value > </list > </property >
6.4. map 1 2 3 4 5 6 7 <property name ="map" > <map > <entry key ="1" value ="A" > </entry > <entry key ="2" value ="B" > </entry > <entry key ="3" value ="C" > </entry > </map > </property >
6.5. properties 1 2 3 4 5 <property name ="demo" > <props > <prop key ="login.id" > value</prop > </props > </property >
7. bean的scope属性 bean默认为单例模式singleton,整个应用中存在一个对象
1 <bean id ="user" class ="com.runaccpeted.pojo.User" scope =".." > </bean >
singleton 单例
prototype 多例
request 每次请求
session 每个会话
8. 整合MyBatis mybatis-spring-1.3.1.jar
mysql-connector-java-8.0.11.jar
spring-jdbc-4.1.6.RELEASE.jar
spring-tx-4.1.6.RELEASE.jar
mybatis-3.5.0
8.1. db.properties 1 2 3 4 jdbc.driver =com.mysql.cj.jdbc.Driver jdbc.url =jdbc:mysql://localhost:3306/login?useSSL=false jdbc.username =root jdbc.password =mysql123//
8.2. applicationContext.xml 1 2 3 4 5 6 7 8 9 10 11 12 13 14 15 16 17 18 19 20 21 22 23 <context:property-placeholder location ="classpath:db.properties" /> <bean id ="dataSource" class ="org.springframework.jdbc.datasource.DriverManagerDataSource" > <property name ="driverClassName" value ="${jdbc.driver}" > </property > <property name ="url" value ="${jdbc.url}" > </property > <property name ="username" value ="${jdbc.username}" > </property > <property name ="password" value ="${jdbc.password}" > </property > </bean > <bean id ="factory" class ="org.mybatis.spring.SqlSessionFactoryBean" > <property name ="dataSource" ref ="dataSource" > </property > </bean > <bean class ="org.mybatis.spring.mapper.MapperScannerConfigurer" > <property name ="basePackage" value ="com.runaccpeted.mapper" > </property > <property name ="sqlSessionFactoryBeanName" value ="factory" > </property > </bean > <bean id ="userService" class ="com.runaccpeted.service.Impl.UserServiceImpl" > <property name ="userMapper" ref ="userMapper" > </property > </bean >
1 2 3 4 5 6 7 8 9 10 11 12 package com.runaccpeted.mapper;import java.util.List;import org.apache.ibatis.annotations.Select;import com.runaccpeted.pojo.User;public interface UserMapper { @Select("select * from user") List<User> selAll () ; }
8.4. 用于service中 1 2 3 4 5 6 7 8 9 10 11 12 13 14 15 16 17 18 19 20 package com.runaccpeted.service.Impl;import java.util.List;import com.runaccpeted.mapper.UserMapper;import com.runaccpeted.pojo.User;import com.runaccpeted.service.UserSrevice;public class UserServiceImpl implements UserSrevice { private UserMapper userMapper; public UserMapper getUserMapper () { return userMapper; } public void setUserMapper (UserMapper userMapper) { this .userMapper = userMapper; } public List<User> selectAll () { return userMapper.selAll(); } }
8.5. 测试 1 2 3 4 5 6 7 ApplicationContext context = new ClassPathXmlApplicationContext ("applicationContext.xml" ); UserServiceImpl service = context.getBean(UserServiceImpl.class);List<User> user= service.selectAll(); for (User u:user){ System.out.println(u); }
输出
1 2 3 4 5 6 7 8 9 10 dataSource factory org.mybatis.spring.mapper.MapperScannerConfigurer#0 userMapper org.springframework.context.annotation.internalConfigurationAnnotationProcessor org.springframework.context.annotation.internalAutowiredAnnotationProcessor org.springframework.context.annotation.internalRequiredAnnotationProcessor org.springframework.context.annotation.internalCommonAnnotationProcessor org.springframework.context.annotation.ConfigurationClassPostProcessor.importAwareProcessor org.springframework.context.annotation.ConfigurationClassPostProcessor.enhancedConfigurationProcessor
8.6. 部署到tomcat web.xml
1 2 3 4 5 6 7 8 9 10 11 12 13 14 <?xml version="1.0" encoding="UTF-8" ?> <web-app version ="3.0" xmlns ="http://java.sun.com/xml/ns/javaee" xmlns:xsi ="http://www.w3.org/2001/XMLSchema-instance" xsi:schemaLocation ="http://xmlns.jcp.org/xml/ns/javaee http://java.sun.com/xml/ns/javaee/web-app_3_0.xsd" > <context-param > <param-name > contextConfigLocation</param-name > <param-value > classpath:applicationContext.xml</param-value > </context-param > <listener > <listener-class > org.springframework.web.context.ContextLoaderListener</listener-class > </listener > </web-app >
应用到servlet
使用WebApplicationContextUtils.getRequiredWebApplicationContext(ServletContext);
得到ApplicationContext
1 2 3 4 5 6 7 8 9 10 11 12 13 14 15 16 17 18 19 20 21 @WebServlet("/show") public class ListServlet extends HttpServlet { private UserService service; @Override public void init (ServletConfig config) throws ServletException { ServletContext sc = config.getServletContext(); WebApplicationContext ac=WebApplicationContextUtils.getRequiredWebApplicationContext(sc); service=ac.getBean(UserServiceImpl.class); } @Override protected void service (HttpServletRequest req, HttpServletResponse resp) throws ServletException, IOException { req.setCharacterEncoding("utf-8" ); resp.setContentType("text/html;charset=utf-8" ); req.setAttribute("list" ,service.selAll()); req.getRequestDispatcher("show.jsp" ).forward(req, resp); } }
show.jsp
1 2 3 4 5 6 7 8 9 10 11 12 13 14 15 16 17 18 <%@ page language="java" contentType="text/html; charset=UTF-8" import ="com.runaccpeted.pojo.*" pageEncoding="UTF-8" %> <%@taglib prefix="c" uri="http://java.sun.com/jsp/jstl/core" %> <!DOCTYPE html> <html> <head> <meta charset="UTF-8" > <title>Insert title here</title> </head> <body> <c:forEach items="${list }" var ="user" > <c:out value="${user.id }" ></c:out> <c:out value="${user.username }" ></c:out> <c:out value="${user.password }" ></c:out> <br> </c:forEach> </body> </html>
9. AOP 9.1. schema-based 每个通知对应一个bean 实现接口
在aop:config中配置aop:advisor
9.1.1. 前置通知 MethodBeforeAdvice before - MethodBeforeAdvice接口
Method m 方法对象– public void com.runaccpeted.pojo.User.method()
Object[] obj1切点方法参数
Object obj 方法所在对象 User
1 2 3 4 5 6 7 8 9 10 11 package com.runaccpeted.aspect;import java.lang.reflect.Method;import org.springframework.aop.MethodBeforeAdvice;public class Before implements MethodBeforeAdvice { public void before (Method m, Object[] obj1, Object obj) throws Throwable{ System.out.println("构建方法前" ); } }
9.1.2. 后置通知 AfterReturningAdvice after-AfterReturningAdvice接口
Object returnobj返回值
Method m方法对象
Object[] obj2 方法参数
Object obj 方法所在对象
1 2 3 4 5 6 public class After implements AfterReturningAdvice { public void afterReturning (Object returnobj, Method m, Object[] obj2, Object obj) throws Throwable { System.out.println("方法执行后" ); } }
9.1.3. 异常通知 ThrowsAdvice ThrowsAdvice仅为一个标记,无任何方法
1 2 3 4 5 6 7 8 9 import org.springframework.aop.ThrowsAdvice;public class myThrow implements ThrowsAdvice { public void afterThrowing (Exception e) { System.out.println(e.getMessage()); } }
9.1.4. 环绕通知 MethodInterceptor around – MethodInterceptor接口
1 2 3 4 5 6 7 public class Around implements MethodInterceptor { public Object invoke (MethodInvocation m) throws Throwable { return m.proceed(); } }
9.1.5. applicationContext.xml execution(* com.runaccpeted.pojo.User.method(..) )针对User类中method方法,不限参数,不限返回值
1 2 3 4 5 6 7 8 9 10 11 12 13 14 15 16 17 18 19 20 21 22 23 <?xml version="1.0" encoding="UTF-8" ?> <beans xmlns ="http://www.springframework.org/schema/beans" xmlns:xsi ="http://www.w3.org/2001/XMLSchema-instance" xmlns:aop ="http://www.springframework.org/schema/aop" xsi:schemaLocation ="http://www.springframework.org/schema/beans https://www.springframework.org/schema/beans/spring-beans.xsd http://www.springframework.org/schema/aop http://www.springframework.org/schema/aop/spring-aop.xsd " > <bean id ="before" class ="com.runaccpeted.aspect.Before" > </bean > <bean id ="after" class ="com.runaccpeted.aspect.After" > </bean > <bean id ="throw" class ="com.runaccpeted.aspect.myThrow" > </bean > <bean id ="around" class ="com.runaccpeted.aspect.Around" > </bean > <aop:config > <aop:pointcut expression ="execution(* com.runaccpeted.pojo.User.method(..))" id ="performance" /> <aop:advisor advice-ref ="before" pointcut-ref ="performance" /> <aop:advisor advice-ref ="after" pointcut-ref ="performance" /> <aop:advisor advice-ref ="throw" pointcut-ref ="performance" /> <aop:advisor advice-ref ="around" pointcut-ref ="performance" /> </aop:config > <bean id ="user" class ="com.runaccpeted.pojo.User" > </bean > </beans >
9.2. AspectJ 在aop:config中配置aop:aspect
普通类
1 2 3 4 5 6 7 8 9 10 11 package com.runaccpeted.aspect;public class Advice { public void before () { System.out.println("构建方法前" ); } public void after () { System.out.println("构建方法后" ); } }
applicationContext.xml
类–>切面 <aop:aspect ref=”aop”>
9.2.1. 前/后置通知 <aop:before method=”before” />对应before方法
1 2 3 4 5 6 7 8 9 10 11 12 <aop:aspectj-autoproxy proxy-target-class ="true" > </aop:aspectj-autoproxy > <bean id ="aop" class ="com.runaccpeted.aspect.Advice" > </bean > <aop:config > <aop:aspect ref ="aop" > <aop:pointcut expression ="execution(* com.runaccpeted.pojo.User.method(..))" id ="performance" /> <aop:before method ="before" pointcut-ref ="performance" /> <aop:after method ="after" pointcut-ref ="performance" /> <aop:after-returning method ="afterReturn" pointcut-ref ="performance" /> </aop:aspect > </aop:config >
9.2.2. 异常通知 当异常在原方法中被try-catch捕获时,异常通知不出现
<aop:after-throwing method=”throwing” pointcut-ref=”performance”/>
输出异常信息 throwing=”e”
1 <aop:after-throwing method ="throwing" pointcut-ref ="performance" throwing ="e" />
1 2 3 public void throwing (Exception e) { System.out.println("出错了" +e.getMessage()); }
1 2 3 4 public void method () throws Exception{ int a = 3 /0 ; System.out.println("方法" ); }
9.2.3. 环绕通知 <aop:around >
1 <aop:around method ="around" pointcut-ref ="performance" />
方法
1 2 3 4 5 6 7 8 9 public void around (ProceedingJoinPoint p) { System.out.println("前" ); try { p.proceed(); } catch (Throwable e) { e.printStackTrace(); } System.out.println("后" ); }
10. 自动注入autowire 自动查找所有装配了的bean,当类调用其他类时,bean ID存在则自动注入对象
no 不注入
byName 跟bean id值相同
byType 跟bean id类型相同
default 跟全局default-autowire同步
constructor 构造方法注入,底层使用byName
1 <bean id ="user" class ="com.runaccpeted.pojo.User" autowire ="default" >
11. 加载properties 文件 在src下新建db.properties
1 2 3 4 jdbc.driver =com.mysql.cj.jdbc.Driver jdbc.url =jdbc:mysql://localhost:3306/login?useSSL=false jdbc.username =root jdbc.password =mysql123//
applicationContext.xml
引入xmlns:context,加载db文件
1 <context:property-placeholder location ="classpath:db.properties" />
取数据${login.id}
1 2 3 4 5 6 7 8 9 <context:property-placeholder location ="classpath:db.properties" /> <bean id ="user" class ="com.runaccpeted.pojo.User" > <property name ="id" value ="${login.id}" > </property > </bean >
bean 装配 org.springframework.context.support.PropertySourcesPlaceholderConfigurer#0
11.1. 注解方式 加载文件
1 <context:property-placeholder location ="classpath:db.properties,classpath:param.properties" />
成员变量添加注解
1 2 3 import org.springframework.beans.factory.annotation.Value;@Value("${param.name}") private String name;
注册注解
1 <context:component-scan base-package ="com.runaccpeted.service.Impl" > </context:component-scan >
12. 声明式事务
主要针对ServiceImp类
事务管理器基于通知advice
管理的是与数据库的交互 – dataSource
1 2 3 4 5 6 7 8 9 10 11 12 13 14 15 16 17 18 19 20 21 <context:property-placeholder location ="classpath:db.properties,classpath:param.properties" /> <bean id ="dataSource" class ="org.springframework.jdbc.datasource.DriverManagerDataSource" scope ="" > <property name ="driverClassName" value ="${jdbc.driver}" > </property > <property name ="url" value ="${jdbc.url}" > </property > <property name ="username" value ="${jdbc.username}" > </property > <property name ="password" value ="${jdbc.password}" > </property > </bean > <bean id ="factory" class ="org.mybatis.spring.SqlSessionFactoryBean" > <property name ="dataSource" ref ="dataSource" > </property > <property name ="" > </property > </bean > <bean class ="org.mybatis.spring.mapper.MapperScannerConfigurer" > <property name ="basePackage" value ="com.runaccpeted.mapper" > </property > <property name ="sqlSessionFactoryBeanName" value ="factory" > </property > </bean >
事务声明
1 2 3 4 <bean id ="transactionManager" class ="org.springframework.jdbc.datasource.DataSourceTransactionManager" > <property name ="dataSource" ref ="dataSource" > </property > </bean >
针对aop
1 2 3 4 5 6 7 8 9 10 11 12 13 14 15 16 17 18 19 20 21 22 23 24 25 <tx:advice id ="txAdvice" transaction-manager ="transactionManager" > <tx:attributes > <tx:method name ="ins*" /> <tx:method name ="upd*" /> <tx:method name ="del*" /> <tx:method name ="*" readonly ="true" /> </tx:attributes > </tx:advice > <bean id ="aop" class ="com.runaccpeted.aspect.Advice" > </bean > <aop:config > <aop:aspect ref ="aop" > <aop:pointcut expression ="execution(* com.runaccpeted.service.Impl.*(..))" id ="performance" /> <aop:before method ="before" pointcut-ref ="performance" /> <aop:after method ="after" pointcut-ref ="performance" /> <aop:after-throwing method ="throwing" pointcut-ref ="performance" throwing ="e" /> <aop:around method ="around" pointcut-ref ="performance" /> </aop:aspect > <aop:advisor advice-ref ="txAdvice" pointcut-ref ="performance" /> </aop:config >
12.1. tx:method 12.1.1. name 需要事务控制的方法名
12.1.2. read-only=”true” 只读事务,优化数据库查找效率
false 事务需要提交
12.1.3. propagation 当一个具有事务控制的方法被另一个有事务控制的方法调用时,需要如何管理事务(新增事务,在事务中执行,挂起事务,报异常)
REQUIRED 当前有事务,在事务中执行,当前没有事务,新建事务
SUPPORTS 当前有事务,在事务中执行,当前没有事务,非事务状态下执行
MANDATORY 必须在事务内部执行,当前有事务,在事务中执行,当前没有事务,报错
REQUIRES_NEW 必须在事务内部执行,当前有事务,将事务挂起,当前没有事务,新建事务
NOT_SUPPORTED 必须在非事务下执行,当前有事务,将事务挂起,当前没有事务,正常执行
NEVER 必须在非事务下执行,当前有事务,报错,当前没有事务,正常执行
NESTED 必须在事务下执行,当前有事务,将创建一个嵌套事务,当前没有事务,新建事务
isolation 事务隔离级别
多线程或并发访问下如何保证访问到数据具有完整性
脏读
一个事务读取另一个事务中未提交的事务中数据可能进行了改变,此时事务读取的数据可能和数据库中数据是不一致的,此时认为数据是脏数据,读取脏数据的过程叫脏读
不可重复读
针对某行数据
针对操作修改操作
事务第一次读取,另一个事务对事务读取的数据进行了修改,事务再次读取的数据和之前读取的数据不一致,过程不可重复读
幻读
针对新增,删除
两次事务结果
事务按照特定条件查询结果,另一个事务新增数据,导致查询数据不一致,事务出现幻读
DEFAULT 由底层数据库自动判断应该使用什么隔离界别
READ_UNCOMMITTED 读取未提交数据,可能出现脏读,不重复读,幻读,效率最高
READ_COMMITTED 只能读取其他事务已提交的事务,可以防止脏读,可能出现不可重复读和幻读
REPEATABLE_READ 读取的数据被添加锁,防止其他事务修改此数据,防止不可重复读,脏读,可能出现幻读
SERIALIZABLE 排队操作,对整个表添加锁,一个事务在操作数据时,另一个事务等待事务操作完成后才能操作这个表,最安全,效率最低
12.1.4. rollback-for 异常类型全限定路径
出现什么异常时需要进行回滚
手动抛异常时需要添加该属性
12.1.5. no-rollback-for 出现什么异常时不需要进行回滚
12.1.6. timeout=”-1” 13. 注解 13.1. @Component 创建类对象,相当于bean
13.2. @Service 写在ServiceImpl类上 ,相当于@Component
13.3. @Repository 写在数据访问层上,相当于@Component
13.4. @Controller 写在控制器上,相当于@Component @Controller
13.5. @Resource 不需要写set/get
java中的注解
默认按照byName注入,如果没有名称对象,按照byType注入
13.6. @Autowired 不需要写set/get
spring注解
默认按照byType注入
13.7. @Value 获取properties中的值
13.8. @Aspect @Pointcut
@Before
@After
@AfterReturning
@Around
@AfterThrowing
14. ajax – jquery 1 2 response.setContentType("text/html;charset=UTF-8" ); response.getWriter().write("hello" );
14.1. $.ajax() data 参数
dataType 响应返回类型
success 响应返回数据 –> hello
type 请求方式
1 2 3 4 5 6 7 8 9 10 11 12 13 14 15 16 17 18 19 20 21 <script type ="text/javascript" src ="js/jquery.min.js" > </script > <script type ="text/javascript" > $(function ( $("a" ).click (function ( $.ajax ({ url :'./list' , data :{"name" :"张三" }, dataType :'html' , error :function (data ){ }, success :function (data ){ alert (data); }, type :'POST' }) return false ; }) }); </script > <a href ="./list" > 点击</a >
14.2. $.get() $.get(url,data,success,dataType);
1 2 3 $.get ('./list' ,{"name" :"张三" },function (data ){ alert (data); },'html' );
14.3. $.post() $.post(url,data,success,dataType);
1 2 3 $.post ('./list' ,{"name" :"张三" },function (data ){ alert (data); },'html' );
14.4. $.getJSON() $.getJSON(url,data,success)
相当于$.get的dataType为json
14.5. $.getScript() $.getScript(url,data,success)
相当于$.get的dataType为script
15. JSON jackson-annotations的,往下拉找到Downloads就有jar包下载了
https://github.com/FasterXML/jackson-annotations/wiki
jackson-datahind的,往下拉找到Non-Maven
https://github.com/FasterXML/jackson-databind
core的,往下拉找到Non-Maven
https://github.com/FasterXML/jackson-core
15.1. jsonObject 1 2 3 4 { "key" : value, "key:value" }
15.2. jsonArray 1 2 3 4 [ { "key" : value, "key" : value } ]
15.3. 实例 1 2 3 4 5 6 7 8 9 10 11 12 13 14 15 16 17 import com.fasterxml.jackson.databind.ObjectMapper;try { User user = new User (); user.setId(1 ); user.setUsername("abc" ); user.setPassword("123" ); ObjectMapper mapper = new ObjectMapper (); String result=mapper.writeValueAsString(user); System.out.println(result); } catch (JsonProcessingException e) { e.printStackTrace(); }
应用于服务器
1 2 3 4 5 6 7 8 9 10 11 12 response.setContentType("application/json;charset=UTF-8" ); ObjectMapper mapper = new ObjectMapper ();String result=null ; try { result=mapper.writeValueAsString(userService.selectAll()); } catch (JsonProcessingException e) { e.printStackTrace(); } response.getWriter().write(result);
ajax
1 2 3 4 5 $.post ('./list' ,{"name" :"张三" },function (data ){ for (var i=0 ;i<data.length ;i++){ alert (data[i].id +" " +data[i].username +" " +data[i].password ); } },"json" );