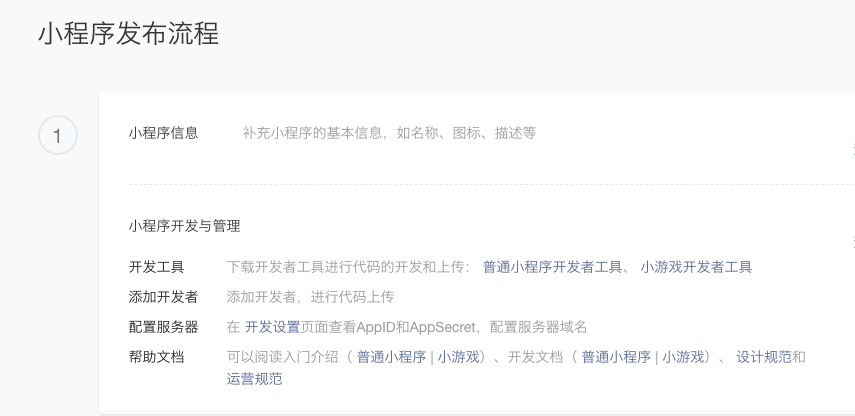
共享单车程序开发及数据采集
1. 注册微信小程序
https://mp.weixin.qq.com/
最重要的是知道AppID(小程序ID)
2. 开发者工具下载
https://developers.weixin.qq.com/miniprogram/dev/devtools/download.html
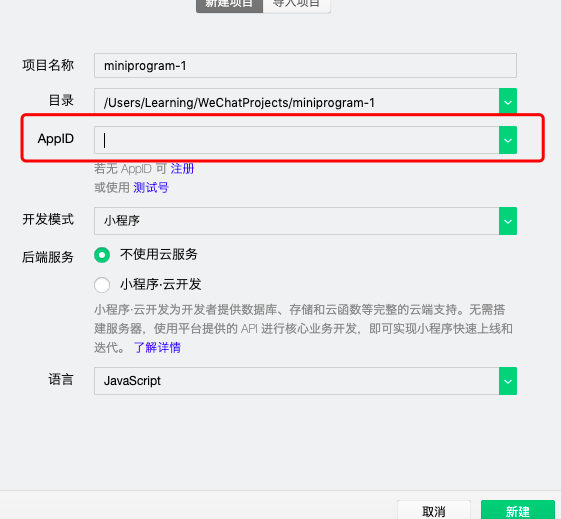
3. 项目结构
1
2
3
4
5
6
7
8
9
10
11
12
13
| ├── app.js
├── app.json
├── app.wxss
├── pages
│ │── index
│ │ ├── index.wxml html
│ │ ├── index.js js
│ │ ├── index.json
│ │ └── index.wxss css
│ └── logs
│ ├── logs.wxml
│ └── logs.js
└── utils
|
4. 显示地图
https://developers.weixin.qq.com/miniprogram/dev/component/map.html
| 属性 |
说明 |
| id |
map主键标识 |
| longitude |
中心经度 |
| latitude |
中心纬度 |
| controls |
页面控件,扫码登录等图标位置 |
| show-location |
显示带有方向的当前定位点 |
| bindcontroltap |
点击控件时触发 |
| scale |
缩放级别,取值范围为3-20 |
| markers |
标记点,显示附近车辆 |
| bindregionchange |
视野发生变化时触发 |
| style |
整个map大小 |
5. 生命周期
onload 监听页面加载
onReady 监听页面初次渲染完成
6. 获取设备定位
允许设备取值
在app.json
“page”下 添加
1
2
3
4
5
6
7
| "pages": [
],
"permission":{
"scope.userLocation": {
"desc": "您的位置将用于车辆查询"
}
},
|
index.wxml
longitude,longitude的值从js内获取
1
2
3
4
5
6
7
8
| <map
id="mymap"
longitude='{{longitude}}'
latitude='{{longitude}}'
show-location="true"
scale="17"
style='width:100%;height:100%'>
</map>
|
index.js
获取当前设备信息
wx.getLocation()
获取成功后调用,res中存储了定位信息
1
| success: function(res) {}
|
将值设置为页面全局变量
1
2
3
4
| that.setData({
longitude:long,
latitude:lat
})
|
整合代码
1
2
3
4
5
6
7
8
9
10
11
12
13
14
15
16
17
18
19
20
21
22
23
24
25
| Page({
data: {
longitude: 0,
latitude: 0,
},
onLoad: function () {
var that =this;
wx.getLocation({
success: function(res) {
var long=res.longitude;
var lat = res.latitude;
that.setData({
     longitude:long,
     latitude:lat
 })
},
})
}
})
|
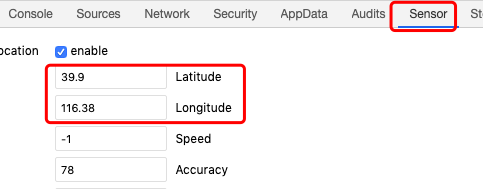
模拟器无法定位,模拟定位
在线查找经纬度 http://www.gpsspg.com/maps.htm
7. 添加事件
7.1. 添加图片
1
| <map controls='{{controls}}'></map>
|
wx.getSystemInfo 获取设备信息,成功返回res数据
1
2
3
4
| wx.getSystemInfo({
success: function(res) {
},
})
|
通过屏幕宽和高相对摆放组件
1
2
3
4
5
6
7
8
9
10
11
12
13
14
15
16
17
18
19
20
21
22
23
24
25
26
27
28
29
30
31
32
| that.setData({
controls: [
{
id: 1,
iconPath: '/images/lock.png',
position: {
width: 100,
height: 50,
left: width/2-50,
top: height-60
},
clickable:true
},
{
id: 2,
iconPath: '/images/pay.png',
position: {
width: 35,
height: 35,
left: width - 40,
top: height - 100
},
clickable: true
}
]
})
|
整合代码
1
2
3
4
5
6
7
8
9
10
11
12
13
14
15
16
17
18
19
20
21
22
23
24
25
26
27
28
29
30
31
32
33
34
35
36
37
38
39
40
41
42
43
44
45
46
47
48
49
50
51
52
53
54
55
56
57
58
59
60
61
62
63
64
65
66
67
68
69
70
71
72
73
74
75
76
77
78
79
80
81
82
83
84
85
86
87
88
89
90
91
92
93
94
95
96
97
98
99
100
101
102
103
104
105
106
| Page({
data: {
longitude: 0,
latitude: 0,
controls:[],
},
onLoad: function () {
var that =this;
wx.getLocation({
success: function(res) {
var long=res.longitude;
var lat = res.latitude;
that.setData({
longitude:long,
latitude:lat
})
},
})
wx.getSystemInfo({
success: function(res) {
var width=res.windowWidth;
var height=res.windowHeight;
that.setData({
controls: [
{
id: 1,
iconPath: '/images/lock.png',
position: {
width: 100,
height: 50,
left: width/2-50,
top: height-60
},
clickable:true
},
{
id: 2,
iconPath: '/images/pay.png',
position: {
width: 35,
height: 35,
left: width - 40,
top: height - 100
},
clickable: true
},
{
id: 3,
iconPath: '/images/warn.png',
position: {
width: 35,
height: 35,
left: width - 40,
top: height - 60
},
clickable: true
},
{
id: 4,
iconPath: '/images/locate.png',
position: {
width: 35,
height: 35,
left: width/30,
top: height - 60
},
clickable: true
},
{
id: 5,
iconPath: '/images/cur.png',
position: {
width: 23,
height: 40,
left: width / 2 -12,
top: height /2 - 40
},
},
{
id: 6,
iconPath: '/images/add.png',
position: {
width: 35,
height: 35,
left: width / 30,
top: height / 30
},
clickable: true
}]
})
},
})
}
})
|
整体显示
7.2. 绑定事件
1
| <map bindcontroltap="controltap"></map>
|
controltap定义为一个函数
e 返回点击事件数据
1
2
3
4
5
6
7
8
9
10
11
12
13
14
15
16
17
18
19
20
21
22
23
24
25
26
27
28
29
30
31
| page({
onload:funtion(){
this.mapCtx=wx.createMapContext("mymap");
},
controltap: function(e){
var that = this;
var id = e.controlId;
switch(id){
case 1:{
break;
}
case 4:{
this.mapCtx.moveToLocation();
break;
}
case 6:
{
break;
}
}
}
})
|
7.3. 点击事件实现
wx.navigateTo({ })
当点击扫码开锁时扫码
在线制作二维码https://www.liantu.com/
事件 wx.scanCode({})
成功时返回二维码内容
1
2
3
| success:function(e){
console.log(e.result);
}
|
实现
1
2
3
4
5
6
7
8
9
10
11
12
13
14
15
16
17
18
19
20
21
22
23
24
25
| controltap: function(e){
var that = this;
var id = e.controlId;
switch(id){
case 1:{
wx.scanCode({
success:function(e){
console.log(e.result);
}
})
break;
}
case 4:{
this.mapCtx.moveToLocation()
break;
}
case 6:
{
break;
}
}
}
|
8. SpringBoot
https://start.spring.io/
9. 设置全局数值
app.js中的方法,值是所有页面共享的
设置status,用于定位用户状态
status:0-未注册,1-未支付,2-未实名 ,3-开始用车
1
2
3
4
5
6
7
8
9
10
| App({
onLaunch: function () {
},
globalData: {
userInfo: null,
status:0
}
})
|
页面获取全局数据
1
| var status=this.getApp().globalData.status;
|
10. 注册页面
10.1. 添加注册页面
不需要手动添加
app.json中添加register页面,保存,自动生成
这里的顺序即为页面调用顺序
1
2
3
4
5
| "pages": [
"pages/index/index",
"pages/register/register",
"pages/logs/logs"
],
|
当status=0跳转到注册页面
wx.navigateTo()
1
2
3
4
5
| if(status==0){
wx.navigateTo({
url: '../register/register',
})
}
|
10.2. 实现手机绑定
手机国际区号选择
picker
bindchange=”bindCountryCodeChange”
value=”“
range=”
显示
后台数据
data: {
countryCodes: [“86”, “80”, “84”, “87”],
countryCodeIndex: 0,
},
1
2
3
4
| <picker bindchange="bindCountryCodeChange" value="{{countryCodeIndex}}" range="{{countryCodes}}">
<view class="weui-select">{{countryCodes[countryCodeIndex]}} </view>
</picker>
|
点击事件
1
2
3
4
5
6
| bindCountryCodeChange: function (e) {
this.setData({
countryCodeIndex: e.detail.value
})
},
|
填写手机号
绑定输入事件,获取输入内容
bindinput
1
| <input class="weui-input" name="phoneNum" placeholder="请输入手机号码" bindinput="inputPhoneNum"/>
|
获取
1
2
3
4
5
6
7
8
9
| data: {
phoneNum: ""
},
inputPhoneNum: function (e) {
this.setData({
phoneNum: e.detail.value
})
},
|
获取验证码点击事件
1
| <view class="weui-vcode-btn" bindtap="genVerifyCode">获取验证码</view>
|
10.2.1. 连接服务器
wx.request({})
url 请求地址
data 请求参数
method 请求方式
sunccess 响应数据
1
2
3
4
5
6
7
8
9
10
11
12
13
14
15
16
17
18
19
20
21
22
| genVerifyCode: function () {
var index = this.data.countryCodeIndex;
var countryCode = this.data.countryCodes[index];
var phoneNum = this.data.phoneNum;
wx.request({
url: "http://localhost:8080/user/genCode",
data: {
countryCode: countryCode,
phoneNum: phoneNum
},
method: 'GET',
success: function (res) {
wx.showToast({
title: '已发送,请查收!',
duration: 2000
})
}
})
},
|
点击获取验证码,
查看Console 虽然错误但得到一个请求URLhttp://localhost:8080/user/genCode?countryCode=86&phoneNum=123
10.2.2. SpringBoot–redis
采用redis存储数据,实现只存在3分钟
创建UserController.java 接收区号和手机号,使其返回json类型的数据
1
2
3
4
5
6
7
8
9
10
11
12
13
14
15
16
17
18
19
20
21
22
23
24
25
| package com.runaccpeted.controller;
import javax.annotation.Resource;
import org.springframework.stereotype.Controller;
import org.springframework.web.bind.annotation.RequestMapping;
import org.springframework.web.bind.annotation.ResponseBody;
import com.runaccpeted.service.UserService;
@Controller
@RequestMapping("/user")
public class UserController {
@Resource
UserService service;
@RequestMapping("/genCode")
@ResponseBody
public String genCode(String countryCode,String phoneNum){
String code=service.register(countryCode,phoneNum);
return code;
}
}
|
对应创建UserService接口 进行操作
1
2
3
4
5
6
7
| package com.runaccpeted.service;
public interface UserService {
String register(String countryCode, String phoneNum);
}
|
创建具体实现类
1
2
3
4
5
6
7
8
9
10
11
12
13
14
15
16
17
18
19
20
| package com.runaccpeted.service.impl;
import javax.annotation.Resource;
import org.springframework.stereotype.Service;
import com.runaccpeted.dao.UserDao;
import com.runaccpeted.service.UserService;
@Service
public class UserServiceImpl implements UserService {
@Resource
UserDao dao;
@Override
public String register(String countryCode, String phoneNum) {
return dao.register(countryCode,phoneNum);
}
}
|
对应数据库dao层,对接数据库
需要添加redis依赖
1
2
3
4
5
|
<dependency>
<groupId>org.springframework.boot</groupId>
<artifactId>spring-boot-starter-data-redis</artifactId>
</dependency>
|
配置redis
1
2
3
4
5
6
7
8
9
10
11
12
|
spring.redis.host=192.168.0.101 #本地IP
spring.redis.port=6379
spring.redis.pool.max-active=20
spring-redis.pool.max-idle=10
spring-redis.pool.min-idle=10
spring-redis.pool.max-wait=-1
|
10.2.3. 腾讯云短信服务
https://console.cloud.tencent.com/smsv2
需要实名认证! 没上线怎么认证,又不是企业
记录SpringBoot操作流程
https://cloud.tencent.com/document/product/382/13613
添加依赖
1
2
3
4
5
6
|
<dependency>
<groupId>com.github.qcloudsms</groupId>
<artifactId>qcloudsms</artifactId>
<version>1.0.6</version>
</dependency>
|
使用
将appid,appkey永久存入redis中
1
2
3
4
5
6
7
8
9
10
11
12
13
14
15
16
17
18
19
20
21
22
23
24
25
26
27
28
29
30
31
32
33
34
35
36
37
38
39
40
41
42
43
44
45
46
47
48
49
50
51
52
| package com.runaccpeted.dao;
import java.io.IOException;
import java.util.concurrent.TimeUnit;
import org.json.JSONException;
import org.springframework.beans.factory.annotation.Autowired;
import org.springframework.data.redis.core.StringRedisTemplate;
import org.springframework.stereotype.Component;
import com.github.qcloudsms.SmsSingleSender;
import com.github.qcloudsms.SmsSingleSenderResult;
import com.github.qcloudsms.httpclient.HTTPException;
@Component
public class UserDao {
@Autowired
private StringRedisTemplate redisTemplate;
public boolean register(String countryCode, String phoneNum) {
int appid = Integer.parseInt(redisTemplate.opsForValue().get("appid"));
String appkey = redisTemplate.opsForValue().get("appkey");
boolean flag=true;
String code="";
for(int i=0;i<4;i++){
code+=(int)(Math.random()*10)+"";
}
redisTemplate.opsForValue().set(phoneNum, code, 300,TimeUnit.SECONDS);
SmsSingleSender ssender = new SmsSingleSender(appid, appkey);
try {
SmsSingleSenderResult result = ssender.send(0, countryCode, phoneNum, "您的登陆验证码为"+code, "", "");
redisTemplate.opsForValue().set(phoneNum, code, 300,TimeUnit.SECONDS);
} catch (HTTPException | JSONException | IOException e) {
flag=false;
e.printStackTrace();
}
return flag;
}
}
|
。。。没认证手机是收不到的。。。

10.2.4. 不调用腾讯云短信服务
随机生成四位数字,充当验证码
1
2
3
4
5
6
7
8
9
10
11
12
13
14
15
16
17
18
19
20
21
22
23
24
25
26
27
28
29
30
31
| package com.runaccpeted.dao;
import java.io.IOException;
import java.util.concurrent.TimeUnit;
import org.json.JSONException;
import org.springframework.beans.factory.annotation.Autowired;
import org.springframework.data.redis.core.StringRedisTemplate;
import org.springframework.stereotype.Component;
import com.github.qcloudsms.SmsSingleSender;
import com.github.qcloudsms.SmsSingleSenderResult;
import com.github.qcloudsms.httpclient.HTTPException;
@Component
public class UserDao {
@Autowired
private StringRedisTemplate redisTemplate;
public String register(String countryCode, String phoneNum) {
String code="";
for(int i=0;i<4;i++){
code+=(int)(Math.random()*10)+"";
}
redisTemplate.opsForValue().set(phoneNum, code, 300,TimeUnit.SECONDS);
return code;
}
}
|
微信直接接收验证码
1
2
3
| wx.showModal({
content:'您的注册验证码为'+res.data
})
|
❌

需要修改redis保护模式
vi /usr/local/Cellar/redis/5.0.5/bin/redis.conf
protected-mode no
重启 redis-server
微信小程序点击获取验证码
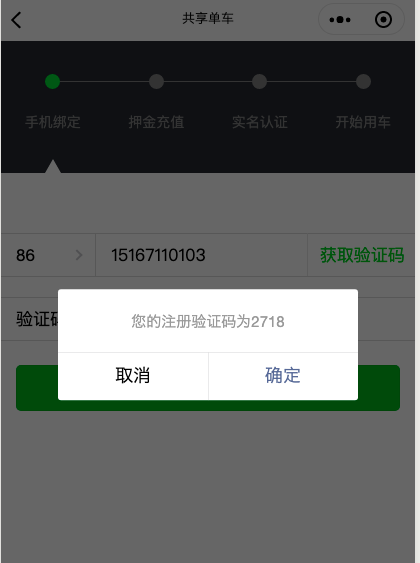
redis

5分钟后

10.2.5. 验证用户输入
取用户输入的手机号和验证码与redis中进行匹配
整个注册页面的两个input框包在form中
bindsubmit 绑定提交事件
1
2
3
4
5
| <form bindsubmit="formSubmit">
<input class="weui-input" name="phoneNum" placeholder="请输入手机号码" bindinput="inputPhoneNum"/>
<input class="weui-input" name="verifyCode" placeholder="请输入验证码" />
<button class="weui-btn" type="primary" formType="submit">确定</button>
</form>
|
提交事件 返回true/false
1
2
3
4
5
6
7
8
9
10
11
12
13
14
15
16
17
18
| formSubmit: function (e) {
var phoneNum = e.detail.value.phoneNum;
var verifyCode = e.detail.value.verifyCode;
wx.request({
url: 'http://localhost:8080/user/verify',
method:"POST",
header:{
'content-type': "application/x-www-form-urlencoded"
},
data:{
phoneNum:phoneNum,
verifyCode:verifyCode
},
success:function(res){
console.log(res);
}
})
}
|
取redis中的手机号对应验证码
Controller
1
2
3
4
5
| @RequestMapping("/verify")
@ResponseBody
public boolean verify(String phoneNum,String verifyCode, HttpServletRequest request){
return service.verify(phoneNum,verifyCode);
}
|
service
1
2
3
4
| @Override
public boolean verify(String phoneNum, String verifyCode) {
return dao.verify(phoneNum,verifyCode);
}
|
UserDao.java
1
2
3
4
5
6
7
8
| public boolean verify(String phoneNum, String verifyCode) {
String code = redisTemplate.opsForValue().get(phoneNum);
if(verifyCode.equals(code)){
return true;
}
return false;
}
|
11. 注册用户到MongoDB
当/user/verify 返回true时,应该传入手机号和注册时间,注册到mongodb中
1
2
3
4
5
6
7
8
9
10
11
12
13
14
15
16
17
| success:function(res){
console.log(res);
if(res.data){
wx.request({
url: 'http://localhost:8080/user/register',
method:"POST",
data:{
phoneNum:phoneNum,
regDate:new Date(),
},
success: function (res) {
console.log(res)
}
})
}
}
|
将整个json数据映射到一个User类
@Document(collection=”user”) 注解标识为映射mongodb中的user表
@Id id为主键 自动对应_id
@Indexed 为其创建索引
1
2
3
4
5
6
7
8
9
10
11
12
13
14
15
16
17
18
19
20
21
22
23
24
25
26
27
28
29
30
31
32
33
34
35
36
37
38
39
40
41
42
43
44
45
46
47
48
49
50
51
52
53
54
55
56
57
58
59
60
61
62
63
64
65
66
67
68
69
| package com.runaccpeted.pojo;
import java.util.Date;
import org.springframework.data.annotation.Id;
import org.springframework.data.mongodb.core.index.Indexed;
import org.springframework.data.mongodb.core.mapping.Document;
@Document(collection="user")
public class User {
@Id
private int id;
@Indexed
private String phoneNum;
private Date regDate;
private String nickName;
private String uname;
private double money;
public double getMoney() {
return money;
}
public void setMoney(double money) {
this.money = money;
}
public int getId() {
return id;
}
public void setId(int id) {
this.id = id;
}
public String getPhoneNum() {
return phoneNum;
}
public void setPhoneNum(String phoneNum) {
this.phoneNum = phoneNum;
}
public Date getRegDate() {
return regDate;
}
public void setRegDate(Date regDate) {
this.regDate = regDate;
}
public String getNickName() {
return nickName;
}
public void setNickName(String nickName) {
this.nickName = nickName;
}
public String getUname() {
return uname;
}
public void setUname(String uname) {
this.uname = uname;
}
@Override
public String toString() {
return "User [id=" + id + ", phoneNum=" + phoneNum + ", regDate=" + regDate + ", nickName=" + nickName
+ ", uname=" + uname + ", money=" + money + "]";
}
}
|
传入的数据通过@RequestBody 会自动通过set/get注入到User类中
1
2
3
4
5
6
| @RequestMapping("register")
@ResponseBody
public boolean register(@RequestBody User user){
return service.register(user);
}
|
service层
1
2
3
4
| @Override
public boolean register(User user) {
return dao.register(user);
}
|
Dao层
1
2
3
4
5
6
7
8
| public boolean register(User user) {
User u=mongoTemplate.insert(user);
System.out.println(user);
if(u!=null){
return true;
}
return false;
}
|
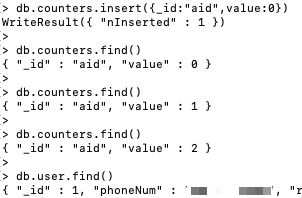
查看moogdb
use bike
db.user.find()
❌注册多个手机号
duplicate key error collection
11.1. _id 并不会自增
创建一个集合counters存入id,value
db.counters.insert({_id:”aid”,value:0})
每增加一条记录,令value自增+1,更新counters,取value值作为_id
counters中始终只有一条记录,故_id不会重复
1
2
3
4
5
6
7
8
9
10
11
12
13
14
15
16
17
18
19
20
21
22
| public boolean register(User user) {
user.setId(getIncrement("aid"));
User u=mongoTemplate.insert(user);
System.out.println(user);
if(u!=null){
return true;
}
return false;
}
private int getIncrement(String id){
Query query = new Query(Criteria.where("_id").is(id));
Update update = new Update();
update.inc("value",1);
mongoTemplate.updateFirst(query, update, Counters.class);
Counters counters=mongoTemplate.findOne(query, Counters.class);
return counters.getValue();
}
|
实现
11.2. 跳转页面&存数据
当/user/register返回true时,跳转到充值页面
注册充值页面
1
2
3
4
5
6
| "pages": [
"pages/index/index",
"pages/register/register",
"pages/deposite/deposite",
"pages/logs/logs"
],
|
register.js
1
2
3
4
| if(res.data){
wx.navigateTo({
url: '../deposite/deposite',
})
|
此时已完成注册手机号,应当保存用户状态,将状态设为全局变量
1
2
3
|
getApp().globalData.status = 1
getApp().globalData.phoneNum = phoneNum
|
并同时保存到手机内存中
1
2
| wx.setStorageSync("status",1)
wx.setStorageSync("phoneNum",phoneNum)
|
index页可以根据status状态在用户退出程序时保存用户状态,在扫码开锁的点击事件中
1
2
3
4
5
6
7
8
9
10
11
12
13
14
15
16
17
18
19
| case 1:{
var status=getApp().globalData["status"];
if(status==0){
    wx.navigateTo({
       url: '../register/register',
    })
}else if(status==1){
wx.navigateTo({
url: '../deposite/deposite',
})
}
else if (status == 2) {
wx.navigateTo({
url: '../identify/identify',
})
}
}
|
其实数据可以来自内存,也可以是全局变量,新建myUtil.js
1
2
3
4
5
6
7
8
9
10
11
|
function get(key) {
var status = wx.getStorageSync(key);
if (!status) {
status = getApp().globalData[key];
}
return status;
}
|
index.js导入包
1
| var myUtils=require("../../utils/myUtil.js")
|
使用
1
| var status=myUtils.get("status");
|
12. 充值页面
并不能实现个人账号支付,用loading模拟支付时长
点击按钮事件绑定 bindtap
1
| <button type='primary' bindtap='deposit'>去充值</button>
|
事件
wx.showModal({}) 提示框,res.confirm点确定事件,按取消,页面不动
wx.showLoading({}) mask启动一个面罩,整个页面不能点击
1
2
3
4
5
6
7
8
9
10
11
12
13
14
15
16
17
| deposit:function(){
var that = this;
var phoneNum = myUtils.get("phoneNum")
wx.showModal({
title:"提示",
content:"是否进行充值",
success:function(res){
if(res.confirm){
wx.showLoading({
title: '正在充值',
mask:true
})
}
}
})
}
|
页面
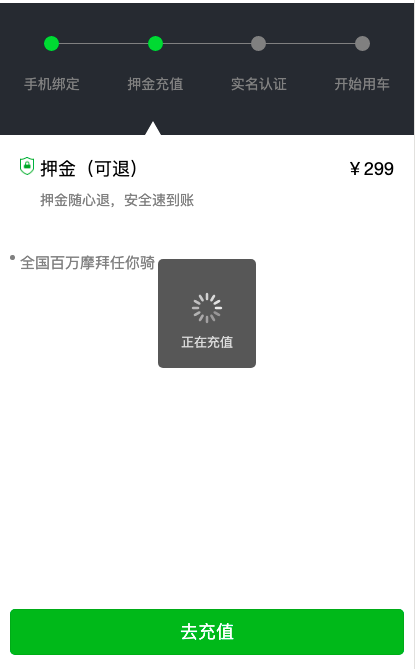
请求充值,存入手机号和金额,成功后进入实名认证页面
1
2
3
4
5
6
7
8
9
10
11
12
13
14
15
16
17
18
19
20
21
22
23
24
25
26
| wx.request({
url: 'http://localhost:8080/user/deposite',
method:"POST",
data:{
phoneNum:phoneNum,
deposit:299,
},
success:function(res){
wx.hideLoading()
if(data.error){
wx.navigateTo({
url: '../identify/identify',
})
getApp().globalData.status = 2
wx.setStorageSync("status",2)
}
}
})
|
13. 实名认证页面
mongodb中存入用户名和身份证id,更新phoneNum相同的数据
1
2
3
4
5
6
7
8
9
10
11
12
13
14
15
16
17
18
19
20
21
22
23
24
25
26
27
28
29
30
31
32
33
34
35
36
37
38
39
40
41
42
43
|
formSubmit: function(e){
var phoneNum = myUtils.get("phoneNum");
var name = e.detail.value.name;
var idNum = e.detail.value.idNum;
wx.showLoading({
title: '正在实名认证',
mask: true,
})
wx.request({
url: 'http://localhost:8080/user/identify',
method: 'POST',
data: {
phoneNum: phoneNum,
uname: name,
idNum: idNum,
},
success: function (res) {
if(res.data){
wx.hideLoading();
getApp().globalData.status = 3
wx.setStorageSync('status', 3)
wx.navigateTo({
url: '../index/index',
})
}
},
fail:function(){
wx.hideLoading()
wx.showModal({
title: '提示',
content: '服务器繁忙,请销后再试',
showCancel: false
})
}
})
}
|
同样使用RequestBody接收数据
1
2
3
4
5
6
| @RequestMapping("/identify")
@ResponseBody
public boolean identify(@RequestBody User user){
return service.identify(user);
}
|
mongodb更新语句
1
2
3
4
5
6
7
8
9
10
11
| public boolean identify(User user) {
Query query = new Query(Criteria.where("phoneNum").is(user.getPhoneNum()));
Update update = new Update();
update.set("idNum", user.getIdNum());
update.set("uname", user.getUname());
UpdateResult result= mongoTemplate.updateFirst(query, update, User.class);
if(result.getModifiedCount()!=0){
return true;
}
return false;
}
|
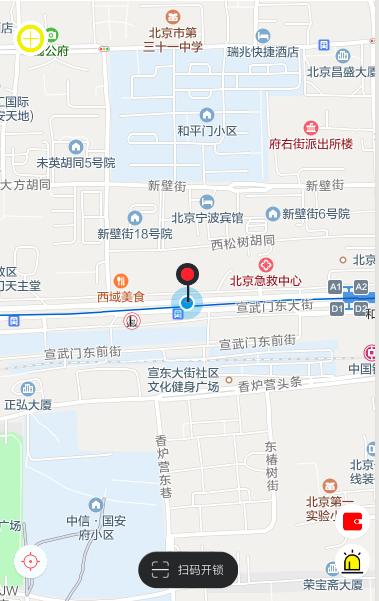
14. 附近车辆
14.1. 添加车辆 - 临时数据
添加车辆图标
1
2
3
4
5
6
7
8
9
10
11
12
13
14
15
16
| that.setData({
controls:[
{
id: 6,
iconPath: '/images/add.png',
position: {
width: 35,
height: 35,
left: width / 30,
top: height / 30
},
clickable: true
}
]
})
|
添加点击事件
这里传入的是location:[log,lat] [经度,纬度]
1
2
3
4
5
6
7
8
9
10
11
12
13
14
15
16
17
18
19
20
21
22
23
24
25
26
27
28
29
30
31
32
33
34
35
36
| controltap:function(e){
var id = e.controlId;
switch(id){
case 6:
var bikes=that.data.markers;
this.mapCtx.getCenterLocation({
success: function (res) {
var log=res.longitude;
var lat =res.latitude;
var bikeno=myUtils.get("bikeno");
wx.request({
url: 'http://localhost:8080/bike/add',
data: {
bikeno:bikeno,
location:[log,lat],
status:0
},
method:'POST',
success: function(res){
bikeno=bikeno+1;
getApp().globalData.bikeno=bikeno;
wx.setStorageSync("bikeno", bikeno)
}
})
}
})
break;
}
}
|
14.2. 注册车辆到mongodb
新建bikecounters用于bikes集合主键自增
1
2
| db.bikecounters.insert({_id:"aid",value:0})
db.bikecounters.find()
|
对应新建pojo-BikeCounters
1
2
3
4
5
6
7
8
9
10
11
12
13
14
15
16
17
18
19
20
21
22
23
24
25
26
27
28
29
30
31
| package com.runaccpeted.pojo;
import org.springframework.data.annotation.Id;
import org.springframework.data.mongodb.core.index.Indexed;
import org.springframework.data.mongodb.core.mapping.Document;
@Document(collection="bikecounters")
public class BikeCounters {
@Id
private String id;
@Indexed
private int value;
public String getId() {
return id;
}
public void setId(String id) {
this.id = id;
}
public int getValue() {
return value;
}
public void setValue(int value) {
this.value = value;
}
@Override
public String toString() {
return "BikeCounters [id=" + id + ", value=" + value + "]";
}
}
|
存储bikes,[id主键,bikeno车编号,location经纬度,status车辆状态]
@GeoSpatialIndexed 标记为其创建索引
1
2
3
4
5
6
7
8
9
10
11
12
13
14
15
16
17
18
19
20
21
22
23
24
25
26
27
28
29
30
31
32
33
34
35
36
37
38
39
40
41
42
43
44
45
46
47
48
49
50
51
52
53
54
55
56
57
58
59
60
61
62
| package com.runaccpeted.pojo;
import java.util.Arrays;
import org.springframework.data.annotation.Id;
import org.springframework.data.mongodb.core.index.GeoSpatialIndexType;
import org.springframework.data.mongodb.core.index.GeoSpatialIndexed;
import org.springframework.data.mongodb.core.index.Indexed;
import org.springframework.data.mongodb.core.mapping.Document;
@Document(collection="bikes")
public class Bike {
@Id
private int id;
@Indexed
private int bikeno;
@GeoSpatialIndexed(type=GeoSpatialIndexType.GEO_2DSPHERE)
private double[] location;
public double[] getLocation() {
return location;
}
public void setLocation(double[] location) {
this.location = location;
}
private int status;
public int getId() {
return id;
}
public void setId(int id) {
this.id = id;
}
public int getBikeno() {
return bikeno;
}
public void setBikeno(int bikeno) {
this.bikeno = bikeno;
}
public int getStatus() {
return status;
}
public void setStatus(int status) {
this.status = status;
}
@Override
public String toString() {
return "Bike [id=" + id + ", bikeno=" + bikeno + ", location=" + Arrays.toString(location) + ", status="
+ status + "]";
}
}
|
添加车辆
注入车编号使用的是手机内存中存入全局变量bikeno:100000
每次调用bike/add bikeno+1 ,所以会存在bikeno不会相同,而经纬度相同。
当经纬度相同时,用更新,不同时,用插入
1
2
3
4
5
6
7
8
9
10
11
12
13
14
15
16
17
18
19
20
21
22
23
| public boolean add(Bike bike){
Query query = new Query(Criteria.where("location").is(bike.getLocation()));
if (mongoTemplate.findOne(query, Bike.class)!=null) {
Update update = new Update();
update.set("bikeno", bike.getBikeno());
update.set("status", bike.getStatus());
UpdateResult result= mongoTemplate.updateFirst(query, update, Bike.class);
if (result.getModifiedCount()!=0) {
return true;
}else{
return false;
}
}else{
bike.setId(getIncrement("aid"));
Bike b = mongoTemplate.insert(bike);
if (b!=null) {
return true;
}else {
return false;
}
}
}
|
14.3. 显示附近车辆
findBikes(log,lat,that);
1
2
3
4
5
6
7
8
9
10
11
| function findBikes(longitude,latitude,that){
wx.request({
url: "http://localhost:8080/bike/findNear",
method: "POST",
data: {
location: [longitude,latitude]
},
success: function (res) {
console.log(res)
}
})
|
从mongodb中读取附近车辆信息
1
2
3
4
5
6
7
8
9
10
11
12
13
| public List<GeoResult<Bike>> findNear(Bike bike) {
Point location = new Point(bike.getLocation()[0], bike.getLocation()[1]);
NearQuery query = NearQuery.near(location);
query.maxDistance(0.2,Metrics.KILOMETERS);
query.query(new Query(Criteria.where("status").is(0)).limit(20));
GeoResults<Bike> bikes=mongoTemplate.geoNear(query, Bike.class);
return bikes.getContent();
}
|
获取响应数据
❌
“errmsg” : “no such command: ‘geoNear’”
?? mongodb没安装好,重装还是一样问题??版本问题,低版本下载?
安装mongodb-osx-ssl-x86_64-4.0.12.tgz 运行正确
返回数据
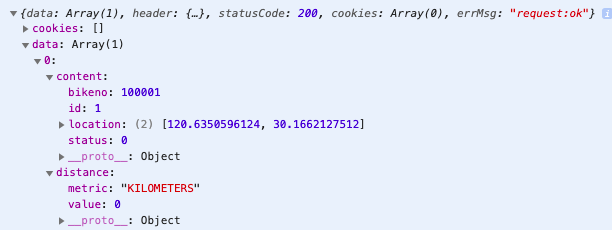
获取到经纬度,用map的markers属性,注入图标
1
2
3
4
5
6
7
8
9
10
11
12
13
| var bikes = res.data.map((geoResult) => {
return {
longitude: geoResult.content.location[0],
latitude: geoResult.content.location[1],
width: 30,
height: 35,
iconPath: '/images/bike.png'
}
}
)
that.setData({
markers: bikes
})
|
实现效果
#
所用mongo命令
use bike
db.createUser({user:”bike”,pwd:”123456”,roles:[“readWrite”]})
db.auth(“bike”,”123456”)
db.usercounters.insert({_id:”aid”,value:0})
db.user.find()
db.usercounters.find()
db.usercounters.remove({})
db.user.drop()
db.bikecounters.insert({_id:”aid”,value:0})
db.bikes.find()
db.bikecounters.find()
db.bikecounters.remove({})
15. 扫码页面