网站搭建过程
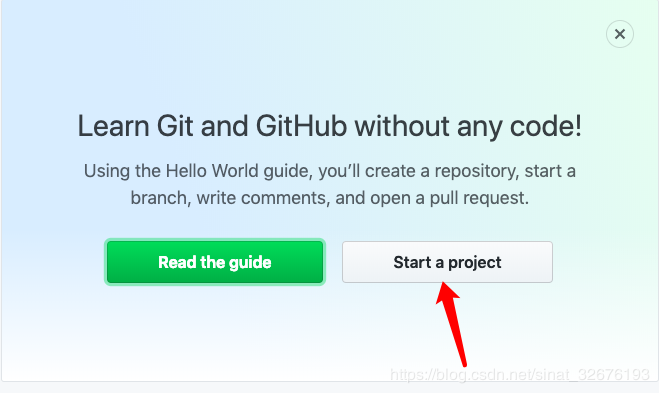
1. 注册GitHub
1.1. 创建仓库
仓库名必须为username.github.io
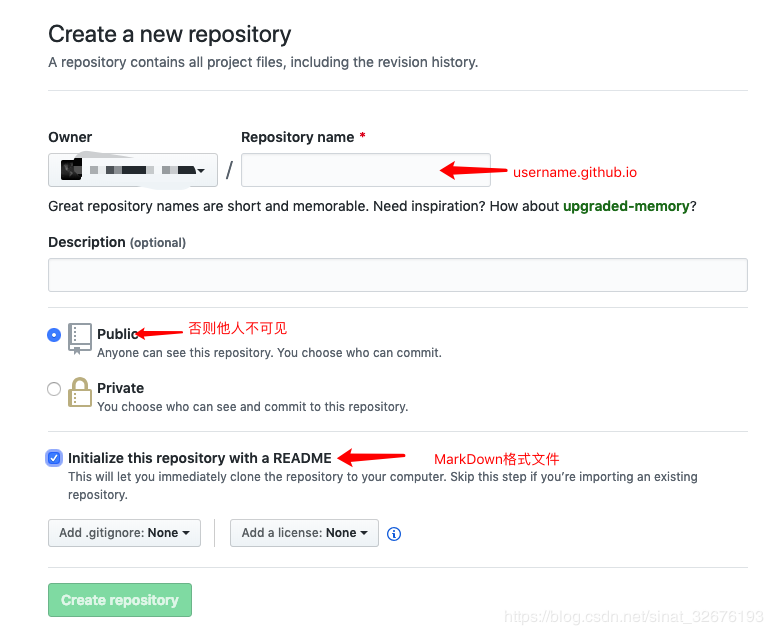
创建好后在设置中就可以看到GitHub Pages选项,现在就可以直接访问该网页https://username.github.io了
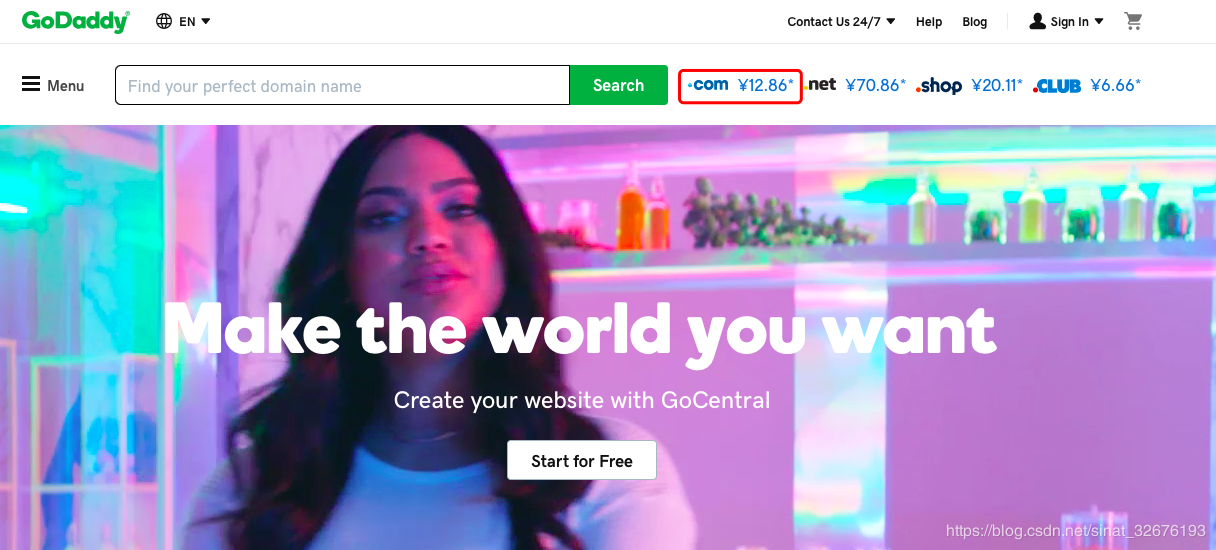
2. doDaddy域名购买
国外的更加可控些,自主性高, godaddy https://sg.godaddy.com/zh/
2.1. 网址后缀
.com 第一代全球顶级域名
.cn 中国顶级域名
.vip和com同一级 联想到vip会员,贵宾 好像比较高端
还有好多域名,也是不懂,就选个.com
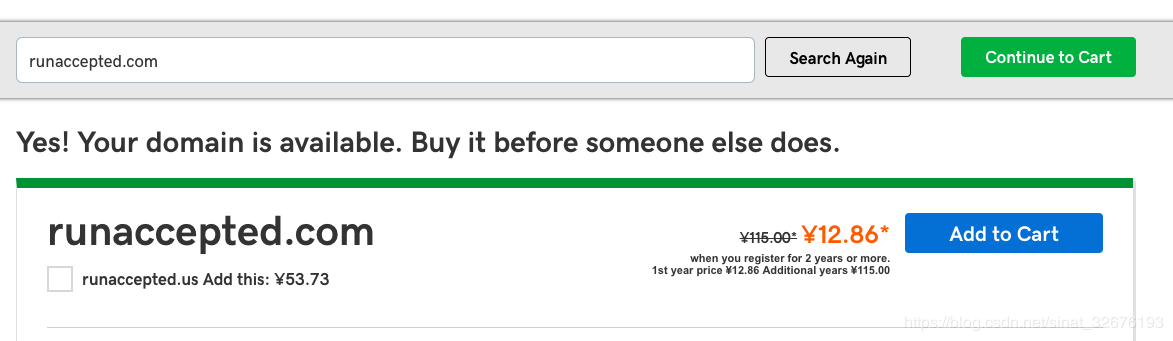
2.2. 购买
创建的域名没有被注册过就可以购买了
加入购物车后注册,登录后购买
支持支付宝付款
3. Dnspod域名解析
https://www.dnspod.cn/Login?default=email
用dnspod获得DNS服务提供商。
可用微信登录免费使用,域名解析,添加刚刚购买的域名。点击域名添加记录。
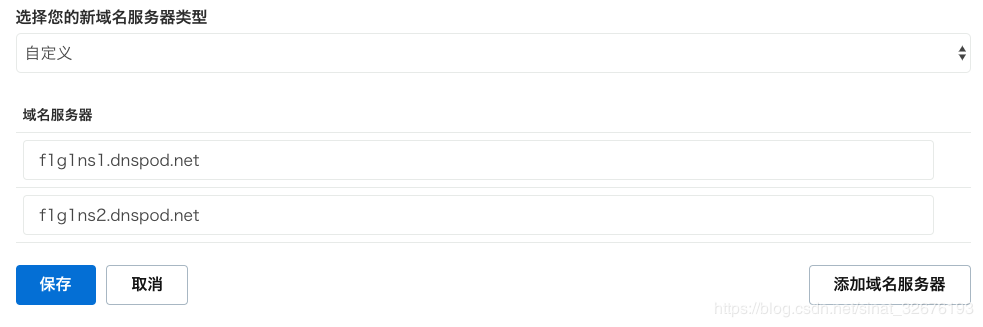
再次前往godaddy网 管理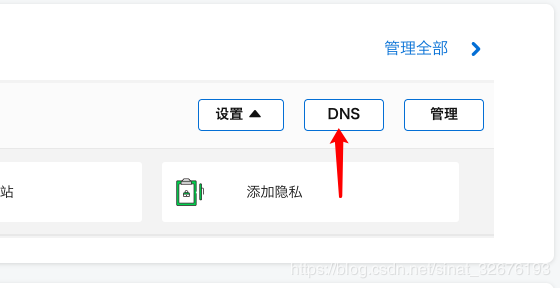
定位到域名服务器添加域名服务器f1g1ns1.dnspod.net,f1g1ns2.dnspod.net保存
3.1. 添加A记录
又称IP指向,可以在此设置子域名并指向到自己的目标主机地址上,从而实现通过域名找到服务器。
主机记录:@将直接解析 xxx.com;www 解析 www.xxx.com
记录类型:A 将域名指向一个IPv4地址;CNAME 将域名指向另一个域名
记录值:记录类型为A 在终端ping https://username.github.io 获得网站的IP值
记录类型为CNAME,直接输入username.github.io
4. brew安装
1 | /usr/bin/ruby -e "$(curl -fsSL https://raw.githubusercontent.com/Homebrew/install/master/install)" |
5. Github与域名关联
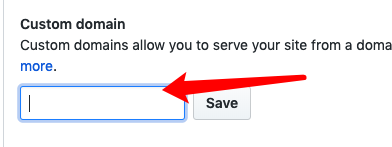
回到github仓库->setting->GitHub Pages 输入刚刚购买的域名xxx.com 或 www.xxx.com 点击Save 个人网站就创建好了。点击网址就搭建成功了。
6. 安装git
1 | brew install git |
这个时候它会告诉你已经生成了.ssh的文件夹。在你的电脑中找到这个文件夹。/Users/Learning/.ssh/
ssh,简单来讲,就是一个秘钥,其中,id_rsa是你这台电脑的私人秘钥,不能给别人看的,id_rsa.pub是公共秘钥,可以随便给别人看。把这个公钥放在GitHub上,这样当你链接GitHub自己的账户时,它就会根据公钥匹配你的私钥,当能够相互匹配时,才能够顺利的通过git上传你的文件到GitHub上。
而后在GitHub的setting中,找到SSH keys的设置选项,点击New SSH key
把你的id_rsa.pub里面的信息复制进去。
1 | ssh -T git@github.com |
检查是否匹配
7. 安装hexo
1 | brew install nodejs |
安装在/usr/local/Cellar/node/13.8.0
是否已安装
1 | nodejs -v |
创建一个文件夹myblog,然后cd到这个文件夹下
1 | npm install -g hexo-cli |
初始化
1 | hexo init myblog |
新建完成后,指定文件夹目录下有:
- node_modules: 依赖包
- public:存放生成的页面
- scaffolds:生成文章的一些模板
- source:用来存放你的文章
- themes:主题
- ** _config.yml: 博客的配置文件**
1 | hexo g |
打开hexo的服务,在浏览器输入localhost:4000就可以看到你生成的博客了。
7.1. 安装自定义主题
1 | cd myblog/themes |
修改配置文件_config.yml
1 | theme: next |
7.2. 部署到GitHub
修改_config.yml
1 | deploy: |
终端
1 | npm install hexo-deployer-git --save |
8. hexo基本配置
8.1. _config.yml
在文件根目录下的_config.yml,就是整个hexo框架的配置文件
| 参数 | 描述 |
|---|---|
| title | 网站标题 |
| subtitle | 网站副标题 |
| description | 网站描述 |
| author | 您的名字 |
| language | 网站使用的语言 |
| timezone | 网站时区。Hexo 默认使用您电脑的时区。时区列表。比如说:America/New_York, Japan, 和 UTC |
其中,description主要用于SEO,告诉搜索引擎一个关于您站点的简单描述,通常建议在其中包含网站的关键词。author参数用于主题显示文章的作者
| 参数 | 描述 |
|---|---|
| url | 网址, 把url改成你的网站域名 |
| root | 网站根目录 |
| permalink | 文章的 永久链接 格式 |
| permalink_defaults | 永久链接中各部分的默认值 |
新建一个文章叫temp.md,那么这个时候他自动生成的地址就是http://yoursite.com/2018/09/05/temp
链接的变量还有很多
| 参数 | 结果 |
|---|---|
| :year/:month/:day/:title/ | 2013/07/14/hello-world |
| :year-:month-:day-:title.html | 2013-07-14-hello-world.html |
| :category/:title | foo/bar/hello-world |
8.2. layout(布局)
当你每一次使用代码hexo new paper,其实默认使用的是post这个布局,也就是在source文件夹下的_post里面
Hexo 有三种默认布局:post、page 和 draft,它们分别对应不同的路径,而您自定义的其他布局和 post 相同,都将储存到 source/_posts 文件夹。
| 布局 | 路径 |
|---|---|
post |
source/_posts |
page |
source |
draft |
source/_drafts |
8.2.1. post
hexo new [layout] <title>默认是post
8.2.2. page
如果你想另起一页,那么可以使用hexo new page books,系统会自动给你在source文件夹下创建一个board文件夹 ,以及board文件夹中的index.md,这样你访问的board对应的链接就是http://xxx.xxx/books`
8.2.2.1. 在菜单中添加链接
编辑主题的_config.yml,在menu中的添加
menu: books: /books/ || book
||之前的值是目标链接,之后的是分类页面的图标,图标名称来自于FontAwesome icon。若没有配置图标,默认会使用问号图标。
8.2.2.2. 新添加的菜单需要翻译对应的中文
打开hexo>theme>next>languages>zh-Hans.yml,在menu下添加:
menu: books:书单
8.2.3. draft
draft是草稿的意思,也就是你如果想写文章,又不希望被看到
hexo new draft newpage,会在source/_draft中新建一个newpage.md文件草稿文件写的过程中,想要预览一下,那么可以使用
hexo server --draft,在本地端口中开启服务预览草稿文件写完了,想要发表到post中,
hexo publish draft newpage会自动把newpage.md发送到post中。
9. 美化next主题
9.1. 文章中插入本地图片
使用hexo new命令创建新文章时,会生成相同名字的文件夹,且在同一个文件夹下
1 | npm i hexo-renderer-marked |
在 根目录的 _config.yml中修改
1 | post_asset_folder: true |
安装插件
1 | npm i hexo-asset-image |
在文章中使用本地路径插入图片
1 |  |
生成的图片路径存在问题
1 | update link as:-->/.io//test.jpg |
查看hexo-asset-image源代码,/node_modules/hexo-asset-image/index.js,大约13行
1 | // var beginPos = getPosition(link, '/', 3) + 1; |
修改为
1 | var beginPos = config.url.length + 1; |
9.2. fork me on github
next/_config.yml
1 | # Follow me on GitHub banner in right-top corner. |
9.3. 安装RSS
cd 进入到博客根目录blog
运行命令
1 | npm install --save hexo-generator-feed |
插件会安装在node_modules下
安装插件错误
1 | ❌ |
根目录中的_config.yml中添加
1 | # Extensions |
next主题文件夹中的_config.yml的rss中添加内容
1 | # Set rss to false to disable feed link. |
hexo clean g server –> 在./public 文件夹中看到 atom.xml 文件
9.4. 动态背景
https://github.com/theme-next/theme-next-canvas-nest
1 | git clone https://github.com/theme-next/theme-next-canvas-nest source/lib/canvas-nest |
next主题文件夹下
1 | canvas_nest: |
9.5. 本文结束🔚
在路径 \themes\next\layout\_macro\post.swig ,post-body 之后添加以下内容
1 | <div> |
9.6. 社交小图标
图标库中寻找图标
1 | social: |
9.7. 图标
https://www.easyicon.net/language.en/1227806-binary_code_icon.html
1 | favicon: |
9.8. 阅读统计
1 | npm install hexo-symbols-count-time --save |
根目录_config.yml
1 | symbols_count_time: |
主题目录_config.yml
1 | # Post wordcount display settings |
awl Average Word Length (chars count in word). Default:4
- CN ≈
2 - EN ≈
5 - RU ≈
6
wpm– Words Per Minute. Default:275
- Slow ≈
200 - Normal ≈
275 - Fast ≈
350
9.9. 每篇文章末尾统一添加“本文结束”标记

具体实现方法
在路径 \themes\next\layout\_macro 中新建 passage-end-tag.swig 文件,并添加以下内容:
1 | <div> |
接着打开\themes\next\layout\_macro\post.swig文件,在post-body 之后, post-footer 之前添加如下画红色部分代码(post-footer之前两个DIV):
1 | <div> {% if not is_index %} {% include 'passage-end-tag.swig' %} {% endif %}</div> |
然后打开主题配置文件(_config.yml),在末尾添加:
1 | # 文章末尾添加“本文结束”标记 |
完成以上设置之后,在每篇文章之后都会添加如上效果图的样子。
9.10. 文章底部版权信息©️
themes /next/layout/_partials/post/post-copyright.swig
Hexo 页面参数
https://hexo.io/zh-cn/docs/variables.html#%E9%A1%B5%E9%9D%A2%E5%8F%98%E9%87%8F
1 | <div class="post-copyright"> |
themes /next/source/css/ _common/components/post/post-copyright.styl
1 | .post-copyright ul { |
每个博文 /scaffolds/post.md
这样每次hexo new "你的内容"之后,生成的md文件会自动把copyright:加到里面去
1 | title: {{ title }} |
9.11. 阅读次数👀&评论💬
需要实名注册
9.11.1. 配置
创建一个新的应用
设置 > 安全中心 > 服务开关仅打开数据存储 添加网站到Web安全域名
设置 > 应用Key > 复制App ID, App Key
\themes\next_config.yml中查找Valine 添加 App ID, App Key
1 | valine: |
9.11.2. placeholder
同html中
9.11.3. avatar 头像
Gravatar官方图形
mm- 神秘人
indenticon 抽象几何图形
monsterid- 小怪物
wavatar- 不同面孔和背景组合生成
retro-八位像素复古头像
9.11.4. 创建Counter,Comment
存储 > 创建Class > 无限制 > Counter,Comment
9.11.5. ❌评论未显示
next\_config.yml 和next\layout_third-party\comments\valine.swig中变量不对应
valine.swig
1 | appId: '{{ theme.valine.appid }}', |
_config.yml
1 | appid: |
9.11.6. ⚠️加载慢–修改CDN
next\_config.yml查找Valine
1 | # Valine |
获取最新版Valinecdn地址,下载到本地hexo/source/js/Valine.min.js
添加地址
1 | valine: /js/Valine.min.js |
9.11.7. Gravatar
简介:
Gravatar是一图像跟随著您到访过的网站,当您在博客中留言或发表文章,它将会出现在您的名称旁。头像协助识别您在博客和论坛发表的文章,何乐而不为呢?
在官网进行注册
配置:
next\_config.yml查找Valine
avatar: 为空
1 | Valine: |
valine.swig
1 | avatar_cdn: '{{ theme.valine.avatar_cdn }}' |
加载慢⚠️
改镜像
1 | function ssl_avatar($avatar) { |
9.12. 字体大小
/next/source/css/_variables/base.styl
1 | // Font size |
9.13. 改变背景样式
在 source/css/_schemes/Picses/_layout.styl 中
1 | header{ width: 90%; } |
9.14. 修改文章高亮部分样式
next/source/css/_common/scaffolding/base.styl中显示
1 | ::selection { |
打开 next/source/css/_variables/base.styl 修改样式
1 | // Selection |
在next/source/css/_common/components/post/post.syl中添加如下代码
1 | /*文章中高亮文字样式*/ |
9.15. 添加 README.md 文件
每个项目下一般都有一个 README.md 文件,但是使用 hexo 部署到仓库后,项目下是没有 README.md 文件的。
在 Hexo 目录下的 source 根目录下添加一个 README.md 文件,修改站点配置文件 _config.yml,将 skip_render 参数的值设置为
1 | skip_render: README.md |
保存退出即可。再次使用 hexo d 命令部署博客的时候就不会在渲染 README.md 这个文件了。
9.16. 使文章目录编号手动添加
themes/next/_config.yml 将number值改为false
1 | # Table Of Contents in the Sidebar |
themes/next/layout/_marco/sidebar.swig中编号的显示通过判断
1 | {%- set next_toc_number = page.toc_number | default(theme.toc.number) %} |
故在文章中通过添加toc_number:true来手动添加该文章的目录编号
9.17. 自动生成文章标题编号
https://github.com/r12f/hexo-heading-index
1 | npm install hexo-heading-index --save |
在hexo根目录
1 | #标题编号 |
生成后的字体很大,修改样式
next/source/css/_common/scaffolding/base.styl
1 | for headline in (1 .. 6) { |
9.18. 修改文章链接样式
修改文件 themes\next\source\css\_common\components\post\post.styl,在末尾添加如下css样式,:
1 | /* 文章内链接文本样式*/ |
9.19. 文章加密
9.19.1. 低级
在next/layout/custom/head.swig中
添加
1 | (function () { |
实现的是低级加密方式,可能被破解。博客源码是存放在GitHub这样的开源库的话,别有用心之人可以通过查看仓库对应文章的md文件找到这个密码
9.19.2. 高级
https://github.com/MikeCoder/hexo-blog-encrypt
1 | npm install --save hexo-blog-encrypt |
在文章中添加password
1 | --- |
该文章就可以加密访问
修改样式:
在根目录的_config.yml添加
1 | # 安全 |
9.20. 文章置顶
修改 hero-generator-index 插件,把文件:node_modules/hexo-generator-index/lib/generator.js 内的代码替换为:
1 | ; |
在文章中添加 top 值,数值越大文章越靠前,如
1 | --- |
置顶的文章显示在最上面之后,如果没有明确的置顶标志
添加样式为
/themes/next/layout/_macro 目录下的post.swig文件,定位到<div class="post-meta">标签下,插入如下代码:
1 | {% if post.top %} |
9.21. 为博客加上萌萌的宠物
1 | npm install -save hexo-helper-live2d |
安装模版
1 | npm install --save live2d-widget-model-wanko |
然后在 hexo 的 _config.yml中添加参数
参数列表 https://l2dwidget.js.org/docs/class/src/index.js~L2Dwidget.html#instance-method-init
1 | live2d: |
实现